Dell Latitude E6530 Support Question
Dell Latitude E6530 Support Question
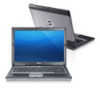
Find answers below for this question about Dell Latitude E6530.Need a Dell Latitude E6530 manual? We have 5 online manuals for this item!
Question posted by c88laak on November 16th, 2013
How To Install Optical Drive Latitude 6530
The person who posted this question about this Dell product did not include a detailed explanation. Please use the "Request More Information" button to the right if more details would help you to answer this question.
Current Answers
Answer #1: Posted by waelsaidani1 on January 26th, 2014 1:04 PM
waelsaidani1

Member since:
May 12th, 2013 Points: 19,501,797

Member since:
May 12th, 2013 Points: 19,501,797
To Install Optical Drive in Latitude 6530, simply insert the Dell Utility and Driver CD to your computer, search for 'Optical Drive' and install. If you don't have the dell utility and driver cd, go online, google 'optical drive for latitude 6530, it always advisable to download from Dell official website
Related Dell Latitude E6530 Manual Pages
User Manual - Page 2
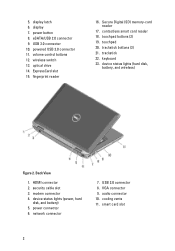
... control buttons 12. device status lights (hard disk,
battery, and wireless)
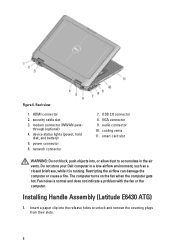
Figure 2. HDMI connector 2. audio connector 10. keyboard 23. USB 2.0 connector 8. power button 8. optical drive 14. 5. eSATA/USB 2.0 connector 9. USB 3.0 connector 10. touchpad buttons (2) 19. power connector 6. Secure Digital (SD) memory-card reader
17. cooling vents 11. powered...
User Manual - Page 3
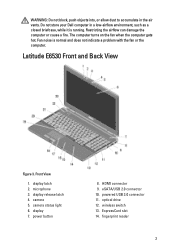
Latitude E6530 Front and Back View
Figure 3. display release latch 4. camera 5. power button
8. optical drive 12. ExpressCard slot 14. Front View
1. camera status light 6. Do not store your Dell computer in the air vents. eSATA/USB 2.0 connector 10. fingerprint reader
3 ...
User Manual - Page 5
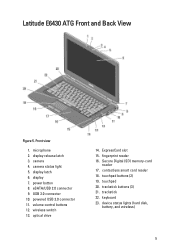
...light 5. eSATA/USB 2.0 connector 9. optical drive
14. fingerprint reader 16. Secure Digital (SD) memory-card
reader 17. microphone 2. wireless switch 13. volume control buttons 12. contactless smart card reader 18. trackstick 22. ExpressCard slot 15. trackstick buttons (3) 21. USB 3.0 connector 10. keyboard 23. camera 4. power button 8. Latitude E6430 ATG Front and Back View...
User Manual - Page 6
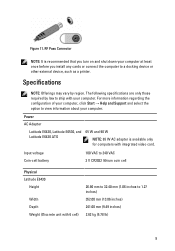
... remove the covering plugs from their slots.
6 Figure 6. power connector 6. The computer turns on the fan when the computer gets hot. security cable slot 3.
Installing Handle Assembly (Latitude E6430 ATG)
1. Back view
1. VGA connector 9. smart card slot
WARNING: Do not block, push objects into the release holes to accumulate in a low-airflow...
User Manual - Page 9
...240 VAC 3 V CR2032 lithium coin cell
Physical Latitude E6430
Height
Width Depth Weight (Discrete unit with your computer. Power
AC Adapter
Latitude E6430, Latitude E6530, and Latitude E6430 ATG
65 W and 90 W
NOTE:...and Support and select the option to view information about your computer at least once before you install any cards or connect the computer to 1.27 inches)
352.00 mm (13.86 inches...
Latitude E-Family Re-Imaging Guide - Page 3
...E6520
E6230 E6330 E5430 E5530 E6430/E6430s E6430 ATG E6530
M2400 M4400 M6400
M4500 M6500
M4600 M6600
Precision Mobile
WorkStations Dell Latitude E-Family & Mobile Precision Reimage "How-To"...with Microsoft operating systems (see Chapter 2.1 for reimaging Dell Latitude E-Family & Mobile Precision notebooks. Failure to install drivers and applications as detailed in this document is to ...
Latitude E-Family Re-Imaging Guide - Page 5
...Sector HDDs o Intel AMT (Intel Active Management Technology) & vPRO o Intel RAID Functionality - Latitude E-Family & Mobile Precision 1st & 2nd generation o Dell Control Vault o Contactless smartcard / RFID...previous images built or installed on none Latitude E-Family, Mobile Precision or previous Dell products. Images between 1st, 2nd, 3rd & 4th generations Latitude E-Family & Mobile ...
Latitude E-Family Re-Imaging Guide - Page 8
... to ensure optimal performance. Note: Dell Alienware, Inspiron, Studio, XPS and Vostro Laptops may vary. Dell Latitude E-Family & Mobile Precision Reimage "How-To" Guide
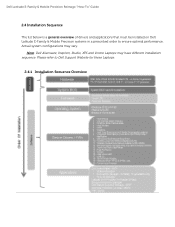
2.4 Installation Sequence
The list below is a general overview of drivers and applications that must be installed on Dell Latitude E-Family & Mobile Precision systems in a prescribed order to Dell Support Website for...
Latitude E-Family Re-Imaging Guide - Page 11
...eSATA support, and increased battery life. Note: o RAID support requires second hard disk drive. See section "2.6.4 Intel Storage" of the BIOS settings are hidden ATA, ... by Dell.
Dell Latitude E-Family & Mobile Precision Reimage "How-To" Guide
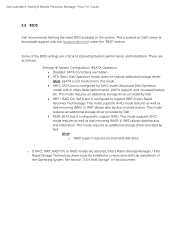
2.5 BIOS
Dell recommends flashing the latest BIOS available to Operating System performance and installation. These are as follows...
Owners Manual - Page 3

...) Card 13 Removing the Base Cover...13 Installing the Base Cover...14 Removing the Keyboard Trim...14 Installing the Keyboard Trim...15 Removing the Keyboard...15 Installing the Keyboard...17 Removing the Hard Drive...17 Installing the Hard Drive...19 Removing the Optical Drive...19 Installing the Optical Drive...21 Removing the Memory...21 Installing the Memory...22 Removing the Processor...22...
Owners Manual - Page 19

... the computer. 6. Removing the Optical Drive
1. Slide the hard drive into the computer. 5. Follow the procedures in After Working Inside Your Computer. Install the hard-drive isolation on the hard drive. 2. Tighten the screws to secure the hard drive to the hard drive. 4. Attach the hard-drive caddy to release the optical drive from the computer.
19 Install the battery. 7. Follow the...
Owners Manual - Page 20

Remove the screw that secure the optical-drive latch bracket to the optical drive assembly. 6. Remove the screws that secures the optical-drive latch to the optical-drive assembly 8. Remove the latch bracket from the optical-drive assembly. 7. 5. Push the optical-drive latch forward and remove it from the optical drive.
20
Owners Manual - Page 21

... bracket to the optical drive assembly. 4. Remove:
a) battery b) base cover 3. Install the battery. 9. Secure the optical-drive latch to the optical drive. 2. 9.
Follow the procedures in the eject latch to secure the optical drive latch. 6. Removing the Memory
1. Pry the securing clips away from the optical drive. Installing the Optical Drive
1. Slide the optical drive into its...
Owners Manual - Page 35

... board in its compartment in After Working Inside Your Computer. Remove:
a) battery b) base cover c) hard drive d) optical drive e) bluetooth card f) keyboard trim g) keyboard h) display assembly i) palmrest j) media board (available in Before...board to the computer.
35 Installing the Power LED Board
1.
Follow the procedures in E6430/E6430 ATG only) k) ExpressCard cage l) system board ...
Owners Manual - Page 36

... the procedures in E6430/E6430 ATG only) d) palmrest e) display assembly f) keyboard g) keyboard trim h) bluetooth card i) hard drive j) optical drive k) base cover l) battery 4. Removing the Hard-Drive Support Plate
1.
Installing the Input Output (I /O board. 3. Install:
a) system board b) ExpressCard cage c) media board (available in After Working Inside Your Computer. Remove the...
Owners Manual - Page 37

... support plate to the computer. 3.
Follow the procedures in its compartment. 2. Place the hard-drive support plate in After Working Inside Your Computer. Install the:
a) palmrest b) display assembly c) keyboard d) keyboard trim e) optical drive f) hard drive g) base cover h) battery 4. Follow the procedures in Before Working Inside Your Computer. 2.
Tighten the screw to secure the...
Owners Manual - Page 40

... secures the WiFi-switch board.
5. Removing the WiFi-Switch Board
1. Follow the procedures in Before Working Inside Your Computer. 2. Remove the:
a) battery b) base cover c) hard drive d) optical drive e) keyboard trim f) keyboard g) palmrest 3. Disconnect the WiFi-switch board cable from the system board.
4. Peel of the adhesive tape on the back of the WiFi...
Owners Manual - Page 41

... b) base cover c) hard drive d) optical drive e) bluetooth card f) keyboard trim g) keyboard h) WLAN card i) modem card j) heat sink k) processor l) palmrest m) ExpressCard cage 3. Tighten the screw to the system board. 4. Removing the System Board
1. Install:
a) palmrest b) keyboard c) keyboard trim d) optical drive e) hard drive f) base cover g) battery 5. Installing the WiFi-Switch Board...
Owners Manual - Page 45

...procedures in Before Working Inside Your Computer. 2. Remove:
a) battery b) base cover c) hard drive d) bluetooth card e) keyboard trim f) keyboard g) display assembly h) palmrest i) media board (...
45 Install the: a) ExpressCard cage b) palmrest c) processor d) heat sink e) modem card f) WLAN card g) keyboard h) keyboard trim i) bluetooth card j) optical drive k) hard drive l) base cover m) battery
...
Owners Manual - Page 63
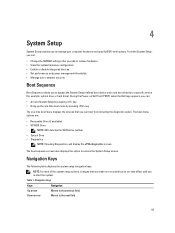
... the system setup options, changes that you can :
• Change the NVRAM settings after you make are :
• Removable Drive (if available) • STXXXX Drive
NOTE: XXX denotes the SATA drive number. • Optical Drive • Diagnostics
NOTE: Choosing Diagnostics, will display the ePSA diagnostics screen.
Down arrow
Moves to the next field.
63
During...
Similar Questions

Installed Backlit Keyboard Latitude E6430 Does Not Turn On
(Posted by Bpjahs 9 years ago)

Where Do I Install The Micro Sd Card In Dell Latitude 6530
(Posted by alDullah 9 years ago)

How To Get Fingerprint Reader Installed On Dell Latitude E6530
(Posted by Shugwneon 10 years ago)

How To Use Optical Drive Inspiron M731r Laptop
I've inserted a dvd inthe optical drive port and nothing happens. What am I doing wrong?
I've inserted a dvd inthe optical drive port and nothing happens. What am I doing wrong?
(Posted by 1crav4144 10 years ago)
