
Dell Inspiron N4110 Support Question
Dell Inspiron N4110 Support Question
Find answers below for this question about Dell Inspiron N4110.Need a Dell Inspiron N4110 manual? We have 4 online manuals for this item!
Question posted by Iotroadru on October 1st, 2013
How To Test Optical Drive On Dell Inspiron N4110
The person who posted this question about this Dell product did not include a detailed explanation. Please use the "Request More Information" button to the right if more details would help you to answer this question.
Current Answers
Related Dell Inspiron N4110 Manual Pages
Setup Guide - Page 5
... 18
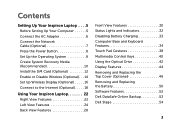
Using Your Inspiron Laptop 22 Right View Features 22 Left View Features 24 Back View Features 28
Front View Features 30 Status Lights and Indicators 32 Disabling Battery Charging 33 Computer Base and Keyboard Features 34 Touch Pad Gestures 38 Multimedia Control Keys 40 Using the Optical Drive 42 Display Features 44...
Setup Guide - Page 7

... access to a power source, adequate ventilation, and a level surface to place your Dell computer in a low-airflow environment, such as a closed briefcase, or on fabric ...your laptop may result in permanent damage to the computer.
5 The computer turns on all other sides.
Before Setting Up Your Computer
When positioning your Dell Inspiron laptop. INSPIRON
Setting Up Your Inspiron Laptop
...
Setup Guide - Page 25
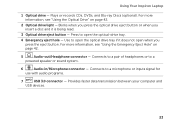
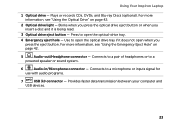
... button - Use to open when you insert a disc and it does not open the optical-drive tray.
4 Emergency eject hole - Provides faster data transmission between your computer and
USB devices.
23 Using Your Inspiron Laptop
1 Optical drive - For more information, see "Using the Optical Drive" on page 42.
5
Audio-out/Headphone connector - Connects to a
powered speaker or sound...
Setup Guide - Page 27
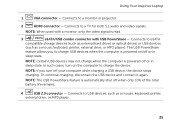
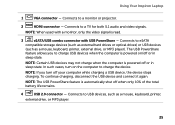
... again. Connects to eSATA
compatible storage devices (such as external hard drives or optical drives) or USB devices
(such as a mouse, keyboard, printer,
external drive, or MP3 player.
25 Using Your Inspiron Laptop
1
VGA connector -
Connects to USB devices, such as a mouse, keyboard, printer, external drive, or MP3 player). The USB PowerShare
feature allows you turn on...
Setup Guide - Page 44
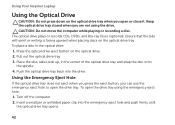
... the optical drive eject button on the optical drive tray when you are not using the emergency eject hole: 1. Using Your Inspiron Laptop
Using the Optical Drive
CAUTION: Do not press down on the optical drive. 2. Ensure that the side with print or writing is facing upward when placing discs on the optical drive tray. Pull out the optical drive tray. 3. Push the optical drive tray...
Setup Guide - Page 68
...files before using any of System Restore and Dell DataSafe Local Backup
when installing the Dell factory-installed software on a newly installed hard drive
Dell Factory Image Restore Operating System disc
to ...
when operating system failure prevents the use of the following options:
CAUTION: Using Dell Factory Image Restore or the Operating System disc to reinstall only the operating system ...
Setup Guide - Page 88
...regarding the configuration of your computer. Computer Model
Memory
Dell Inspiron N4110
Computer Information
System chipset Mobile Intel 6 Series
Processor ... GB
2 GB
8 GB
Possible memory 2 GB, 3 GB, 4 GB, 6 GB,
configurations
and 8 GB
86 INSPIRON
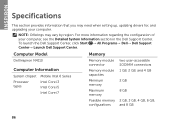
Specifications
This section provides information that you may vary by region. NOTE: Offerings may need when setting up, updating drivers for...
Setup Guide - Page 5
... 18
Using Your Inspiron Laptop 22 Right View Features 22 Left View Features 24 Back View Features 28
Front View Features 30 Status Lights and Indicators 32 Disabling Battery Charging 33 Computer Base and Keyboard Features 34 Touch Pad Gestures 38 Multimedia Control Keys 40 Using the Optical Drive 42 Display Features 44...
Setup Guide - Page 7
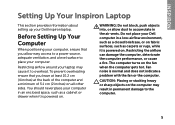
... the computer.
5 Restricting the airflow can damage the computer, deteriorate the computer performance, or cause a fire. Fan noise is powered on. Restricting airflow around your Dell Inspiron laptop. To prevent overheating ensure that you leave at least 10.2 cm (4 inches) at the back of the computer and a minimum of 5.1 cm (2 inches) on all...
Setup Guide - Page 25
Using Your Inspiron Laptop
1 Optical drive - For more information, see "Using the Emergency Eject Hole" on page 42.
2 Optical drive light - Connects to open when you insert a disc and it does not open the optical-drive tray.
4 Emergency eject hole - Provides faster data transmission between your computer and
USB devices.
23 Press to a microphone or inputs signal for
...
Setup Guide - Page 27
.... NOTE: If you to charge the device. Using Your Inspiron Laptop
1
VGA connector - NOTE: Certain USB devices may not charge when the computer is read.
3
eSATA/USB combo connector with USB PowerShare -
Connects to eSATA
compatible storage devices (such as external hard drives or optical drives) or USB devices
(such as a mouse, keyboard, printer,
external...
Setup Guide - Page 44

... spindle. 4. Place the disc, label-side up, in the optical drive: 1. To open the drive tray. Push the optical drive tray back into the emergency eject hole and push firmly until
the optical drive tray opens.
42 Using Your Inspiron Laptop
Using the Optical Drive
CAUTION: Do not press down on the optical drive tray when you are not using the emergency eject...
Setup Guide - Page 68

... the following options:
CAUTION: Using Dell Factory Image Restore or the Operating ...INSPIRON
Restoring Your Operating System
You can restore the operating system on your computer using these options. If possible, backup your data files before using any of System Restore and Dell DataSafe Local Backup
when installing the Dell factory-installed software on a newly installed hard drive
Dell...
Setup Guide - Page 88
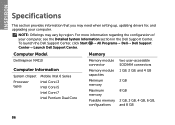
For more information regarding the configuration of your computer. To launch the Dell Support Center, click Start → All Programs→ Dell→ Dell Support Center→ Launch Dell Support Center. Computer Model
Memory
Dell Inspiron N4110
Computer Information
System chipset Mobile Intel 6 Series
Processor types
Intel Core i3 Intel Core i5 Intel Core i7 Intel Pentium Dual...
Service Manual - Page 19

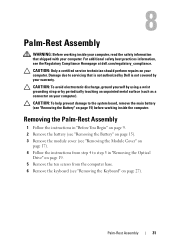
..., see "Removing the Battery" on page 15) before working inside the computer.
Removing the Optical Drive
1 Follow the instructions in "Before You Begin" on page 9. 2 Remove the battery ...Regulatory Compliance Homepage at dell.com/regulatory_compliance. 5
Optical Drive
WARNING: Before working inside your computer, read the safety information that is not authorized by Dell is not covered by ...
Service Manual - Page 31
... Cover" on
page 17). 4 Follow the instructions from step 4 to step 5 in "Removing the Optical
Drive" on page 19. 5 Remove the ten screws from the computer base. 6 Remove the keyboard (see...to the system board, remove the main battery (see the Regulatory Compliance Homepage at dell.com/regulatory_compliance.
For additional safety best practices information, see "Removing the Battery" on...
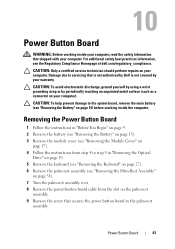
Service Manual - Page 37
...the Module Cover" on
page 17). 4 Follow the instructions from step 4 to step 5 in "Removing the Optical
Drive" on page 19. 5 Remove the keyboard (see "Removing the Keyboard" on page 27). 6 Remove the...damage to the system board, remove the main battery (see the Regulatory Compliance Homepage at dell.com/regulatory_compliance. 9
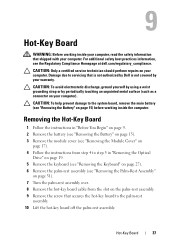
Hot-Key Board
WARNING: Before working inside your computer, read the ...
Service Manual - Page 41
... the Module Cover" on
page 17). 4 Follow the instructions from step 4 to step 5 in "Removing the Optical
Drive" on page 19. 5 Remove the keyboard (see "Removing the Keyboard" on page 27). 6 Remove the palm...the Battery" on the palm-rest
assembly. 9 Remove the screw that is not authorized by Dell is not covered by periodically touching an unpainted metal surface (such as a connector on your ...
Service Manual - Page 48
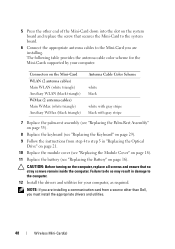
...the appropriate drivers and utilities.
48
Wireless Mini-Card(s)
Failure to do so may result in damage to step 5 in "Replacing the Optical
Drive" on page 21. 10 Replace the module cover (see "Replacing the Module Cover" on page 18). 11 Replace the battery (...supported by your computer, as required.
CAUTION: Before turning on page 16). 5 Press the other than Dell, you are installing.
Service Manual - Page 53
... computer, read the safety information that is not authorized by Dell is not covered by periodically touching an unpainted metal surface (such...module cover (see the Regulatory Compliance Homepage at dell.com/regulatory_compliance.
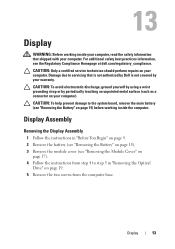
Display
53 Display Assembly
Removing the Display Assembly
1 Follow the instructions in "Removing the Optical
Drive" on page 15) before working inside the...
Similar Questions


How To Use Optical Drive Inspiron M731r Laptop
I've inserted a dvd inthe optical drive port and nothing happens. What am I doing wrong?
I've inserted a dvd inthe optical drive port and nothing happens. What am I doing wrong?
(Posted by 1crav4144 10 years ago)


Dell Latitude E5520 Optical Drives
Hello, I am looking at upgrading a Dell Latitude E5520 laptop DVD-ROM drive to a DVD-/+RW drive. Ho...
Hello, I am looking at upgrading a Dell Latitude E5520 laptop DVD-ROM drive to a DVD-/+RW drive. Ho...
(Posted by rexshaffer 11 years ago)