Dell Inspiron 23 All-in-One Support Question
Dell Inspiron 23 All-in-One Support Question
Find answers below for this question about Dell Inspiron 23 All-in-One.Need a Dell Inspiron 23 All-in-One manual? We have 1 online manual for this item!
Question posted by Anonymous-159262 on July 2nd, 2016
Will Not Start
Returned from trip and computer off. Power button blinks Oran e will not start
Current Answers
Answer #1: Posted by tfarner7 on July 2nd, 2016 12:04 PM
tfarner7

Member since:
April 2nd, 2011 Points: 429,890

Member since:
April 2nd, 2011 Points: 429,890
It could be one of several problems. If it is flashing only (no audible beeps) it could be a power supply problem. If it is accompanied by audible beeps, it is probably a bios/motherboard problem. HERE is a link to the service manual (Go to Advanced Trouble-Shooting, around page 5, to narrow down your problem).
HERE is a link to the manual for your computer. At the very end of the manual is an information page with all the contact information. Depending on your level of training with regards to computer repair, you may be able to fix yourself. If not comfortable with doing the repairs yourself, take it to a professional, but still trouble-shoot it so you will know what the problem probably is and the repair shop can't hose you.
Related Dell Inspiron 23 All-in-One Manual Pages
Owners Manual - Page 1

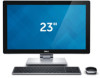
Inspiron 23 Owner's Manual
Computer model: Inspiron 2350 Regulatory model: W07C Regulatory type: W07C002
Owners Manual - Page 2
Bluetooth® is used in this text: Dell™, the DELL logo, and Inspiron™ are trademarks of Dell Inc.; and is a registered trademark owned by Dell under license; CAUTION: A CAUTION indicates potential damage to hardware or loss of ...
Owners Manual - Page 4
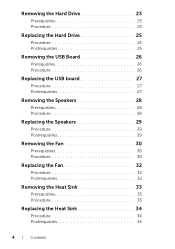
Removing the Hard Drive 23
Prerequisites 23 Procedure 23
Replacing the Hard Drive 25
Procedure 25 Postrequisites 25
Removing the USB Board 26
Prerequisites 26 Procedure 26
Replacing the USB board 27
Procedure 27 ...
Owners Manual - Page 6

...49 Procedure 49
Replacing the Microphones 50
Procedure 50 Postrequisites 50
Removing the Power-Button Assembly 51
Prerequisites 51 Procedure 51
Replacing the Power-Button Assembly 52
Procedure 52 Postrequisites 52
Removing the Control-Buttons Board 53
Prerequisites 53 Procedure 53
Replacing the Control-Buttons Board 54
Procedure 54 Postrequisites 54
Removing the Stand Assembly 55...
Owners Manual - Page 9

...programs. 2 Move your computer. 5 After the computer is unplugged, press and hold the power button for shut-down instructions. 3 Disconnect your computer and all attached devices from their electrical outlets.... 4 Disconnect all open the Charms sidebar, and then click Settings→ Power→ Shut down on a flat surface. Before You Begin | 9
NOTE: If you ...
Owners Manual - Page 10
...CAUTION: To avoid damaging the components and cards, handle them evenly aligned to the power source. See the safety instructions for complete information about safety precautions, working inside ...When connecting cables, make sure that you finish working inside the computer, replace all power sources before connecting to avoid bending any installed card from potential damage and ensure ...
Owners Manual - Page 16

3 Starting from the right side, pry up the base cover to release the ports on the system board from the slots on the base cover.
4 Lift the base cover off the computer base.
16 | Removing the Base Cover
Owners Manual - Page 23

... computer base. 4 Slide and lift the hard-drive assembly off the computer base.
1 2
3
4
1 speaker cable 3 computer base
2 screws (4) 4 hard-drive assembly
Removing the Hard Drive | 23
Owners Manual - Page 26
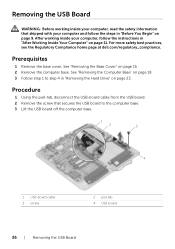
... cable from the USB board. 2 Remove the screw that shipped with your computer and follow the instructions in "After Working Inside Your Computer" on page 23. After working inside your computer, follow the steps in "Before You Begin" on page 15. 2 Remove the computer base. See "Removing the Base Cover" on...
Owners Manual - Page 40
... Service Tag in the system board. See "Removing the Computer Base" on page 35. 6 Remove the coin-cell battery. See "Removing the Processor" on page 23. 5 Remove the wireless mini-card. See "Removing the Memory Module(s)" on page 12. 4 Follow step 1 to step 4 in "Removing the Hard Drive" on page 37...
Owners Manual - Page 49
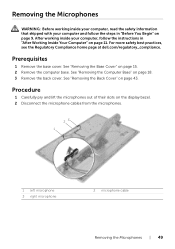
... their slots on page 18. 3 Remove the back cover. See "Removing the Computer Base" on the display bezel. 2 Disconnect the microphone cables from the microphones.
23 1
1 left microphone 3 right microphone
2 microphone cable
Removing the Microphones | 49 For more safety best practices, see the Regulatory Compliance home page at dell.com/regulatory_compliance...
Owners Manual - Page 51

... board cable. 4 Peel off the display bezel.
2
1
1 Mylar 3 routing guides 5 power button
3 4
5
2 screw 4 power-button cable
Removing the Power-Button Assembly | 51 Removing the Power-Button Assembly
WARNING: Before working inside your computer, read the safety information that covers the power button. 5 Lift the power button off the Mylar that shipped with your computer and follow the...
Owners Manual - Page 52

... slot on the display bezel.
2 Adhere the Mylar over the power button. 3 Route the power-button cable through the routing guides. 4 Connect the power-button cable to the control-buttons board cable. 5 Replace the screw that the power button fits in "Before You Begin" on page 9. Procedure
1 Place the power button in the display bezel and make sure that secures the...
Owners Manual - Page 53
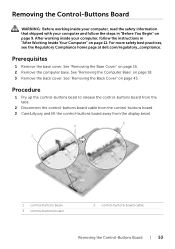
... board from the tabs.
2 Disconnect the control-buttons board cable from the control-buttons board. 3 Carefully pry and lift the control-buttons board away from the display bezel.
3 2
1
1 control-buttons bezel 3 control-buttons board
2 control-buttons board cable
Removing the Control-Buttons Board | 53
Removing the Control-Buttons Board
WARNING: Before working inside your computer, read...
Owners Manual - Page 54

...Replacing the Base Cover" on the display bezel.
2 Connect the control-buttons board cable to the control-buttons board. After working inside your computer and follow the instructions in "After... Compliance home page at dell.com/regulatory_compliance. Procedure
1 Place the control-buttons board under the control-buttons bezel and make sure that shipped with your computer, follow the steps in...
Owners Manual - Page 56

... alignment posts on the display bezel.
2 Press the securing clips and disconnect the LVDS cable from the display panel. 3 Disconnect the control-buttons board cable from the control-buttons board. 4 Disconnect the power-button cable from the control-buttons board cable. 5 Remove the screws that secure the cables to the display bracket.
2 1
8
3
5
4
7
6
1 screws (3) 3 LVDS cable...
Owners Manual - Page 59

... working inside your computer, read the safety information that secure the cables to the display bracket. 8 Connect the power-button cable to the control-buttons board cable. 9 Connect the control-buttons board cable to the control-buttons board. 10 Connect the LVDS cable to the display assembly. 11 Align the antenna modules with the alignment...
Owners Manual - Page 63
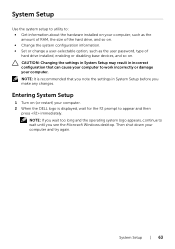
... you make any changes. System Setup | 63 CAUTION: Changing the settings in System Setup may result in System Setup before you see the Microsoft Windows desktop. System Setup
Use the system setup to utility to: • Get information about the hardware installed on your computer.
Owners Manual - Page 64
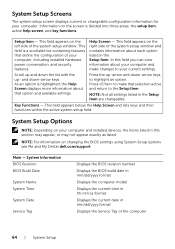
... listed in this field you can view information about your computer and make that selection active and return to the Setup Item. Key Functions - System Setup Options
NOTE: Depending on your computer, including installed hardware, power conservation, and security features. NOTE: For information on the right side of the system setup window...
Owners Manual - Page 68
...)
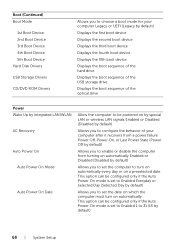
Allows you to configure the behavior of your computer after it recovers from a power failure Power Off, Power On, or Last Power State (Power Off by default)
Allows you to enable or disable the computer from turning on ...(Disabled by default)
68 | System Setup This option can be configured only if the Auto Power On mode is set the computer to set the date on which the computer must turn on ...
Similar Questions

Dell Inspiron One 2020 Power Button Is Solid Amber Nothing Works!
dell inspiron one 2020, Power Button is solid amber nothing elsa works, the power cord has a solid b...
dell inspiron one 2020, Power Button is solid amber nothing elsa works, the power cord has a solid b...
(Posted by josepadilla1116 8 years ago)


What To Do If Your Dell Inspiron 519 Wont Start And The Power Button Blinks
yellow and beeps 5 times
yellow and beeps 5 times
(Posted by lnewdgh1 9 years ago)

Why Does My Dell Inspiron 530 Computer Power Button Blinks Blue And Beeps
(Posted by roos 10 years ago)

Why Wont My Dell Desktop Inspiron 518 Turn On Blinking Amber
(Posted by Flavijvm 10 years ago)