
Dell Alienware 13 R2 Support Question
Dell Alienware 13 R2 Support Question
Find answers below for this question about Dell Alienware 13 R2.Need a Dell Alienware 13 R2 manual? We have 3 online manuals for this item!
Question posted by marchie207 on October 5th, 2022
Screw Size
may i know what is the back screw size of this laptop
Current Answers

Answer #2: Posted by SonuKumar on October 5th, 2022 8:31 AM
SonuKumar

Member since:
May 9th, 2021 Points: 16,619,300

Member since:
May 9th, 2021 Points: 16,619,300
Answer #3: Posted by SafiaNoor on October 5th, 2022 10:10 AM
SafiaNoor

Member since:
October 1st, 2022 Points: 400
Member since:
October 1st, 2022 Points: 400
Hello' marchie Thanks for your question. i have found your question answer your model screw size is M2.5x13mm please check
https://www.amazon.com/Deal4GO-M2-5x13-Original-Replacement-Alienware/dp/B08951XC5B
https://www.amazon.com/Deal4GO-M2-5x13-Original-Replacement-Alienware/dp/B08951XC5B
Related Dell Alienware 13 R2 Manual Pages
Specifications - Page 1

...is protected by U.S. in this document may be trademarks of Dell Inc. All other jurisdictions. Alienware 13
NOTE: The images in the United States and/or other marks and names mentioned herein may ....
2015 ‑ 07 Rev. All rights reserved. A00 Regulatory model: P56G | Type: P56G002 Computer model: Alienware 13 R2
Views Specifications
Copyright © 2015 Dell Inc.
Specifications - Page 2

Specifications
Back
Back
Left
Views
1
2
Right Base Display
1 External graphics port
Connect an Alienware Graphics Amplifier.
2 HDMI port
Connect a TV or another HDMI‑in enabled device. Provides video and audio output.
Specifications - Page 8

Views
System information Computer model Processor L3 cache
v
Specifications
Alienware 13 R2 • 6th generation Intel Core i5 • 6th generation Intel Core i7 • 3 MB • 4 MB
Dimensions and weight
System information
Memory
Ports and connectors
Communications
Video
Audio
Storage
Display
Keyboard
Camera
Touch pad
Battery
Power adapter
Computer environment
Specifications - Page 15

...) Dimensions:
Height Width Diagonal Pixel pitch Refresh rate Operating angle Controls
Specifications
• 13.3-inch HD • 13.3-inch Full HD • 13.3-inch QHD+
Non touch (HD) 1366 x 768
Non touch (Full HD) 1920...40 mm (11.55 in)
293.60 mm (11.56 in)
337.82 mm (13.3 in)
337.82 mm (13.3 in ) 0.115 x 0.115 mm
Dimensions and weight
System information
Memory
Ports and connectors...
Specifications - Page 17

Keyboard
Shortcut keys
Allows to disconnect Alienware Graphics Amplifier Disable/Enable wireless Mute audio Decrease volume Increase volume Switch to external display Decrease brightness Increase brightness Disable/Enable touch pad Disable/Enable AlienFX
Specifications - Page 20

... battery
Specifications
• 4-cell lithium polymer 51 WHr • 4-cell lithium polymer 62 WHr
299.20 mm (11.78 in) 76.83 mm (3.02 in) 13.50 mm (0.53 in) 0.287 kg (0.63 lb) 14.8 VDC Within 4 hours
Varies depending on operating conditions and can significantly reduce under certain power-intensive...
Service Manual - Page 3

Contents
Before working inside your computer 10
Before you begin 10 Safety instructions 10 Recommended tools 12
After working inside your computer 13
Removing the base panel 14
Procedure...14
Replacing the base panel 17
Procedure...17
Removing the memory modules 18
Prerequisites...18 Procedure...18
Replacing the ...
Service Manual - Page 9
BIOS setup program 109
Overview...109 Entering System Setup 109
System Setup Options 109 Boot sequence 113
Boot options 114 Changing boot sequence for the current boot 114 Changing boot sequence for future boots 115
Flashing the BIOS 116 Getting help and contacting Alienware 117
Self-help resources 117 Contacting Alienware 117
9
Service Manual - Page 11

...your warranty.
Damage due to the power source. WARNING: Disconnect all covers, panels, and screws before connecting to servicing that the work , periodically touch an unpainted metal surface to avoid bending...on the cable itself.
Some cables have connectors with locking tabs or thumb-screws that shipped with the product or at www.dell.com/regulatory_compliance. When disconnecting cables, keep ...
Service Manual - Page 13

... screws remain inside your computer. 2 Connect any external devices, peripherals, and cables you removed before working on your computer. 3 Replace any media cards, discs, and any other parts that you removed before working on your computer. 4 Connect your computer and all attached devices to their electrical outlets. 5 Turn on your computer.
13
Service Manual - Page 14

... working inside your computer, follow the steps in After working inside your computer. Procedure
1 Close the display and turn the computer over. 2 Loosen the captive screws that shipped with your computer and follow the instructions in Before working inside your computer.
For more safety best practices, see the Regulatory Compliance home...
Service Manual - Page 34

2 Remove the screws that secure the palm-rest assembly to the computer base.
1 screws (14)
2 computer base
34
Service Manual - Page 60

12 Remove the screws that secure the display assembly to the computer base.
1 display assembly
2 screws (4)
3 display hinges (2)
13 Lift the display assembly off the computer base.
60
Service Manual - Page 62

12 Align the screw holes on the hinge caps with the screw holes on the display hinges.
13 Replace the screws that secure the hinge caps to step 7 in "Replacing the palm rest". 2 Follow the procedure from step 3 to the display hinges. Post-requisites
1 Follow the procedure from step 5 to step 9 in "Replacing the solid-state
drive". 3 Replace the base panel.
62
Service Manual - Page 95

... see the Regulatory Compliance home page at www.dell.com/regulatory_compliance. Procedure
1 Remove the screws that shipped with non-touchscreen display. 1 Remove the base panel. 2 Follow the procedure ...back-cover.
95
Prerequisites
NOTE: This chapter is applicable only if you have purchased a laptop with your computer and follow the instructions in "Removing the palm rest". 4 Remove the...
Service Manual - Page 98
... working inside your computer.
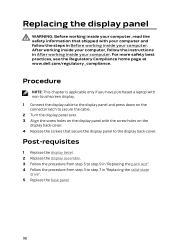
Procedure
NOTE: This chapter is applicable only if you have purchased a laptop with non-touchscreen display. 1 Connect the display cable to the display panel and press down on... the display panel over. 3 Align the screw holes on the display panel with the screw holes on the display back-cover. 4 Replace the screws that shipped with your computer and follow the...
Service Manual - Page 102

...inside your computer.
Prerequisites
NOTE: This chapter is applicable only if you have purchased a laptop with your computer and follow the instructions in "Removing the palm rest". 4 Remove the ... the display hinges to step 8 in After working inside your computer. Procedure
1 Remove the screws that shipped with non-touchscreen display. 1 Remove the base panel. 2 Follow the procedure from...
Service Manual - Page 104
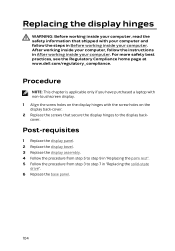
... inside your computer. Procedure
NOTE: This chapter is applicable only if you have purchased a laptop with non-touchscreen display. 1 Align the screw holes on the display hinges with the screw holes on the display back-cover. 2 Replace the screws that shipped with your computer and follow the instructions in After working inside your computer...
Service Manual - Page 112

...
System password Status
Displays if the setup status is clear or set . Default: Express Charge
Displays the battery health. Default: Disabled
Advanced-Performance options with Alienware Graphics Amplifier
Overclocking Feature
Allows you to disable or enable the external USB ports. Allows you to enable or disable global overclocking feature. Default: Not...
Service Manual - Page 117

.... Launch the:
• Dell Help & Support app (Windows 10/Windows 8.1)
• Get started app (Windows 10) • Help+Tips app (Windows 8.1)
Information about Alienware products www.alienware.com and services
Troubleshooting information, user manuals, setup instructions, product specifications, technical help resources:
Self-Help Information Accessing Windows Help
Learn about Windows
Self...
Similar Questions

Black Screen Issue On My Dell Xps 13 9310
How do I fix the black screen issue on my Dell XPS 13 9310?Also Why is my Dell XPS 13 9310 running ...
How do I fix the black screen issue on my Dell XPS 13 9310?Also Why is my Dell XPS 13 9310 running ...
(Posted by fatimamusa 1 year ago)

Dell Alienware M17x-r3 I7 Th2 Not Uefi Support
Hello. Here are the specs of my laptop, Dell Alienware M17X-R3. I was wondering if there is a way to...
Hello. Here are the specs of my laptop, Dell Alienware M17X-R3. I was wondering if there is a way to...
(Posted by farhadasghary 1 year ago)

Alienware M17x R2 How Do You Turn Off Stealth Mode
(Posted by markanilgk 10 years ago)

Alienware M17x R2 Does Not Charge After I Replaced The Battery
(Posted by melishc 10 years ago)

Alienware M17x R2 How To Disable Stealth Mode
(Posted by GONZART 10 years ago)