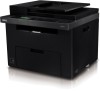
Dell 1355CN Support Question
Dell 1355CN Support Question
Find answers below for this question about Dell 1355CN.Need a Dell 1355CN manual? We have 4 online manuals for this item!
Question posted by crazyIndJ on February 5th, 2014
How To Setup Wireless Printing 1355cnw
Current Answers
Answer #1: Posted by DellJesse1 on February 10th, 2014 10:01 AM

Member since:
April 19th, 2012 Points: 1,551,500

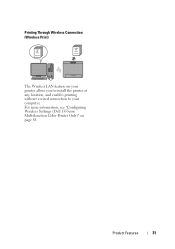
Wireless Connection Setup
Setup Wireless Printing Through Operator Panel and Windows
The following steps describe on how to connect the printer through wireless network using the windows Add Printer option. Ensure the printer is already turn on and already connected to the wireless network.
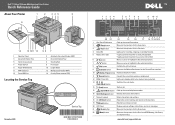
To connect printer to a wireless network through the operator panel:
- Press on the Menu button.
- Press the Down button to select System and press the Enter button to confirm selection.
- On the next screen, press the Down button to select Admin Menu and press the Enter button to confirm selection.
- On the next screen, press the Down button to select Network and press the Enter button to confirm selection.
- On the next screen, press the Down button to select Wireless Setup and press the Enter button to confirm selection.
- On the next screen, press the Manual Setup is highlighted. Press the Enter button to confirm selection.
- On the next screen, key in the wireless network SSID. Use the Navigation keypad to enter the SSID. The Up or Down arrow button are for scrolling the alphanumeric selection. The Left and Right button are for moving to the left or right spacing. Press the Enter button to confirm once the correct SSID is entered.
- On the next screen, there are two options for network type selection:
- Infrastructure - Apply this option if the printer is to connect to a router or switch.
- Adhoc - Apply this option if the printer is to connect directly to a system. The disadvantage of Adhoc connection is once connected, the system can only communicate with the printer wirelessly and not able to connect to any other wireless network which may provide other services like internet or file sharing.
- On the next screen, select the wireless network Encryption Type. The encryption type will have to match the wireless network SSID encryption, otherwise the connection may not be established.
To connect a system with the printer wirelessly in Windows 7:
- Ensure the system is already up and running and is connected to the wireless network
- Click the Start menu and click on Devices and Printers.
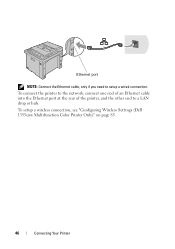
To use the Advanced Setup, display the Configuration Wireless Setting screen.
Displaying Configure Wireless Settings Screen- Insert the Drivers and Utilities CD provided with the printer in your computer. The Easy Setup Navigator file launches automatically.
- Click Guided Setup.
- Select Wireless Connection, and then click Next. The setting method selection window appears.
- Select Advanced.
- Select a connection method from the following:
- WPS-PIN
- WPS-PBC
If the selection is WPS-PIN
NOTE:WPS-PIN (Wi-Fi Protected Setup-Personal Identification Number) is a method to authenticate and register devices required for wireless configuration, by entering PIN assignments to a printer and computer. This setting, performed through access point, is available only when the access points of your wireless router supports WPS.
- Select WPS-PIN, and then click Next.
- Follow the instructions until Check Setup screen appears. Confirm there are no errors displayed on the operator panel, and then click NO on the Check Setup screen. If you see any errors, click YES and follow the instruction.
- Select Local Installation, and then click Next.
- Check if the printer to be installed is listed in the Select Printer, and then click Next.
- Configure the required items on the Enter Printer Settings screen, and then click Next.
- Select the software to be installed, and then click Install.
- Click Finish to exit this tool. Wireless Configuration is complete.
When the WPS-PIN operation is successful and the printer is rebooted, wireless LAN connection is completed.
If the selection is WPS-PBC
NOTE:WPS-PBC (Wi-Fi Protected Setup-Push Button Configuration) is a method to authenticate and register devices required for wireless configuration, by pressing the button provided on the access point via wireless routers, and then performing WPS-PBC setting on the operator panel. This setting is available only when the access point supports WPS.
- Select WPS-PBC, and then click Next.
- Follow the instructions until Check Setup screen appears.
- Confirm there are no errors displayed on the operator panel, and then click NO on the Check Setup screen. If you see any errors, click YES and follow the instruction.
- Select Local Installation, and then click Next.
- Check if the printer to be installed is listed in the Select Printer screen, and then click Next.
- Configure the required items on the Enter Printer Settings screen, and then click Next.
- Select the software to be installed, and then click Install.
- Click Finish to exit this tool. Wireless Configuration is complete.
For WPS-PBC operation on the wireless LAN access point, refer to the manual supplied with the wireless LAN access point.
When the WPS-PBC operation is successful and the printer is rebooted, wireless LAN connection is completed.
Thank You,
Dell-Jesse1
Dell Social Media and Communities
email:[email protected]
Dell Community Forum.
www.en.community.dell.com
Dell Twitter Support
@dellcares
Dell Facebook Support
www.facebook.com/dell
#iwork4dell
Answer #2: Posted by DellJesse1 on February 10th, 2014 10:01 AM
Member since:
April 19th, 2012 Points: 1,551,500
Thank You,
Dell-Jesse1
Dell Social Media and Communities
email:[email protected]
Dell Community Forum.
www.en.community.dell.com
Dell Twitter Support
@dellcares
Dell Facebook Support
www.facebook.com/dell
#iwork4dell
Related Dell 1355CN Manual Pages


Similar Questions


Does the Dell 1355cn have wireless printing capability?