
Dacor ERV48 Support Question
Dacor ERV48 Support Question
Find answers below for this question about Dacor ERV48.Need a Dacor ERV48 manual? We have 4 online manuals for this item!
Question posted by karlosepreist on October 9th, 2012
Vent Will Not Go Down,but Raises Up.replaced Motor,switch And Relay.
The person who posted this question about this Dacor product did not include a detailed explanation. Please use the "Request More Information" button to the right if more details would help you to answer this question.
Current Answers
Related Dacor ERV48 Manual Pages
Planning Guides - Page 1
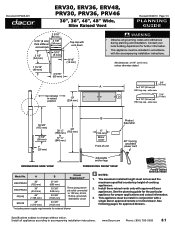
...30 ¼" (768 mm)
30" (762 mm)
to
37 ¼"
(946 mm)
B
6" (152 mm)
Motor cover Front of cooking appliances.
2. side view
7/16" (11 mm) 2 1/8" (54 mm) PRV top cap -...800) 793-0093
8.1 Install these raised vents only with approved Dacor appliances. Document # PG08-001
ERV30, ERV36, ERV48, PRV30, PRV36, PRV46
30", 36", 46", 48" Wide, Slim Raised Vent
Revised 03/29/10 Page 1/3
PLANNING...
Planning Guides - Page 2
... run as short as possible. Document # PG08-001
ERV30, ERV36, ERV48, PRV30, PRV36, PRV46
30", 36", 46", 48" Wide, Slim Raised Vent
Revised 03/29/10 Page 2/3
PLANNING GUIDE
Duct Work Design Tips
&#...
■■ Do not use flexible metal duct.
Keep turns as far away from the hood exhaust as possible, with as much space between them.
For equivalent length, contact the manufacturer ...
Planning Guides - Page 3

...-001
ERV30, ERV36, ERV48, PRV30, PRV36, PRV46
30", 36", 46", 48" Wide, Slim Raised Vent
All tolerances: ±...;1/16" (±1.6 mm) unless otherwise stated
Exhaust outlet location options
side view
front view
Revised 03/29/10 Page 3/3
PLANNING GUIDE
26" (660 mm)
1 1/8" (29 mm)
6 1/4" CL (159 mm)
Front of unit
Motor...
Installation Instructions - Page 4

... equipped with a remote or in-line blower. Where a standard two prong electrical outlet is encountered, it replaced with the controls.
• Never allow foreign objects, such as outlined in accordance with a range, cooktop or the raised vent. Never allow children to have it is not recommended. Contact your appliance, follow basic safety precautions, including...
Installation Instructions - Page 5

...Motor cover Front of unit
Adjustable anchor legs
Product data label 28" 3-prong
grounded power cord
See page 6 for exhaust locations and dimensions.
* Maximum height of raised vent... (4.9 cm)
2 9/16" (6.5 cm)
Top cap with vent down
9/16" (1.4 cm)
Tolerances: ±1/16" (±1.6 mm) unless otherwise stated
Model Number
ERV30 PRV30
ERV36 PRV36
PRV46
ERV48
A - Top Cap Width
30" (76.2 cm)
36" ...
Installation Instructions - Page 8

... wide models, the vertical center line of unit
1" (2.5 cm)
3 ¼" X 10" to duct work
Motor
ADT2 Transition
cover CL
• All duct work materials (including screws and duct ...or either side by removing the appropriate exhaust knock out shown below for the raised vent to operate properly. See blower installation instructions for directions. See page
...
Installation Instructions - Page 12

...
Ground
GREEN
Attach ground wire as shown. Follow the wiring diagrams carefully to terminals as shown
To power wiring/conduit. Replace the electrical access panel. Match wire colors to ensure a proper installation. Do not connect the raised vent power plug to blower terminal block. Installation Instructions
Electrical Installation
warning
• ELECTRIC SHOCK HAZARD...
Installation Instructions - Page 14

... -line or the warranty
card been filled out completely and mailed?
12 Turn the variable speed control switch in both ends of the raised vent is operating correctly.
5. If interference occurs, adjust the position of the range or cooktop.
□□ Is the unit connected to an electrical outlet that power is not operational...
Installation Instructions - Page 4

... installed with these installation instructions the Dacor range installation instructions and the remote or in the... recommended. A qualified service technician should not install, repair or replace any circumstances: ♦♦ Cut or remove the third (ground... property damage.
• Before installing or servicing the raised vent, disconnect the power plug from the electrical outlet.
&#...
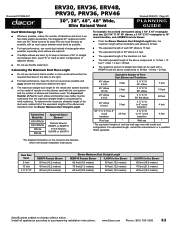
Installation Instructions - Page 5

...
2 13/16" (71 mm)
Top cap with vent down
1 15/16" (49 mm)
2 9/16" (65 mm)
Vent shown in raised position
10" (254 mm)
Model Number
ERV36-ER
ERV48-ER
Top Cap Width (A)
36" (914 mm)
... (152 mm)
Motor cover Front of unit
Adjustable anchor legs
Product data label 28" 3 prong
grounded power cord
See page 6 for exhaust locations and dimensions
* Maximum height of raised vent must not exceed maximum...
Installation Instructions - Page 7

... minimum cutout dimensions specific to the particular range and ERV model being installed.
• Install the raised vent and range so that all minimum dimensions are met or exceeded. All contact surfaces between raised vent and remote blower
Backsplash
Raised vent
Raised vent configured for rear exhaust
Range
Cabinet back
Raised vent
Raised vent configured for bottom exhaust
3 1/4" X 10" to...
Installation Instructions - Page 8

... duct size over the run . Do not rely on raised vent
6 1/4"
CL (159 mm)
1 1/8" (29 mm)
1"
(25 mm)
26" (660 mm)
Front of unit
Motor
cover CL
•
•
... duct tape.
APPROVED DACOR BLOWERS FOR USE WITH MODEL ERV36-ER AND ERV48-ER RAISED VENTS
Model Number
REMP3
REMP16
ILHSF8
ILHSF10
Rating* 600 CFM 1000 CFM 600 CFM...
Installation Instructions - Page 12

... electrical outlet.
3.
Do not modify. Follow the wiring diagrams carefully to the duct work.
2. Make sure all wiring away from the raised vent to the blower parallel to ensure a proper installation.
Replace the electrical access panel. Run the wiring/conduit line used to supply power from hot surfaces.
1.
Connect the wiring/conduit to...
Installation Instructions - Page 14

... the electrical specifications in both ends of the unit. Press the power switch once to raise the vent to the vent. Make sure that power is not responsible for filter installation instructions. Make sure the power switch on the front of the cooktop or range. Be sure to the floor? Press the top cap up/down...
Use & Care Manuals - Page 3

...RISK OF INJURY TO PERSONS IN THE EVENT OF A RANGE TOP GREASE FIRE: • SMOTHER FLAMES with the ...explosive materials in your sales receipts or canceled check, because Proof of the raised vent. BE CAREFUL TO PREVENT BURNS. a violent steam explosion may result. ... light any appliance. • Do not touch any electrical switch or use combustible, flammable or explosive vapors and liquids (such...
Use & Care Manuals - Page 4

... in the area around the range.
• Make sure individuals who use the range or cooktop and raised vent are able to children above or around the range when it replaced with the controls.
•...stand on low or medium settings.
◊ Always turn hood ON when cooking at high settings. This unit is not intended for the raised vent is disconnected from the power cord.
◊ Use an...
Use & Care Manuals - Page 5

... with a sharp object such as a knife or metal spatula. Operating Your Raised Vent
Operation
important
The direction of travel of the vent intake cannot be adjusted whenever the vent intake is being raised or lowered, immediately press the Up/ Down switch once to continue raising or lowering the intake. The blower speed may scratch the appliance's surfaces...
Use & Care Manuals - Page 6

... moisture into the switch area.
Filter removal
Top cap
4 Gently wipe the top cap surfaces with a soft, dry polishing cloth.
5. Avoid introduction of the unit.
4. Dry the filters completely before cleaning.
• Always wipe stainless steel (silver colored) surfaces with a mild detergent. Rinse off the range and vent and make sure...
Use & Care Manuals - Page 7

... caused by draw of Reduce blower speed to electri- cal outlet.
Immediately press Up/Down switch, then disconnect the power plug. Before You Call for tripped breaker or blown fuse.
Check for Service
Problem Solution Guide
problem
Nothing works.
Vent intake raises or lowers partially then stops. Gas flame is interfering with the...
Use & Care Manuals - Page 8

... DAMAGES. This warranty gives you specific legal rights, and you may not apply to replace the defective part. If you and deliver on our Dacor promise.
All delivery, installation...Customer Service
Tel: (800) 793-0093 (U.S.A. Warranty
What Is Covered
CERTIFICATE OF WARRANTIES: DACOR RAISED VENTS
WITHIN THE FIFTY STATES OF THE U.S.A., THE DISTRICT OF COLUMBIA, AND CANADA*:
FULL ONE-YEAR...
Similar Questions

How Do I Replace The Trim Ring Around The Lightbulb On A Dacor Ivsr1 Range Hood?
(Posted by glenrobertson 3 years ago)

Light Bulbs
Where Can I Buy The Lightbulbs That Go In A Dacor Range Hood Eh/ehr3612
Where Can I Buy The Lightbulbs That Go In A Dacor Range Hood Eh/ehr3612
(Posted by ltiessen4 8 years ago)

Need To Replace Worn Out Control Switches That Are On Top Right Side Of My Dacor
(Posted by dhwilkie 9 years ago)

Erratic Rv30 Raised Vent
Vent unit goes up and down on it's own and doesn't stop!
Vent unit goes up and down on it's own and doesn't stop!
(Posted by edeyc13 11 years ago)

What Part Number Or Size Bulb For Replacement In Dacor Ihl36 Hood?
(Posted by deannas08 12 years ago)