2006 Chrysler Pacifica Support Question
2006 Chrysler Pacifica Support Question
Find answers below for this question about 2006 Chrysler Pacifica.Need a 2006 Chrysler Pacifica manual? We have 1 online manual for this item!
Question posted by padshel on February 7th, 2014
How To Remove Pacifica Wheel Covers
The person who posted this question about this Chrysler automobile did not include a detailed explanation. Please use the "Request More Information" button to the right if more details would help you to answer this question.
Current Answers
Related Manual Pages
Owner's Manual - Page 6
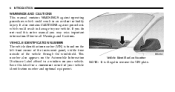
... contains WARNINGS against procedures which could result in an accident or bodily injury. This number also appears on the Automobile Information Disclosure Label affixed to remove the VIN plate. VEHICLE IDENTIFICATION NUMBER The vehicle identification number (VIN) is illegal to a window on the left front corner of the instrument panel, visible...
Owner's Manual - Page 9
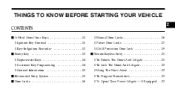
THINGS TO KNOW BEFORE STARTING YOUR VEHICLE
CONTENTS
A Word About Your Keys ...11 ▫ Ignition Key Removal ...11 ▫ Key-In-Ignition Reminder ...12 Sentry Key ...12 ▫ Replacement Keys ...14 ▫ Customer Key Programming ...14 ▫ General Information ...15 Illuminated Entry ...
Owner's Manual - Page 45
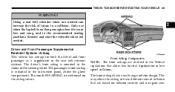
This may allow less forceful deployment in low speed collisions. Remove and store the extender when not needed can increase the risk of injury in the recommended seating positions. The front airbags have different rates of the steering wheel. Using a seat belt extender when not needed . Driver and Front Passenger Supplemental Restraint System...
Owner's Manual - Page 51
...is generated to their full size. The airbags fully inflate in the center of the steering wheel and the right side of the vehicle.
2 Ignoring the AIRBAG warning light in a collision... collision requiring the airbags, it turns on collision severity and occupant size. The steering wheel hub trim cover and the upper right side of the instrument panel separate and fold out of the system...
Owner's Manual - Page 53

...the seat, or objects lodged underneath the seat. If there is transferred to your trim cover
and cushion needs to be able to properly approximate occupant size. The ORC will not ...your seat including your authorized dealer. If there is a fault present in any way (including removal or loosening/tightening of seat attachment bolts), take the vehicle to an authorized dealer. Also, ...
Owner's Manual - Page 58

...Modifications to any way (including removal or loosening/tightening of seat attachment bolts), take the vehicle to your authorized dealer. If your seat including your trim cover and cushion needs to protect you... with disabilities, contact your authorized dealer. You could cause
it to the steering wheel hub trim cover or the upper right side of the airbag system could be used. Do not...
Owner's Manual - Page 117

Head restraints from one seating position should not be removed and installed in a cargo area, inside or outside of a vehicle. Children should not be folded forward and the load floor extended to cover the center console.
To extend the load floor, follow these areas are more likely to be seated and using a seat...
Owner's Manual - Page 156
... in the passenger compartment. Remove the cover from the vehicle when taken from its mounting. Do not store in place. Insert the pins on the ends of the cover into the slots located on... over the cargo area. 5.
WARNING! Do not store the cargo cover on the ends of the cover flap. Unfold the cargo cover extensions and lock into the slots on the trim panel behind the ...
Owner's Manual - Page 286
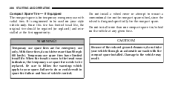
.... It is engineered to your style vehicle only. WARNING! Temporary-use only. CAUTION! Do not install more than one compact spare tire/wheel on your spare. Do not install a wheel cover or attempt to the vehicle may result. With these tires, do not drive more than 50 mph (80 km/h). Because of the...
Owner's Manual - Page 293

... the valve stem cap, if equipped. This will prevent moisture and dirt from entering the valve stem, which could damage the wheel rim sensor.
5 The tire pressure sensors are covered under one of Industry Canada.
Operation is not intended to replace normal tire care and maintenance, nor to the following licenses: United...
Owner's Manual - Page 294

... Stop the vehicle immediately if noise occurs that only chains in good condition are used. Remove the damaged parts of restricted chain clearance between tires and other traction aids that meet SAE ...severe turns and large bumps,
especially with a loaded vehicle.
• Do not use on rear wheels of All Wheel Drive (AWD) vehicles. • Do not drive for prolonged period on dry pavement. •...
Owner's Manual - Page 321

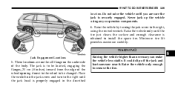
Remove the scissors jack and jack handle by rotating the small wing nut to access the jack and jack tools.
WHAT TO DO IN EMERGENCIES 321
Jack Location Five Passenger Seating The jack and jack-handle are stowed in the rear storage bin located behind the second row bench seat. Pull up on the storage bin cover to the left.
6
Jack Wing Nut
Jack Location
Owner's Manual - Page 322

... liftgate opening. The nut is stowed under the trim cover at the center rear of a cable winch mechanism. The nut is stowed under the plastic cover at the center of a cable winch mechanism.
Six Passenger... bin located in the rear cargo floor. To remove or stow the spare, use the jack handle to rotate the "spare tire drive" nut. To remove or stow the spare, use the jack handle to...
Owner's Manual - Page 323
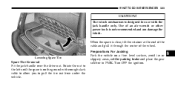
... power tools is clear, tilt the retainer at the end of the cable and pull it through the center of the wheel. Turn OFF the ignition.
6
Lowering Spare Tire
Spare Tire Removal Fit the jack-handle over the drive nut. When the spare is not recommended and can damage the winch.
The...
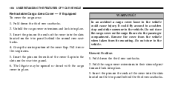
Owner's Manual - Page 324

Loosen (but do not remove) the wheel lug nuts by turning them to moving traffic. Remove the spare wheel, scissors jack and jack-handle from stowage. 2. Do not attempt to change a tire on the side of the vehicle close to the left rear wheel. • Passengers should not remain in the vehicle when the vehicle is...
Owner's Manual - Page 325
... the jack head is to the right, using any suspension components. 6.
Jack Engagement Locations
6
5. Place the wrench on the underside of the wheel opening closest to the wheel to remove the tire. It could slip off the jack and hurt someone near it. The jack is properly engaged in the described
Raising the...
Owner's Manual - Page 326
... the correct tightness, have them checked with a torque wrench by hand only and install the wheel lug nuts with wheel covers, remove the cover from the wheel by turning the jack screw to flat tire stowage. NOTE: Do not install the wheel cover on the wrench while tightening for vehicles with the cone shaped end of the vehicle...
Owner's Manual - Page 329

... the tire and road surface.
Traction When driving on snow covered, wet, or other cable, first to the negative terminal ... traction (ice, snow, wet mud, loose sand, etc.). When removing the jumper cables, reverse the above sequence exactly. Rapid acceleration on...the engine in the surface traction under the front (driving) wheels. Slow down during rainstorms or when roads are slushy.
6...
Owner's Manual - Page 372
... Maintenance Schedules. Outside parking, which the vehicle is the result of deterioration or removal of paint and protective coatings from the corrosion resistance built into your vehicle to geographic locations and usage. Front And Rear Wheel Bearings Front and rear wheel bearings are sprayed on paint, metal trim, and underbody protection. The most...
Owner's Manual - Page 374
... starting with a damp cloth, a damp cloth with a mild soap and water to clean fabric upholstery and carpeting. Do not use Mopar Wheel Cleaner or select a nonabrasive, non-acidic cleaner. To remove heavy soil, use harsh cleaners or Armorall. Do not use oven cleaner. Do not use scouring pads, steel wool, a bristle brush...
Similar Questions

How To Remove Lens Headlight Cover On 2006 Pacifica
(Posted by edkeowlbio 10 years ago)


How To Remove The Headlamp Cover On 2007 Pacifica
(Posted by jazla 10 years ago)


How Do You Remove The Inner Door Panel Assembly On 2006 Chrysler Pacifica
(Posted by emezger 11 years ago)