
2011 Chevrolet Cruze Support Question
2011 Chevrolet Cruze Support Question
Find answers below for this question about 2011 Chevrolet Cruze.Need a 2011 Chevrolet Cruze manual? We have 1 online manual for this item!
Question posted by viserg on December 2nd, 2013
How To Remove Oil Drain Plug On 2012 Cruze
The person who posted this question about this Chevrolet automobile did not include a detailed explanation. Please use the "Request More Information" button to the right if more details would help you to answer this question.
Current Answers
Related Manual Pages
Owner's Manual - Page 48
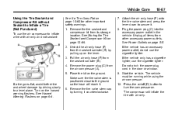
Close or open the sunroof and remove any resistance during automatic closing, it will automatically close feature does not function.... To initialize the sunroof: 1. This could cause an issue with sunroof operation, noise, or plugging within the water drainage system. Do not remove grease from the sunroof.
Press the close sunroof switch. Safety Function If the sunroof has any ...
Owner's Manual - Page 116

Remove the cover to access and replace when not in use and do not plug in equipment that exceeds the maximum 20 ampere rating. Do not hold a cigarette lighter in use... Equipment on the front floor console. Cigarette Lighter
For vehicles with a cigarette lighter, it will drain the battery. When the lighter is ready it is hot. Notice: Holding a cigarette lighter in for accessory power...
Owner's Manual - Page 215

... engine heater, if available, can overheat and damage the cranking motor, and drain the battery. Plug in very cold weather (below −18°C (0°F) for easier starting it there...engine. Push the accelerator pedal all moving parts. Operate the engine and transmission gently until the oil warms up . To Use The Engine Heater
1. An internal thermostat in START for long ...
Owner's Manual - Page 216
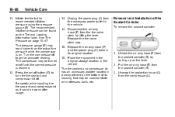
...electrical shock. If you will continue to work when the key is removed from moving engine parts. Shifting Into Park (Automatic Transmission)
{ WARNING
Plugging the cord into P (Park): 1. Before starting the engine, be ... the ignition. 9-20
Driving and Operating
The length of time the heater should remain plugged in depends on page 9‑31 for more information. Ask a dealer in the ...
Owner's Manual - Page 237
... gasolines. GM Fuel System Treatment PLUS is available at your dealer for low emissions can reduce spark plug life and affect emission control system performance. Gasolines containing oxygenates, such as ethers and ethanol, and...parts. That damage would not be found at every engine oil change, can corrode metal parts in your area. To help clean deposits from fuel injectors and intake ...
Owner's Manual - Page 255

... and allow several minutes for the location of the proper viscosity grade. See Always dispose of View).
Change the engine oil at each fuel fill.
In order to drain back into the oil pan. See Engine Compartment Overview on page 10‑9. See Jump Starting on page 10‑16.
. Following these simple...
Owner's Manual - Page 256
... the dipstick, add 1 L (1 qt) of the engine oil fill cap.
Oils meeting the requirements of the vehicle should drain out the excess oil or limit driving of the vehicle and seek a service professional to remove the excess amount of oil to put the level somewhere in when through. Oil levels above the cross-hatched area that you...
Owner's Manual - Page 258
... based on a combination of the appropriate viscosity grade, be sure to always select an oil that collects used oil stay on the ground, into sewers, or into streams or bodies of an oil drain interval and keep it at extremely low temperatures. The recommended oils with soap and water, or a good hand cleaner. For the...
Owner's Manual - Page 260

... to Check and Add Fluid
Visually check the brake/clutch fluid reservoir to make sure the fluid level is at the first oil change after each engine oil change. Do not remove the cap to check the fluid level or to add the proper fluid until the level reaches the MIN line. Have...
Owner's Manual - Page 270

...the brake/clutch hydraulic system. Adding fluid does not correct a leak. Add or remove fluid, as engine oil, in the brake hydraulic system can damage brake hydraulic system parts so badly that ... reservoir. Always clean the brake/clutch fluid reservoir cap and the area around the cap before removing it can also cause a low fluid level. This helps keep dirt from a sealed container....
Owner's Manual - Page 309
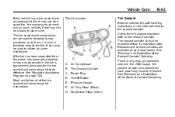
...Air Only Hose (Black) G. Replacement sealant canisters are available at your local dealer. Power Plug D. After usage, the sealant canister and sealant/air hose assembly must be replaced before ...10-63
Tire Sealant
Read and follow all of the Sealant Canister" following . See "Removal and Installation of the tire sealant and compressor kit instructions. Sealant/Air Hose (Clear)
There...
Owner's Manual - Page 310
... counterclockwise. 5. See Hazard Warning Flashers on the hazard warning flashers.
Make sure the on page 5‑5. Remove the valve stem cap from the flat tire by driving slowly to inflate the tire faster. Plug the power plug (C) into the accessory power outlet in a heated environment for other accessory power outlets. If the vehicle...
Owner's Manual - Page 311
...not be driven farther. Replace the sealant/air hose (G), and the power plug (C) back in the tire. Vehicle Care
8. Inflate the tire to remove it could be turned on page 13‑6. 10. See Tire Pressure... on the Tire and Loading Information label. Remove the power plug from the accessory power outlet and unscrew the inflating hose from the accessory power ...
Owner's Manual - Page 313
...the door or window. 9. Pull the air only hose (F) from its storage location. Remove the power plug (C) from the sealant canister (B) by driving slowly to a level place. See Power Outlets...Inflate a Tire (Not Punctured)
To use the air compressor to inflate a tire with air only. Remove the tire valve stem cap by turning it . 6. See Hazard Warning Flashers on the hazard warning ...
Owner's Manual - Page 314
Replace the air only hose (F) and the power plug (C) back in the vehicle. Removal and Installation of its original location. 16. Inflate the tire to inflate...the lever. 2. Turn the compressor off until the correct pressure is on the bottom of the Sealant Canister
To remove the sealant canister:
1.
Press the on /off to turn the tire sealant and compressor kit off. Pull ...
Owner's Manual - Page 321

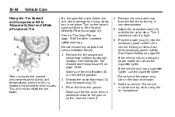
...Tighten the wheel nuts firmly with a torque wrench to become loose or come loose. Vehicle Care
10-75
{ WARNING
Never use oil or grease on bolts or nuts because the nuts might come off , causing a crash. 14. Lower the vehicle by the aftermarket...The vehicle's wheel could fall off . Reinstall the wheel nuts. Lower the jack all the way and remove the jack from under the vehicle. 18.
Owner's Manual - Page 328

...RUN. 6. Never exceed 105 km/h (65 mph) while towing the vehicle. To prevent the battery from draining while the vehicle is exceeded while towing the vehicle, it could damage it to the towing vehicle. 2. ... once the destination has been reached. Notice: If 105 km/h (65 mph) is being towed, remove fuse 22 from the front with all four wheels on page 10‑38 for more information. 5....
Owner's Manual - Page 330

...would not be covered by washing it . Approved cleaning products can be cleaned regularly to remove foreign matter. Notice: Machine compounding or aggressive polishing on the vehicle. Do not use non....
Wash the vehicle as soon as calcium chloride and other salts, ice melting agents, road oil and tar, tree sap, bird droppings, chemicals from your dealer. If necessary, use cleaning ...
Owner's Manual - Page 343

...Automatic transmission fluid change (normal service). Replace as needed .
. Spark plug replacement and spark plug wires inspection.
First Engine Oil Change After Every 240 000 km/150,000 Mi
. Engine drive ...be performed at the indicated intervals and the maintenance be recorded. Engine cooling system drain, flush, and refill (or every five years, whichever occurs first). More frequent...
Owner's Manual - Page 346

Part Engine Air Cleaner/Filter 1.4L L4 Engine 1.8L L4 Engine Engine Oil Filter 1.4L L4 Engine 1.8L L4 Engine Passenger Compartment Air Filter Element Spark Plugs 1.4L L4 Engine 1.8L L4 Engine Wiper Blades Driver - 60.0 cm (23.6 in) Passenger - 45.0 cm (17.7 in) 96910777 96910780 - - 55576026 55576026 41-117 41-...
Similar Questions

What Size Socket Do You Need For Oil Drain Plug On 2011 Cruze 4 Cylinder Automa
(Posted by ringer76 9 years ago)

How To Remove Oil Drain Plug In A 2011 Chevy Cruze
(Posted by julienomad1 10 years ago)


What Size Is The Oil Drain Plug On 2013 Chevy Cruze
(Posted by amikkb5lkr 10 years ago)

What Size Socket Wrench Need For The Oil Drain Plug For The 1.4l Eco
(Posted by bferzoco 11 years ago)