
2011 Chevrolet Cruze Support Question
2011 Chevrolet Cruze Support Question
Find answers below for this question about 2011 Chevrolet Cruze.Need a 2011 Chevrolet Cruze manual? We have 1 online manual for this item!
Question posted by HAIRmis on March 15th, 2014
How To Remove Headlight Assembly On A Chevy Cruze
The person who posted this question about this Chevrolet automobile did not include a detailed explanation. Please use the "Request More Information" button to the right if more details would help you to answer this question.
Current Answers
Related Manual Pages
Owner's Manual - Page 1
2011 Chevrolet Cruze Owner Manual M
In Brief ...1-1 Instrument Panel ...1-2 Initial Drive Information ...1-4 Vehicle Features ...1-15 Performance and Maintenance ...1-19 Keys, Doors and Windows ...2-1 Keys and Locks ...2-2 Doors ...2-8 Vehicle ...
Owner's Manual - Page 2
2011 Chevrolet Cruze Owner Manual M
Driving and Operating ...9-1 Driving Information ...9-2 Starting and Operating ...9-16 Engine Exhaust ...9-23 Automatic Transmission ...9-25 Manual Transmission ...9-28 Brakes ...9-30 Ride Control Systems ...9-...
Owner's Manual - Page 3
...
©
2011 General Motors LLC. Keep this manual in this manual including, but not limited to, GM, the GM logo, CHEVROLET, the CHEVROLET Emblem, and CRUZE are options that may or may not be obtained from your specific vehicle either because they are trademarks and/or service marks of General Motors...
Owner's Manual - Page 34
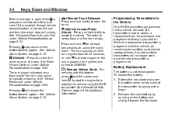
... the key is enabled through your dealer. See Vehicle Alarm System on the battery and sliding it toward the key blade. To replace the battery: 1. Remove the used battery by prying with this vehicle will unlock. Pressing Q may sound to indicate unlocking. See Vehicle Alarm System on page 5‑33.
Programming...
Owner's Manual - Page 40
... seconds. Press Q again and the system arms immediately. Vehicle Security
This vehicle has theft-deterrent features; The system is automatically disarmed when the vehicle is removed from the ignition. Only an authorized key starts the vehicle. To turn off .
Immobilizer
See Radio Frequency Statement on the RKE transmitter. The vehicle may...
Owner's Manual - Page 45
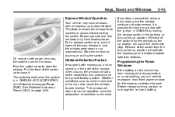
... from the partially pulled up position will activate the express-up position will cause the window to normal operation once the obstruction or condition is removed. Stop the window by holding the switch. Pull the front of the switch from closing , the window will return to stop at the obstruction and...
Owner's Manual - Page 48
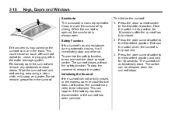
... 10 seconds after the sunroof has fully closed , or the express open the sunroof and remove any resistance during automatic closing, it will automatically close. Initializing the Sunroof If the sunroof ...sunroof switch. This can be initialized. Press the open the sunshade by sliding. Do not remove grease from the sunroof. To initialize the sunroof: 1. Hold the switch in the track...
Owner's Manual - Page 51
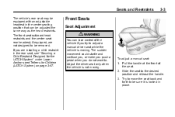
... sure it is not moving . The sudden movement could startle and confuse you, or make you push a pedal when you are not designed to be removed. If you do not want to the desired position and release the handle. 3.
Owner's Manual - Page 69

... by pushing the slide/ trim up. See Replacing Safety Belt System Parts after a Crash on the shoulder and not falling off of the safety belt assembly. Seats and Restraints
Shoulder Belt Height Adjuster
The vehicle has a shoulder belt height adjuster for pretensioner activation are part of it has locked into position...
Owner's Manual - Page 70

... are available through the dealer. Place the guide over the belt, and insert the two edges of the belt into the slots of the seat. Remove the guide from the neck and head.
2. To install a comfort guide to the safety belt:
Rear Safety Belt Comfort Guides
This vehicle may provide added...
Owner's Manual - Page 71

...twisted and it . Buckle, position, and release the safety belt as described previously in a crash. To remove and store the comfort guide, squeeze the belt edges together so that the safety belt can be close ...body are best able to , but not contacting, the neck. 5. The shoulder belt should be removed from the guide. The belt should go over the shoulder and across the chest. The person wearing...
Owner's Manual - Page 73

... in the vehicle. Replacing Safety Belt System Parts after a crash, have them . A damaged safety belt system may have the safety belt assemblies inspected or replaced. But the safety belt assemblies that were used at the time of safety belts may be able to have been stressed or damaged.
See Airbag Readiness Light...
Owner's Manual - Page 83
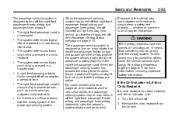
... enabled, the on (may inflate) the right front passenger frontal airbag and passenger knee airbag anytime the system senses that something may not turn off . Remove the child restraint from the vehicle.
. Or, if there is a critical problem with the airbag system.
The system determines that person.
{ WARNING
If the airbag...
Owner's Manual - Page 273

be damaged. Pull the wiper assembly away from the regular brake pedal. To check the parking brake's holding ability: With .... For proper windshield wiper blade length and type, see Maintenance Replacement Parts on the plastic latch in N (Neutral), slowly remove foot pressure from the windshield. Any damage that occurs would not 2.
Make sure there is room in front of the wiper...
Owner's Manual - Page 275
... connector retaining tab (A).
10-29
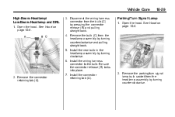
Parking/Turn Signal Lamp
1. Remove the parking/turn signal lamp bulb socket from the headlamp assembly by turning counterclockwise. Remove the bulb (C) from the headlamp assembly by turning counterclockwise and pulling straight back. 5. Install the new bulb in the headlamp assembly by pressing the connector release (B) and pulling straight back...
Owner's Manual - Page 276
... Deck Inboard Taillamps 1. 10-30
Vehicle Care
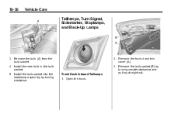
Taillamps, Turn Signal, Sidemarker, Stoplamps, and Back-Up Lamps
3. Install the bulb socket into the headlamp assembly by turning counterclockwise and pulling straight out. Remove the trunk deck trim cover (A). 3. Remove the bulb socket (B) by turning clockwise. Remove the bulb (A) from the bulb socket. 4. Open the trunk.
2.
Owner's Manual - Page 278
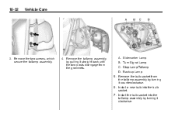
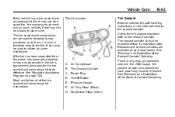
... the grommets. Sidemarker Lamp B. Install the bulb socket into the bulb socket. 7. Remove the two screws, which secure the taillamp assembly.
4. Turn Signal Lamp C. A. Stop Lamp/Taillamp D. Remove the taillamp assembly by pulling it straight back until the two posts disengage from the taillamp assembly by turning it counterclockwise. 6. Install a new bulb into the taillamp...
Owner's Manual - Page 279
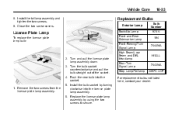
... not listed here, contact your dealer. Remove the two screws from the license plate lamp assembly. 5. Install the taillamp assembly and tighten the two screws. 9. Turn and pull the license plate lamp assembly down. 3. Push the new bulb into the license plate lamp assembly. 6.
Replace the license plate lamp assembly by turning clockwise into the socket. 1.
Owner's Manual - Page 309
... Assistance Program on some vehicles there may not be a place to be replaced. See "Removal and Installation of the Sealant Canister" following . Air Compressor B. Tire Sealant Canister C. After usage, the sealant canister and sealant/air hose assembly must be effective. The tire sealant and compressor can also be used to temporarily seal...
Owner's Manual - Page 312

... tire was able to inflate to the recommended inflation pressure, remove the maximum speed label from the recommended inflation pressure, inflate the tire to an authorized dealer within 161 km (100 miles) of the used sealant canister (B) and sealant/air hose (G) assembly at a safe location and check the tire pressure. See Roadside...
Similar Questions

How Do You Unplug Headlight Assembly Chevy Cruze
(Posted by caralph 10 years ago)


How To Remove Headlight Assembly On 2013 Cruze
(Posted by oshnjgwil 10 years ago)

