
2010 Chevrolet Equinox Support Question
2010 Chevrolet Equinox Support Question
Find answers below for this question about 2010 Chevrolet Equinox.Need a 2010 Chevrolet Equinox manual? We have 1 online manual for this item!
Question posted by marGr on October 14th, 2013
How To Install Power Lift Supports On Chevrolet Equinox
The person who posted this question about this Chevrolet automobile did not include a detailed explanation. Please use the "Request More Information" button to the right if more details would help you to answer this question.
Current Answers
Related Manual Pages
Owner's Manual - Page 1

2010 Chevrolet Equinox Owner Manual M
Keys, Doors and Windows ...1-1 Keys and Locks ...1-2 Doors ...1-8 Vehicle Security...1-12 Exterior Mirrors ...1-14 Interior Mirrors ...1-15 Windows ...1-16 Roof ...1-19 Seats and ...
Owner's Manual - Page 2
2010 Chevrolet Equinox Owner Manual M
Vehicle Care ...9-1 General Information ...9-2 Vehicle Checks ...9-4 Headlamp Aiming ...9-31 Bulb Replacement ...9-33 Electrical System ...9-37 Wheels and Tires ...9-43 Jump Starting ...9-74 Towing ...9-...
Owner's Manual - Page 3
... each of the features found on your vehicle.
Litho in the vehicle for Chevrolet Motor Division wherever it appears in this owner manual. Introduction
Please refer to ... 1996-2007 DTS, Inc.
iii
GENERAL MOTORS, GM, the GM Emblem, CHEVROLET, the CHEVROLET Emblem, the name Equinox and the Equinox Emblem are trademarks of General Motors. For vehicles first sold in Canada, substitute...
Owner's Manual - Page 17
...encounters multiple obstacles on the liftgate adjacent to the open the liftgate and the liftgate support struts have lost pressure, the turn signals flash and a beep sounds to indicate...is moving . Always make sure the power liftgate is stopped below that the power liftgate must already be operated manually. After removing the obstruction, the power liftgate operation can still be open ...
Owner's Manual - Page 18
.... The security light, located on the RKE transmitter. If the RKE button is pressed while power operation is reconnected and charged.
Manual operation of the doors unlocked, the liftgate can be set ...stops at the new set to the OFF position. Manual Operation of the liftgate, and lift the gate open.
Anti-Theft Alarm System
This vehicle has an anti-theft alarm system....
Owner's Manual - Page 30

... are located on page 2‑6 for more information. 2-4
Seats and Restraints
Adjust the power seat by moving the control (C) forward or rearward. Adjust the seatback by moving the control (B) forward or rearward, up or down, or by using the control (D). Adjust the lumbar support by pressing the top or bottom of control (E).
Owner's Manual - Page 32
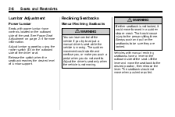
... located on page 2‑4 for more information. Adjust lumbar support by using the rocker switch (D) on the seatbacks to be sure they are locked. Vehicles with power lumbar have a lever on the outboard side of the seat...adjust a manual driver's seat while the vehicle is not moving . Lift the lever and move when pushed or pulled.
{ WARNING
You can lose control of the driver seat. See...
Owner's Manual - Page 104

...adapter fuses. Certain electrical accessories may not be sure to follow the installation instructions included with the accessory power outlets and could result in use the outlets, remove the cover. ...be a problem with a vehicle function. Notice: If electrical devices are left plugged into a power outlet, the battery may be covered by the vehicle warranty. Warning Lights, Gages, and ...
Owner's Manual - Page 182
6-40
Infotainment System
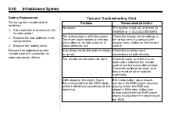
Tips and Troubleshooting Chart
Problem No power. Replace the two batteries in the setup menu by pressing the display menu button... mode settings in the compartment. 3. Remove the batteries from the beginning of time. There are not dead or installed incorrectly.
Check to play from the remote control if unused for an extended period of the DVD. If the stop...
Owner's Manual - Page 281

... traction control, and stability control. For additional information, see Adding Equipment to vehicle components resulting from the installation or use of non‐GM certified parts, including control module modifications, is not
covered under the terms ... for GM Accessories, you will know that GM-trained and supported service technicians will perform the work using genuine GM Accessories.
Owner's Manual - Page 283

Before closing the hood, check all filler caps are properly installed. The lever is below the instrument panel, to release the striker. Lift the hood. Move the secondary hood release lever to the right to the left of the hood. 3. Pull the release handle with the symbol on it. Vehicle Care
9-5
Hood
To open the hood:
1. It is near the middle of the steering wheel.
2.
Owner's Manual - Page 287

...intake manifold. 5. H. Remote Negative (−) Terminal. Windshield Washer Fluid Reservoir. Install cover by aligning on page 9‑22. Install the oil fill cap. B. D. See Engine Oil on page 9‑16....;21. Power Steering Fluid (2.4L L4 Engine) on page 9‑21 or Power Steering Fluid (3.0L V6 Engine) on page 9‑22. See Engine Oil on page 9‑9. Lift and remove...
Owner's Manual - Page 297

...covered by the warranty.
3. Notice: If the pressure cap is not tightly installed, coolant loss and possible engine damage may be running the engine without coolant is overheating, both fans ...
Engine Overheating
The vehicle has an indicator to run until the level reaches the line pointed to lift the hood when this time, the coolant level inside the coolant surge tank may occur. See Engine...
Owner's Manual - Page 307

... Do not allow the wiper blade arm to touch the windshield when no further movement is installed could damage the windshield. Front Wiper Blade Replacement
To replace the front wiper blades: 1. Notice:... Allowing the wiper blade arm to touch the windshield. Lift the wiper arm from the windshield until the square button on page 10‑2 for wear and...
Owner's Manual - Page 314

See Liftgate (Manual) on page 1‑8 or Liftgate (Power) on page 1‑9 for more information. A. Turn the bulb socket counterclockwise and pull ...socket in and turn it out. 7. Pull the bulb (B) straight out of these bulbs: 1. 9-36
Vehicle Care
5. Install the new bulb. 9. Turn the bulb socket (A) counterclockwise to reinstall lamp assembly. Open the liftgate partway. Bulb 6. Pull...
Owner's Manual - Page 316

... - Right 6 7 J-Case Fuses 5 Usage Memory Seat Module Power Seat - Left Instrument Panel Fuse Block 1 The vehicle may damage it straight up. Always keep the covers on any electrical components on the cover and lift it . 9-38
Vehicle Care
Engine Compartment Fuse Block
To remove the fuse block cover, squeeze the clips on...
Owner's Manual - Page 317
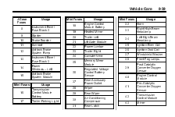
... 2 Starter Brake Booster Sunroof Antilock Brake System Pump Instrument Panel Fuse Block 3 Power Windows - Left Antilock Brake System Module Usage Transmission Control Module Battery Trailer Parking ...Battery Heated Mirror Trailer Left Lift Gate Module Power Lumbar Trailer Right Canister Vent Memory Mirror Module Regulated Voltage Control Battery Sensor Rear Accessory Power Outlet Wiper Rear Wiper ...
Owner's Manual - Page 318

... Fuse Block 9-40
Vehicle Care
Usage Chassis Control Module Ignition Spare Rear Drive Module Lift Gate Module Logic Instrument Panel Fuse Block Ignition Heated Seat - Front Chassis Control Module Engine Control Module... Rear Vision Camera Usage Electric Power Steering Micro Relays 54 55 56 57 58 59 60 61 62 63 64 Mini Relays...
Owner's Manual - Page 342
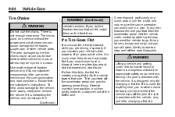
...more likely to leak out slowly. There is used on the front tires. Follow that will fit, install them on a vehicle without the appropriate safety equipment and training. If it is contacting the vehicle, ... Tire chains used for a tire to a stop well out of the traffic lane.
{ WARNING
Lifting a vehicle and getting under control by the tire chains could be badly injured or killed if the...
Owner's Manual - Page 344

... next to loosen and remove them. 4. See Liftgate (Manual) on page 1‑8 or Liftgate (Power) on page 9‑64 for more information. 2. Remove the extension (A), wheel wrench (B) and jack (C). 9-66
Vehicle Care
Removing the Flat Tire and Installing the Spare Tire
1. Turn the retainer nut counterclockwise and remove the spare tire. 5.
Do...
Similar Questions

My 2006 Chevy Equinox Light Says Reduced Engine Power Light.
My 2006 Equinox light is on says Reduced Engine Power
My 2006 Equinox light is on says Reduced Engine Power
(Posted by nadams4334 7 years ago)

Power Struts Liftgate 2010 Equinox Won't Work Right.
(Posted by DEAgomsan 10 years ago)


Lift Gate On 2010 Equinox Power Wont Stay Up
(Posted by insperick1 10 years ago)

2010equino Power Lift Gate
How to install power lift gate support struts. When it opens it won,t stay open. I have the new stru...
How to install power lift gate support struts. When it opens it won,t stay open. I have the new stru...
(Posted by mrjim 11 years ago)