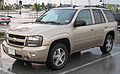
2008 Chevrolet TrailBlazer Support Question
2008 Chevrolet TrailBlazer Support Question
Find answers below for this question about 2008 Chevrolet TrailBlazer.Need a 2008 Chevrolet TrailBlazer manual? We have 1 online manual for this item!
Question posted by Falcdlca on February 14th, 2014
How To Remove Rear Wiper 2008 Chevy Tahoe
The person who posted this question about this Chevrolet automobile did not include a detailed explanation. Please use the "Request More Information" button to the right if more details would help you to answer this question.
Current Answers
Related Manual Pages
Owner's Manual - Page 48

...in a vehicle. Young children should have the protection provided by the appropriate restraint. To remove and store the comfort guides, squeeze the belt edges together so that the shoulder belt ... there is no other children. Buckle, position and release the safety belt as described in "Rear Seat Passenger Positions" earlier in a vehicle needs protection! Slide the guide back on its storage...
Owner's Manual - Page 59

...or use , where the bottom of the seatback meets the back of the seat cushion. 2. To remove the child restraint, simply unhook the top strap from the top tether anchor and then disconnect the anchor ...-facing, attach the top strap to the top strap anchor. See "Securing a Child Restraint in a Rear Outside Seat Position" in the Index for information on how to secure a child restraint in the Index....
Owner's Manual - Page 88

...accessories in the ACCESSORY position could break the key or the ignition switch. Using a tool to remove the key when the ignition is off. Don't operate accessories in the ACCESSORY position for driving. ...way in? B (Accessory): This position lets you use things like the radio and the windshield wipers when the engine is turned to LOCK. Ignition Positions
NOTICE:
If your key seems stuck in...
Owner's Manual - Page 109

... your vision. For delayed wiping, turn the control to 0.
To turn the control to 1 or 2. To turn the wiper off, turn the rear wiper on the windshield, blocking your fluid level.
2-40 Rear Window Washer/Wiper This control is located to your washer until the windshield is a paddle marked with the windshield washer symbol at...
Owner's Manual - Page 127

... items in the trim panel located behind the rear seat. 2. Latch the posts into the sockets on the opposite side of the trim panel and release. 3. Compress one endcap and remove it outside of your vehicle has a cargo...If your vehicle. To install the cargo cover, do the following : 1.
Remove the cargo cover from the other endcap so that it back up. 2. You or others could be injured.
Owner's Manual - Page 128

...remove the rear floor stowage lid, do the following: 1. Pull the lid rearward to release it click.
2-59 Make sure the lid is secure by applying slight pressure to the latch until you hear it from moving. Be sure to unhook it . To reinstall the rear... floor stowage lid, reverse the previous steps. People in the rear cargo area that allow you to ...
Owner's Manual - Page 131

...equipment, be compatible with the accessory power outlet and could result in the rear of the cigarette lighter on the rear of the center console, and the third one is located to use ...of accessory or accessory bracket from the plug. Improper use anything that exceeds the fuse rating. Remove the cover from working as a cellular telephone or CB radio. NOTICE:
Power outlets are designed ...
Owner's Manual - Page 140

Ignition Switch F. Comfort Controls J. Shift Lever M. Rear Window Defogger P. Rear Window Washer/Wiper H. Exterior Lamp Controls B. Ashtray L. Accessory Power Outlet O. The main components of your instrument panel are the following: A. Hood Release K. Lighter N. Instrument Panel Cluster E. Audio System I. ...
Owner's Manual - Page 285

...a weight-distributing hitch, the trailer tongue weight (A) should be sure to follow: D If you remove the hitch. If you don't seal them right simply by and rough roads are proper. Total Weight on the... Certification label at the rear edge of the trailer tongue. If you do, then be sure to seal the holes later ...
Owner's Manual - Page 310

...to "blow out" while you're driving, especially if you maintain your hazard warning flashers. A rear blowout, particularly on a curve, acts much more likely to change a flat tire safely. If ...noisy, but you 'd use your foot from moving: 1. not in PARK (P). 3. In any rear blowout, remove your jacking equipment to a stop -- It may require the same correction you can still steer. ...
Owner's Manual - Page 311

Removing the Spare Tire and Tools
The following steps will tell you will need is stored under the rear seat.
5-19 The jacking equipment you how to use the jack and change a tire. See "Rear Seats" in the Index for more information on accessing the jacking equipment under the rear seat of the vehicle.
Owner's Manual - Page 312

Be sure the socket end of the extension connects into the hole in the rear bumper.
To remove the underbody-mounted spare, insert the socket end of the vehicle when restowing.
5-20 NOTICE:
Never remove or restow a tire from/to remove the spare tire mounted underneath your vehicle. 1. The following instructions explain how to a stowage...
Owner's Manual - Page 327

... Checking Things Under the Hood Engine Oil Engine Air Cleaner/Filter Automatic Transmission Fluid Rear Axle Four-Wheel Drive Engine Coolant Radiator Pressure Cap Power Steering Fluid Windshield Washer Fluid...6-50 6-54 6-55 6-55 6-56 6-63 6-63 6-63 Battery Bulb Replacement Windshield Wiper Blade Replacement Tires Appearance Care Cleaning the Inside of Your Vehicle Care of Safety Belts Cleaning...
Owner's Manual - Page 361

... three socket retaining screws (B). 5. Remove the socket by releasing the retaining tabs. 6. Reinstall the socket and screws. 3. Reinstall the lamp assembly and tighten the screws. 11.
Pull the assembly away from the vehicle. 9. Taillamps and Rear Turn Signals
1. Push the new bulb into the socket until it from the lamp assembly.
4. For...
Owner's Manual - Page 362

... blade.
1. Blade Pivot E. Press down on the blade assembly pivot locking tab. See "Wiper Blade Check" in the Index for wear or cracking. Locking Tab
D. Blade Assembly B. Arm Hook
2.
NOTICE:
Use care when removing or installing a blade assembly. A. To remove the old wiper blades, lift the wiper arm until it from the wiper arm hook.
6-36
Owner's Manual - Page 363

... the blade assembly. Be sure that are locked by the bottom claws of the insert slots. Incorrect Installation 6. Carefully lower the wiper arm and blade assembly onto the windshield.
6-37 Remove the insert from the blade assembly. Make sure that all the way through the blade claws at one end that the...
Owner's Manual - Page 375
...a crash, they may cause scratches. If abrasive cleaners are used on the inside of the rear window, an electric defogger element may have to clean the top surfaces of the instrument panel.
...GM Glass Cleaner or a liquid household glass cleaner will remove normal tobacco smoke and dust films on a soft cloth or sponge.
Clean safety belts only ...
Owner's Manual - Page 376
The windshield is to enter your vehicle. Check the wiper blades and clean them last longer, seal better, and not stick or squeak. Cleaning the Outside of Your Vehicle
The paint finish on weatherstrips will stick to rinse the vehicle well, removing all -cotton towel to dry on the blade or windshield. Don...
Owner's Manual - Page 386

... 41 42 43 44 Solid State Relays 45 46
Usage Trailer Anti-Lock Brakes (ABS) Ignition A Blower Motor Ignition B Usage Blank Rear Window Washer Fog Lamps Horn Fuel Pump Windshield Wipers/Washer High-Beam Headlamp Air Conditioning Usage Cooling Fan HDM
Mini Relay 47 Miscellaneous 48 49
Usage Starter Usage Instrument Panel...
Owner's Manual - Page 388
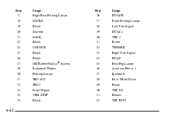
... 21 23 24 25 26 27 29 30 31 32 33 34 35
Usage Right Rear Parking Lamps LOCKS Blank Sunroof LOCK Blank UNLOCK Blank Blank OH Battery/OnStarR System Rainsense Wipers Parking Lamps TBC 4CC TBC5 Front Wipers VEH STOP Blank
Fuse 36 37 38 39 40 41 42 43 44 45...
Similar Questions

How To Remove Spare On 2008 Chevy Trailblazer
(Posted by Wrandkimbo 10 years ago)

How Do U Remove Rear Wiper Arm On A 2008 Trailblazer
(Posted by jojbald 10 years ago)

Cannot Remove 2008 Trailblazer Rear Wiper Arm
(Posted by smjenn 10 years ago)
How To Remove Rear Window 2007 Chevy Trailblazer
(Posted by brr1san 10 years ago)

Remove Rear Wiper Motor
How do I remove the rear wiper motor? I cannot get the plastic cover off the outside.
How do I remove the rear wiper motor? I cannot get the plastic cover off the outside.
(Posted by hannagary 11 years ago)