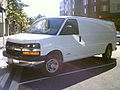
2006 Chevrolet Express Van Support Question
2006 Chevrolet Express Van Support Question
Find answers below for this question about 2006 Chevrolet Express Van.Need a 2006 Chevrolet Express Van manual? We have 1 online manual for this item!
Question posted by grdeath on April 18th, 2014
How To Remove Rear Rotors On A 2006 Chevy Express Van
The person who posted this question about this Chevrolet automobile did not include a detailed explanation. Please use the "Request More Information" button to the right if more details would help you to answer this question.
Current Answers
Related Manual Pages
Owner's Manual - Page 1
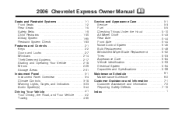
2006 Chevrolet Express Owner Manual
Seats and Restraint Systems ...1-1 Front Seats ...1-2 Rear Seats ...1-5 Safety Belts ...1-9 Child Restraints ...1-30...and Appearance Care ...5-1 Service ...5-3 Fuel ...5-5 Checking Things Under the Hood ...5-10 All-Wheel Drive ...5-43 Rear Axle ...5-44 Front Axle ...5-44 Noise Control System ...5-45 Bulb Replacement ...5-46 Windshield Wiper Blade Replacement ...5-...
Owner's Manual - Page 2
... time it appears in this manual in U.S.A. Box 07130 Detroit, MI 48207 GENERAL MOTORS, GM, the GM Emblem, CHEVROLET, the CHEVROLET Emblem, and the name CHEVY EXPRESS are on the road. It is sold in the vehicle, so it will be there if it can be found.
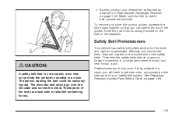
Owner's Manual - Page 11

...when the vehicle is in the seat and wear your safety belt properly. Removing the Rear Seat
1. To do its job because it will be removed. Instead, it , receiving neck or other injuries. The lap belt ....
1-5 If the vehicle has floor mats, the pins will not be dangerous. Rear Seats
{CAUTION:
Rear Seat Operation
Sitting in a reclined position when your vehicle is in motion can be against ...
Owner's Manual - Page 35
...only once. The shoulder belt should go over the shoulder and across the chest. To remove and store the comfort guides, squeeze the belt edges together so that the shoulder belt ...safety belts reduce a person's forward movement in a moderate to take them , they activate in Rear Outside Passenger Positions on the buckle end of the guides. See Replacing Restraint System Parts After a...
Owner's Manual - Page 52

... equipped with a three-passenger bench seat. There is located at the bottom rear of the seat cushion.
Never install two top tethers using the same top tether anchor. Third or Fourth Row - Three Passenger Bench Seat Second Row - Passenger Van
1-46 To install a child restraint in the center seating position, use anchor...
Owner's Manual - Page 65
...has been installed and the on indicator is still lit, check to the top tether anchor. Remove the child restraint from the vehicle and reinstall the child restraint. If after reinstalling the child restraint... and to RUN or START. To remove the child restraint, if the top tether is still lit, secure the child in the child restraint in a rear seat position in different directions to be...
Owner's Manual - Page 85

... the vehicle's seatback is not pressing the child restraint into the seat cushion. Remove the child restraint from the vehicle and reinstall the child restraint following the child... right front passenger seat is unoccupied • the system determines that an infant is present in a
rear-facing infant seat
If a child restraint has been installed and the on indicator is still lit, secure the...
Owner's Manual - Page 119
... objects behind you.
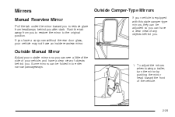
Outside Manual Mirror
Adjust your outside mirrors so you can see a little of the side of your vehicle, and have a cargo van without the rear door glass, your vehicle is equipped with this style camper-type mirrors, they can be adjusted so you can be folded in to the...
Owner's Manual - Page 142
...flectors may
adversely affect the performance of the system.
• Keep the path under the front seats clear of objects
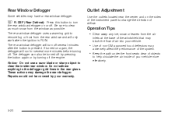
to remove fog or frost from the rear window and will run for several minutes after the button is RUN. Repairs would not be turned off the engine. Operation Tips
•...
Owner's Manual - Page 292
... .
{CAUTION:
Batteries have acid that are wrong for your vehicle, the balance between your front and rear brakes can change in many parts have to be badly hurt if you are not going to drive your...brake stop, your disc brakes adjust for battery location. When it is time for 25 days or more, remove the black, negative (−) cable from running down and you need new ones put in - be sure ...
Owner's Manual - Page 304
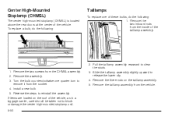
... the taillamp assembly. 5. Pull the taillamp assembly rearward to release the lower clip. 4. Reverse the steps to remove it from the inside of the vehicle. To replace a bulb, do the following :
Taillamps
To replace one ... center high-mounted stoplamp (CHMSL) is located above the rear doors at the center of the taillamp assembly.
2. Remove the two inboard nuts from the socket...
Owner's Manual - Page 305

... 194 9005 9006GS H6054
For replacement bulbs not listed here, contact your dealer.
5-51 Install a new bulb. 9. Reverse the steps to remove it counterclockwise. 7. Replacement Bulbs
Exterior Lamp Back-up, Rear Parking, Stoplamp, and Turn Signal Lamp CHMSL Front Parking and Turn Signal Lamp Front Sidemarker Lamp Headlamps Composite High-Beam Composite...
Owner's Manual - Page 311

...tire has built up heat from steel or other reinforcing materials. Air pressure is expressed in which can also identify the tire manufacturer, production plant, brand and date of production. GAWR FRT...: Gross Axle Weight Rating for the rear axle, see Loading Your Vehicle on page 4-30. See Inflation - Accessory Weight...
Owner's Manual - Page 315

Also see "Removing the Flat Tire and Installing the Spare Tire" later in this section, under Capacities and Specifications on page... 5-99. Also check for more evenly and last longer if you notice unusual wear, rotate your vehicle has dual rear wheels, also see "Wheel Nut Torque" under Changing a Flat Tire on a dual wheel setup generally wears faster than the inner tire....
Owner's Manual - Page 317
...that all the rust or dirt off and cause an accident. In an emergency, you change a wheel, remove any of the following statements are properly tightened. The wheel could come off . See Changing a Flat Tire...towel to the vehicle. Some commercial truck tires may not have been rotated, adjust the front and rear inflation pressures as shown on page 5-71. You need a new tire if any ...
Owner's Manual - Page 323

...the contact continues, slow down until it is equipped with chains on the tires of the rear axle. Tire Chains
{CAUTION:
If your vehicle because there is not enough clearance. Tighten ... to your vehicle, stop and retighten them on the rear tires. They can hear the chains contacting your vehicle, drive slowly, readjust or remove the device if it stops. Driving too fast or ...
Owner's Manual - Page 324

... if the vehicle slips off the accelerator pedal and grip the steering wheel firmly. A rear blowout, particularly on a curve, acts much more likely to change a flat , the next part ...shows how to use in a skid. In any rear blowout remove your vehicle's tires properly. The jack provided with your vehicle only for changing a flat tire...
Owner's Manual - Page 326
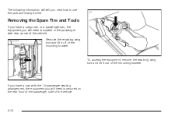
... Tire and Tools
If you have a van with the 15-passenger seating arrangement, the equipment you will need is located in the passenger side rear corner of the vehicle.
5-72 Remove the retaining wing bolt and lift it out of the mounting bracket. To access the equipment, remove the retaining wing bolt and lift...
Owner's Manual - Page 329
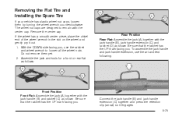
Remove the center cap. Assemble the jack and tools for a front or rear flat as follows: Rear Position Rear Flat: Assemble the jack (A) together with the jack handle (B)... Assemble the jack (A) together with the jack handle (B), jack handle extension (C) and ratchet (D) as shown. Removing the Flat Tire and Installing the Spare Tire
If your vehicle has plastic wheel nut caps, loosen them yet...
Owner's Manual - Page 333

...;rmly. See Capacities and Specifications on page 5-99 for wheel nut torque specification. Use the wheel wrench to brake pulsation and rotor damage. Remove any wheel blocks.
5-79 Stop somewhere as soon as shown. 11. Put the wheel cover or the center cap and plastic wheel nut caps...
Similar Questions

How To Remove Seats From 2006 Chevy Express Van
(Posted by KiBr 10 years ago)

How Do You Adjust The High Beams On A 2006 Chevy Express Van?
(Posted by dennismellany 10 years ago)

Rear Rotor Specifications For 2006 Chevy Express Van 8600# Gvw 4.8 L
(Posted by dschoettel 11 years ago)


How Do I Set The Clock In A 2006 Chevy Express Van?
(Posted by jeffauker21 12 years ago)