2001 Chevrolet Blazer Support Question
2001 Chevrolet Blazer Support Question
Find answers below for this question about 2001 Chevrolet Blazer.Need a 2001 Chevrolet Blazer manual? We have 1 online manual for this item!
Question posted by Bevan152 on March 14th, 2013
Front Hub Assembly
The person who posted this question about this Chevrolet automobile did not include a detailed explanation. Please use the "Request More Information" button to the right if more details would help you to answer this question.
Current Answers
Related Manual Pages
Owner's Manual - Page 38
... range of conditions, including off -road driving.
1-26 Inflation is about 9 to 16 mph (14 to 26 km/h). Don't put anything on the steering wheel hub or on rough terrain. The air bag will inflate only if the impact speed is above or below this range. See "Off-Road Driving" in...
Owner's Manual - Page 39

... by safety belts. If you in the vehicle should never be some people may be hot for the right front passenger's bag -- the steering wheel hub for the driver's air bag, or the instrument panel for a short time. The parts of the right front passenger. How does an air bag restrain...
Owner's Manual - Page 214
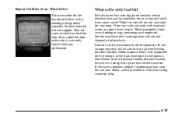
... to indicate that is normal for your dealer (GM Part No. 12344789). If they aren't, they may not operate properly or may appear as the hubs of the tape player. If this message appears on the display, your cassette tape player needs to eject because your tapes and player. Cassette tapes...
Owner's Manual - Page 243
... deep the water is more difficult, and you'll need longer braking distances. On these surfaces, it . If it's deep enough to cover your wheel hubs, axles or exhaust pipe, don't try it will tend to keep your vehicle moving , poor steering and difficult braking can 't accelerate as on safe surfaces...
Owner's Manual - Page 274

...the
engine compartment fuse block. The optional heavy-duty trailer wiring is a six-wire harness assembly. Both harnesses have no connector and should be damaged.
4-58 Be sure you leave it...electrical technician. Trailer Wiring Harness The light-duty trailer wiring is an eight-wire harness assembly. D Brown: Taillamps and parking lamps. The harnesses are stored under the vehicle, ...
Owner's Manual - Page 295
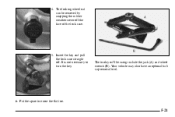
Put the spare tire near the flat tire.
5-21 The tools you'll be removed by snapping the rubber weather cover off . Your vehicle may also have an optional hub cap removal tool.
6. Insert the key and pull the lock case straight off the face of the lock case.
5. It is not necessary to turn the key. 4. The locking wheel nut can be using include the jack (A) and wheel wrench (B).
Owner's Manual - Page 296
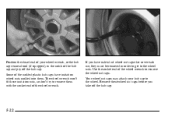
.... Use the socket end of the wheel wrench.
Your wheel nut caps may attach your wheel wrench, or the hub cap removal tool (if equipped), in the notch of the molded plastic hub caps have individual wheel nut caps that cover each nut, they must be removed in order to get to...
Owner's Manual - Page 299

... from the wheel bolts, mounting surfaces and spare wheel. but be turned by hand. If you need to, to which it is held against the hub.
Owner's Manual - Page 304
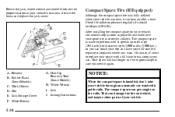
... compact spare is made to perform well at speeds up to 65 mph (105 km/h) for distances up to replace your spare with guide rails. A. Hub Cap Removal Tool (Some Models) H. Of course, it's best to 3,000 miles (5 000 km), so you can lose air after a time. Wheel Wrench I. Jack J. Jacking...
Owner's Manual - Page 322
... oil stay on the ground, into sewers, or into streams or bodies of water. Instead, recycle it by putting it in the steering linkage shield assembly located under the radiator support. Clean your skin and could even cause cancer? Remote Oil Filter (Four-Wheel Drive) The access door for very long...
Owner's Manual - Page 343

... to remove it is tight. 2. Pull the headlamp assembly out. 4. Put the new bulb/socket assembly into the vehicle. 9. Plug in the electrical connector. 8. Headlamps
One-Piece Composite Headlamp System 1. Install the two retaining clips.
6-36 Open the hood.
5. Unplug the ...
Owner's Manual - Page 344

... retaining clips.
2. Plug in the electrical connector. 8. Open the hood.
4. Put the headlamp assembly back into the headlamp assembly and turn it clockwise until it . 6. Turn the bulb/socket assembly counterclockwise to remove it is tight. 7. Pull the headlamp assembly out.
6-37 Two-Piece Composite Headlamp System 1. Remove the black retainer clips by lifting...
Owner's Manual - Page 345

Put the new bulb/socket assembly into the vehicle. 9. Turn the bulb/socket assembly counterclockwise to remove it is tight. 7. Put the headlamp assembly back into the headlamp assembly and turn it clockwise until it . 6. Open the hood.
5. Unplug the electrical connector.
6-38 Plug in the electrical connector. 8. Install the two retaining clips.
2. Remove ...
Owner's Manual - Page 346

... shown under "One-Piece Composite Headlamp System" earlier in this section. 2. Put the headlamp assembly back into the lamp assembly and turn it clockwise until it from the headlamp assembly.
3. Install the two retaining clips. 7. Put the bulb socket into the vehicle. Twist the bulb socket to remove it snaps into the socket...
Owner's Manual - Page 347

... socket until it is tight. 8. Push the new bulb into the vehicle. Then swing the assembly in this section. 2. To reinstall the assembly, snap the outboard end of the assembly out while holding the tabs. Remove the headlamp assembly as shown under "Two-Piece Composite Headlamp System" earlier in and snap it from the...
Owner's Manual - Page 348

... turn the socket clockwise until it . Close the endgate/liftgate.
6-41 Taillamps
1. Push the tab in place. 8. Install the lamp assembly and tighten the screws. 9. Push the new bulb straight into the assembly and turn the socket counterclockwise. 5. Open the endgate/liftgate. 2. Turn the socket counterclockwise to remove it clicks. 7. Remove the...
Owner's Manual - Page 349

... bumping can cause the arm to release it locks into a vertical position. Blade Pivot E. Arm Assembly C. Press down on the blade assembly pivot locking tab. Arm Hook
2.
Blade Assembly B. To remove the old wiper blades, lift the wiper arm until it from the wiper arm hook...Check" in the Index for wear or cracking. NOTICE:
Use care when removing or installing a blade assembly.
Owner's Manual - Page 350

... in Notch 4. The insert has two notches at the opposite end (B). At the notched end, pull the insert from the blade assembly. To install the new wiper insert, slide the insert (D), notched end last, into the end with two blade claws (A). Slide the insert all other claws ...
Owner's Manual - Page 425
.... Part D tells you what to a corrosive environment.
7-44 See "Hydraulic Clutch Fluid" in the clutch reservoir. Body Lubrication Service Lubricate all hood hinges, hood latch assembly, secondary latch, pivots, spring anchor, release pawl, door hinges, fuel door hinge, endgate hinges, outer tailgate handle pivot points, tailgate hinges, tailgate mounted spare tire...
Owner's Manual - Page 432
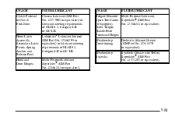
Multi-Purpose Lubricant, SuperlubeR (GM Part No. 12346241 or equivalent). USAGE
FLUID/LUBRICANT
Hood Latch Assembly, Secondary Latch, Pivots, Spring Anchor and Release Pawl Hood and Door Hinges
LubriplateR Lubricant Aerosol (GM Part No. 12346293 or equivalent) or lubricant meeting requirements ...
Similar Questions

On The Back Of A 956 Jimmy Are The Wheels Supposed To Be Flush With The Hub? Om
(Posted by Anonymous-155650 8 years ago)

Is It More Economical To Change The Wholr Hub Assembly Than Just Wheel Bearings
2010 chevy aveo. Drivers side rear.
2010 chevy aveo. Drivers side rear.
(Posted by dionoxendine74 9 years ago)

Replacing The Wheel Hub Assembly On A 2003 Tahoe 4x4
is This A Do It Yoursrlf Pr Shpild I.take It To The Shop
is This A Do It Yoursrlf Pr Shpild I.take It To The Shop
(Posted by jamesnelson74 10 years ago)

Bearing Hub Assembly?
How do I change out my 2005 chevy colorado bearing hub assembly? It's a z71 L's, 2nd front passenger...
How do I change out my 2005 chevy colorado bearing hub assembly? It's a z71 L's, 2nd front passenger...
(Posted by Charliesmith725 10 years ago)

2000 Chevy Blazer Will Not Start After I Replaced Fuel Pump Assembly
My 2000 Chevy blazer will not start after I replaced the fuel pump assembly
My 2000 Chevy blazer will not start after I replaced the fuel pump assembly
(Posted by Tashashaddon88 10 years ago)