Canon PIXMA MX892 Support Question
Canon PIXMA MX892 Support Question
Find answers below for this question about Canon PIXMA MX892.Need a Canon PIXMA MX892 manual? We have 11 online manuals for this item!
Question posted by ddukJWO on December 15th, 2013
Where Is Model Serial Number Canon Pixma Mx512
The person who posted this question about this Canon product did not include a detailed explanation. Please use the "Request More Information" button to the right if more details would help you to answer this question.
Current Answers
Related Canon PIXMA MX892 Manual Pages
Guide for Printer Setup for Network - Page 3
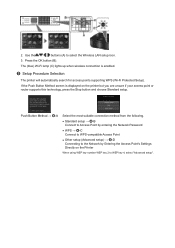
... technology, press the Stop button and choose Standard setup. The (blue) Wi-Fi lamp (C) lights up when wireless connection is displayed on the Printer
When using WEP key number WEP key 2 to WEP key 4, select "Advanced setup". Press the OK button (B).
Push Button Method → d-A
Select the most suitable connection method from...
Guide for Printer Setup for Network - Page 16
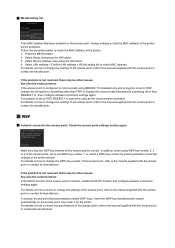
... the access point settings and try again. If using WEP key number 2, 3 or 4 of the access point, set to use WEP key number 1, or select a WEP key number by entering wireless connection settings of the printer directly. For details on the printer. If encryption is correct. WLAN setting list
If the MAC address fi...
Guide for Printer Setup for Network - Page 21
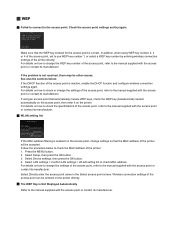
... access point, refer to the manual supplied with the access point or contact its manufacturer.
For details on how to change the WEP key number of the printer directly. See also the sections below to the manual supplied with the access point or contact its manufacturer. WLAN setting list
If the...
Guide for Printer Setup for Network - Page 22

...Select IPv4, then press the OK button. 8. In addition, make sure that the selected WEP key number and entered WEP key are correct. Select Yes, then press the OK button. 9. When the setup... is inactive, enable the DHCP function or specify the IP address (IPv4 only) of the printer and configure wireless connection settings again. Press the MENU button (A).
2. The ...
MX890 series Specifications - Page 1
...800 X 600
XGA 1024 X 768
• A computer with the Canon inkjet printer before upgrading from Mac OS X 10.6 to change without notice. About... Consumables Consumables (ink tanks / FINE Cartridges) are available for 5 years after every 20 transactions) Sequential broadcasting (max. 101 destinations) Rejected numbers...
MX890 series Especificaciones [Spanish Version] - Page 1

....
• Windows: Uninstall software bundled with the Canon inkjet printer before upgrading from Mac OS X 10.6 to 0....printer.
PRINTED IN XXXXXXXX
Transfer speed (Standard value):
IEEE802.11n: max. 150 Mbps IEEE802.11g: max. 54 Mbps IEEE802.11b: max. 11 Mbps * These values are available for 5 years after every 20 transactions) Sequential broadcasting (max. 101 destinations) Rejected numbers...
Setup Guide - Page 4
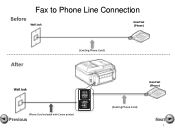
Fax to Phone Line Connection
Before
Wall Jack
Hand Set (Phone)
After
Wall Jack
(Existing Phone Cord)
Hand Set (Phone)
(Phone Cord included with Canon printer)
Previous
(Existing Phone Cord)
Next
4
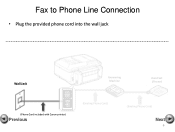
Setup Guide - Page 5
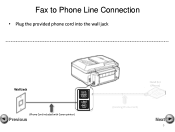
Fax to Phone Line Connection
• Plug the provided phone cord into the wall jack
Wall Jack
(Phone Cord included with Canon printer)
Previous
Hand Set (Phone)
(Existing Phone Cord)
Next
5
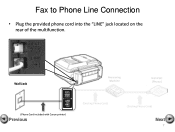
Setup Guide - Page 6
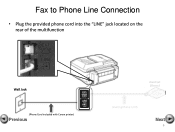
Fax to Phone Line Connection
• Plug the provided phone cord into the "LINE" jack located on the rear of the multifunction
Wall Jack
(Phone Cord included with Canon printer)
Previous
Hand Set (Phone)
(Existing Phone Cord)
Next
6
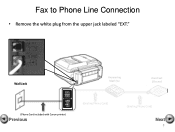
Setup Guide - Page 7
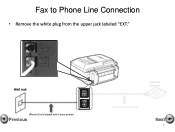
Fax to Phone Line Connection
• Remove the white plug from the upper jack labeled "EXT." Wall Jack
(Phone Cord included with Canon printer)
Previous
Hand Set (Phone)
(Existing Phone Cord)
Next
7
Setup Guide - Page 8

jack located on the rear of the multifunction
Wall Jack
(Phone Cord included with Canon printer)
Previous
Hand Set (Phone)
(Existing Phone Cord)
Next
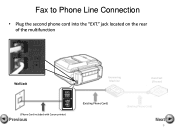
8 Fax to Phone Line Connection
• Plug the second phone cord into the "EXT."
Setup Guide - Page 9
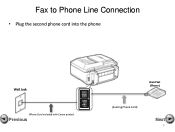
Fax to Phone Line Connection
• Plug the second phone cord into the phone
Wall Jack
(Phone Cord included with Canon printer)
Previous
Hand Set (Phone)
(Existing Phone Cord)
Next
9
Setup Guide - Page 5
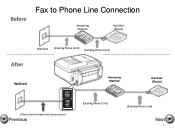
Before
Fax to Phone Line Connection
Answering Machine
Hand Set (Phone)
Wall Jack (Existing Phone Cord) (Existing Phone Cord)
After
Wall Jack
Answering Machine
Hand Set (Phone)
(Phone Cord included with Canon printer)
Previous
(Existing Phone Cord)
(Existing Phone Cord)
Next
5
Setup Guide - Page 6
Fax to Phone Line Connection
• Plug the provided phone cord into the wall jack
Wall Jack
Answering Machine
Hand Set (Phone)
(Phone Cord included with Canon printer)
Previous
(Existing Phone Cord)
(Existing Phone Cord)
Next
6
Setup Guide - Page 7
Fax to Phone Line Connection
• Plug the provided phone cord into the "LINE" jack located on the rear of the multifunction.
Wall Jack
Answering Machine
Hand Set (Phone)
(Phone Cord included with Canon printer)
Previous
(Existing Phone Cord)
(Existing Phone Cord)
Next
7
Setup Guide - Page 8
Fax to Phone Line Connection
• Remove the white plug from the upper jack labeled "EXT." Wall Jack
Answering Machine
Hand Set (Phone)
(Phone Cord included with Canon printer)
Previous
(Existing Phone Cord)
(Existing Phone Cord)
Next
8
Setup Guide - Page 9
jack located on the rear of the multifunction
Wall Jack
Answering Machine
Hand Set (Phone)
(Phone Cord included with Canon printer)
Previous
(Existing Phone Cord)
(Existing Phone Cord)
Next
9 Fax to Phone Line Connection
• Plug the second phone cord into the "EXT."
Setup Guide - Page 10
Wall Jack
Answering Machine
Hand Set (Phone)
(Phone Cord included with Canon printer)
Previous
(Existing Phone Cord)
(Existing Phone Cord)
Next
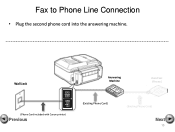
10 Fax to Phone Line Connection
• Plug the second phone cord into the answering machine.
Setup Guide - Page 11
Wall Jack
Answering Machine
Hand Set (Phone)
(Phone Cord included with Canon printer)
Previous
(Existing Phone Cord)
(Existing Phone Cord)
Next
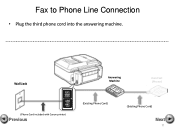
11 Fax to Phone Line Connection
• Plug the third phone cord into the answering machine.
Setup Guide - Page 12

Fax to Phone Line Connection
• Plug the third phone cord into the phone. Wall Jack
Answering Machine
Hand Set (Phone)
(Phone Cord included with Canon printer)
Previous
(Existing Phone Cord)
(Existing Phone Cord)
Next
12
Similar Questions

Where To Find Model Serial Number Of Canon Printer Mx892
(Posted by Megran 9 years ago)

Where Is The Model Serial Number On Canon Printer Mx892
(Posted by yoldeewt 9 years ago)
Where Is The Model Serial Number On The Canon Pixma Mx892 Printer
(Posted by dondMPL 9 years ago)

Where Do I Find My Model Serial Number On Canon Printer Pixma Mx360
(Posted by brainsteven 9 years ago)

Serial Number Pixma Mx472
Where is the serial number located on the canon pixma MX472 printer
Where is the serial number located on the canon pixma MX472 printer
(Posted by victoriadefrancesco 10 years ago)