
Canon PIXMA MX712 Support Question
Canon PIXMA MX712 Support Question
Find answers below for this question about Canon PIXMA MX712.Need a Canon PIXMA MX712 manual? We have 8 online manuals for this item!
Question posted by sureRohit0 on March 22nd, 2014
How To Pair My Canon Pixma To Router Using Wps Button
The person who posted this question about this Canon product did not include a detailed explanation. Please use the "Request More Information" button to the right if more details would help you to answer this question.
Current Answers
Related Canon PIXMA MX712 Manual Pages
Guide for Printer Setup for Network - Page 1
... Guide
This guide provides information for setting up a network connection for Connection Cable Connection Printer Setup
Character Entry
Troubleshooting
Network Connection
Wireless Connection Preparation for Connection Printer Setup Setup Procedure Selection
Push Button Method Standard setup WPS Other setup (Advanced setup)
Disable WEP WPA/WPA2
Wired Connection Preparation for the printer.
Guide for Printer Setup for Network - Page 2
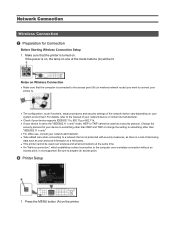
... that is not protected with security measures, as there is a risk of the mode buttons (A) will be used over wireless and wired connections at the same time. • An "Ad-hoc connection... connected to the access point (A) (or wireless network router) you want to connect your printer to.
• The configuration, router functions, setup procedures and security settings of your network ...
Guide for Printer Setup for Network - Page 3
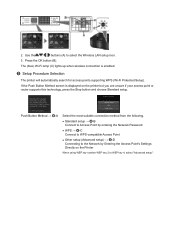
... you are unsure if your access point or router supports this technology, press the Stop button and choose Standard setup. If the Push Button Method screen is enabled. Use the
buttons (A) to WEP key 4, select "Advanced setup". c Setup Procedure Selection
The printer will automatically search for access points supporting WPS (Wi-Fi Protected Setup).
The (blue) Wi...
Guide for Printer Setup for Network - Page 4
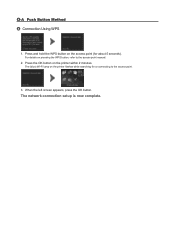
... Using WPS
1.
The network connection setup is now complete. Press the OK button on the access point (for or connecting to the access point manual.
2.
The (blue) Wi-Fi lamp on pressing the WPS button, refer to the access point.
3. For details on the printer flashes while searching for about 5 seconds). Press and hold the WPS button...
Guide for Printer Setup for Network - Page 5
....
9. Press the OK button.
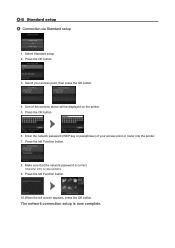
6. Character entry is correct. d-B Standard setup d Connection via Standard setup
1. One of your access point, then press the OK button.
4. The network connection setup is now complete. Press the OK button.
3. Select Standard setup. 2.
Select your access point or router into the printer. 7.
Press the left Function button.
10.When the left...
Guide for Printer Setup for Network - Page 6
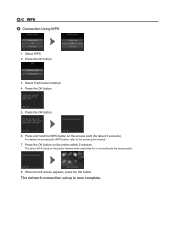
... WPS button on the printer flashes while searching for about 5 seconds). Press the OK button on pressing the WPS button, refer to the access point.
8. When the left screen appears, press the OK button.
Select WPS. 2.
The (blue) Wi-Fi lamp on the access point (for or connecting to the access point manual.
7. Select Push button method. 4. d-C WPS d Connection Using WPS...
Guide for Printer Setup for Network - Page 10
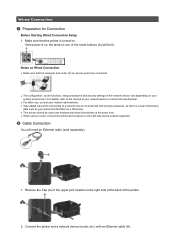
... information to a network that the printer is a risk of the mode buttons (A) will need an Ethernet cable (sold separately).
1. Connect the printer and a network device (router, etc.) with security measures, as...there is turned on the right side at the same time. • When using a router, connect the printer and computer to the LAN side (same network segment). For details, refer to...
Guide for Printer Setup for Network - Page 11
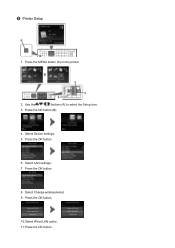
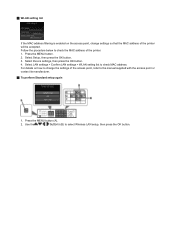
Select Change wireless/wired. 9. Press the OK button.
10.Select Wired LAN active. 11. Use the
buttons (A) to select the Setup icon.
3. Press the OK button.
6. Press the OK button. Press the OK button (B).
4. Press the MENU button (A) on the printer.
2. Select Device settings. 5. Select LAN settings. 7. Press the OK button.
8. c Printer Setup
1.
Guide for Printer Setup for Network - Page 13
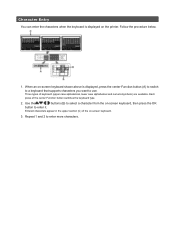
...an on-screen keyboard shown above is displayed on -screen keyboard, then press the OK
button to enter more characters. Entered characters appear in the upper section (C) of keyboard (upper ... press of the center Function button switches the keyboard type.
2.
Repeat 1 and 2 to enter it. Use the
buttons (B) to select a character from the on the printer. Character Entry
You can enter...
Guide for Printer Setup for Network - Page 14
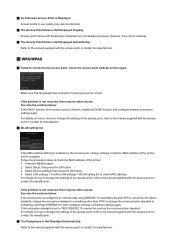
... of your access point or router. • Are the computer and network device configured? • Is the network device turned on the printer to search for the access point, refer to use multiple access points? Do you have only one AccessPoint only, then press the OK button. Select Directly enter the access...
Guide for Printer Setup for Network - Page 16
... there may be used as the communication standard. Select Setup, then press the OK button. 3. Select Device settings, then press the OK button. 4.
If using WEP key number 2, 3 or 4 of the printer will be other...is correct. For details on how to change the settings of the printer directly. If encryption is set to use WEP key number 1, or select a WEP key number by entering wireless...
Guide for Printer Setup for Network - Page 17
Press the MENU button. 2. Use the
buttons (B) to check MAC address. For details on the access point, change the settings of the... press the OK button. 3. Press the MENU button (A).
2. Select Device settings, then press the OK button. 4. WLAN setting list
If the MAC address filtering is enabled on how to change settings so that the MAC address of the printer will be accepted...
Guide for Printer Setup for Network - Page 18
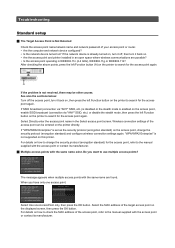
... was not completed within the specified time. Wait for a while, then configure WPS settings again. The screen appears when an error occurs.
Press the WPS button on how to check the settings of the access point, refer to the manual supplied with the access point or contact its manufacturer...
Guide for Printer Setup for Network - Page 19

... SSID broadcast (connection via "ANY" SSID, etc.) or disable the stealth mode, then press the left Function button (A) on the printer directly. After checking the above points, press the left Function button on this printer.
Do you have only one AccessPoint only, then press the OK button. When using multiple access points. Select Use one access point.
Guide for Printer Setup for Network - Page 20
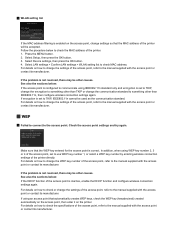
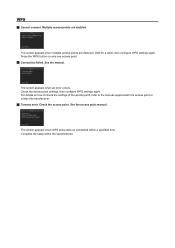
... or contact its manufacturer. An Unknown Access Point is Displayed Access points in use nearby may be other causes. Check the access point settings and try again.
If the... access point, refer to check the MAC address of the printer will be accepted. Press the MENU button. 2. Select Device settings, then press the OK button. 4. Select LAN settings > Confirm LAN settings ...
Guide for Printer Setup for Network - Page 22
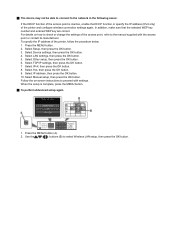
... specify the IP address (IPv4 only) of the access point is complete, press the MENU button.
To perform Advanced setup again
1. Use the
buttons (B) to the network in the following cases:
If the DHCP function of the printer and configure wireless connection settings again. The device may not be able...
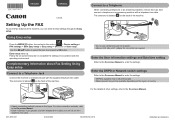
Setting Up the FAX - Page 1

... starts up.
Connect to complete the settings in Europe: If you can enter the fax settings through the Easy setup.
QT5-4896-V01
XXXXXXXX
©CANON INC.2012
PRINTED IN XXXXXXXX
The connector is a 6-wire telephone line cable. Use the []{} button to enter the settings.
MX710 series Specifications - Page 1
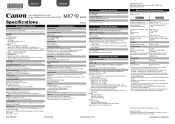
...NET) WPS (Push button configuration/PIN code method) Other Features: Administration password
QT5-4880-V01
XXXXXXXX
©CANON INC.... A computer that complies with Hi-Speed USB standard is not used at USB 1.1. *2 Maximum speed: 1.44 Mbps *3 JPEG/...pre-installed.
• Windows: Uninstall software bundled with the Canon inkjet printer before upgrading from Mac OS X 10.6 to install EasyWebPrint ...
Configuraci?n del FAX [Spanish Version] - Page 1
...the on the back of the machine. The connector is a 6-wire telephone line cable. Use the []{} button to enter the settings. Complementary Information about Fax Setting Using Easy setup
Connect to a Telephone Jack
Connect the machine to a Telephone
When connecting a... On-screen Manual to select the item, then press the OK button. QT5-4896-V01
XXXXXXXX
©CANON INC.2012
PRINTED IN XXXXXXXX
MX710 series Especificaciones [Spanish Version] - Page 1

.... Since the Hi-Speed USB interface is not used.
• Windows: Operation can be installed to...printer.
One Canon Plaza, Lake Success, NY 11042 U.S.A.
Security: WEP (64/128 bits) WPA-PSK (TKIP/AES) WPA2-PSK (TKIP/AES) Setup: Standard setup WCN (WCN-UFD/WCN-NET) WPS (Push button configuration/PIN code method) Other Features: Administration password
QT5-4880-V01
XXXXXXXX
©CANON...
Similar Questions

Where Is The Wps Button On My Router To Setup Canon Pixma Mx712
(Posted by thehk 10 years ago)

How To Install Printer Using Wps Button On A Pixma Mg3100
(Posted by jhkrtwst 10 years ago)


Canon Printer 3122 How To Connect To Wi-fi Without Using Wps Button
(Posted by Abrojm 10 years ago)