
Canon PIXMA MX360 Support Question
Canon PIXMA MX360 Support Question
Find answers below for this question about Canon PIXMA MX360.Need a Canon PIXMA MX360 manual? We have 5 online manuals for this item!
Question posted by Anonymous-56125 on April 9th, 2012
Set Up Cd Rom Is Lost
I need to redownload my cd rom for my printer, i cant find it so im tryin to download it from online..
Current Answers
Answer #1: Posted by bargeboard on June 26th, 2012 9:01 AM
bargeboard

Member since:
May 18th, 2012 Points: 1,201,715

Member since:
May 18th, 2012 Points: 1,201,715
You can find the drivers and software to install at the Canon support site here:
http://www.usa.canon.com/cusa/support/consumer/printers_multifunction/pixma_mx_series/pixma_mx360#DriversAndSoftware
Choose your operating system from the drop down menus and then click "show all" to see the available downloads.
http://www.usa.canon.com/cusa/support/consumer/printers_multifunction/pixma_mx_series/pixma_mx360#DriversAndSoftware
Choose your operating system from the drop down menus and then click "show all" to see the available downloads.
Related Canon PIXMA MX360 Manual Pages
MX360 series Getting Started - Page 31
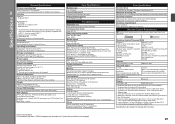
... a pitch of hard disk space may not be available with the Canon inkjet printer before upgrading from Windows Vista to change without notice. Specifications are available for standby...printing only. Weight Approx. 8.5 kg (Approx. 18.7 lb) * With the FINE Cartridges installed.
CD-ROM Drive
Required
Required
Display
SVGA 800 x 600
XGA 1024 x 768
• Windows: Operation can be ...
Selecting Best Receive Mode - Page 7
..." & "DRPD Mode" information
Click here if the options above do not meet your phone provider and set the MX360 to "DRPD Mode".
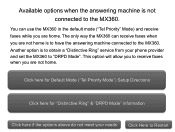
Available options when the answering machine is to obtain a "Distinctive Ring" service from your needs
Click Here to Restart You can receive faxes when you are home. This option will allow...
Selecting Best Receive Mode - Page 9
... from your needs
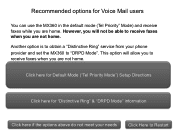
Click Here to receive faxes when you are not home. This option will not be able to Restart Click here for Default Mode ("Tel Priority Mode") Setup Directions
Click here for Voice Mail users
You can use the MX360 in the ..." & "DRPD Mode" information
Click here if the options above do not meet your phone provider and set the MX360 to receive faxes when you are home.
Selecting Best Receive Mode - Page 10
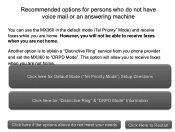
However, you will allow you to receive faxes when you phone provider and set the MX360 to obtain a "Distinctive Ring" service from you are not home.
Recommended options for "Distinctive Ring" & ... Mode ("Tel Priority Mode") Setup Directions
Click here for persons who do not meet your needs
Click Here to Restart This option will not be able to receive faxes when you are home.
Setting Default Mode - Page 1
Setting Up Your MX360 or MX410 In Default Mode (Tel Priority Mode)
With An Answering Machine
Next
Setting Default Mode - Page 4
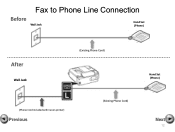
Before
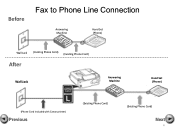
Fax to Phone Line Connection
Answering Machine
Hand Set (Phone)
Wall Jack (Existing Phone Cord) (Existing Phone Cord)
After
Wall Jack
Answering Machine
Hand Set (Phone)
(Phone Cord included with Canon printer)
Previous
(Existing Phone Cord)
(Existing Phone Cord)
Next
4
Setting Default Mode - Page 5

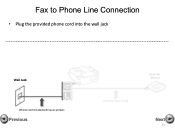
Fax to Phone Line Connection
• Plug the provided phone cord into the wall jack
Wall Jack
Answering Machine
Hand Set (Phone)
(Phone Cord included with Canon printer)
Previous
(Existing Phone Cord)
(Existing Phone Cord)
Next
5
Setting Default Mode - Page 6
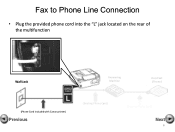
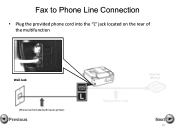
Fax to Phone Line Connection
• Plug the provided phone cord into the "L" jack located on the rear of the multifunction
Wall Jack
Answering Machine
Hand Set (Phone)
(Phone Cord included with Canon printer)
Previous
(Existing Phone Cord)
(Existing Phone Cord)
Next
6
Setting Default Mode - Page 7
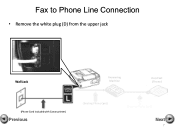
Fax to Phone Line Connection
• Remove the white plug (D) from the upper jack
Wall Jack
Answering Machine
Hand Set (Phone)
(Phone Cord included with Canon printer)
Previous
(Existing Phone Cord)
(Existing Phone Cord)
Next
7
Setting Default Mode - Page 8
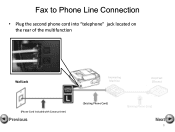
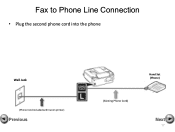
Fax to Phone Line Connection
• Plug the second phone cord into "telephone" jack located on the rear of the multifunction
Wall Jack
Answering Machine
Hand Set (Phone)
(Phone Cord included with Canon printer)
Previous
(Existing Phone Cord)
(Existing Phone Cord)
Next
8
Setting Default Mode - Page 9
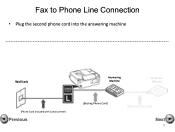
Fax to Phone Line Connection
• Plug the second phone cord into the answering machine
Wall Jack
Answering Machine
Hand Set (Phone)
(Phone Cord included with Canon printer)
Previous
(Existing Phone Cord)
(Existing Phone Cord)
Next
9
Setting Default Mode - Page 10
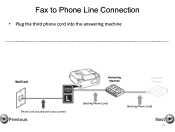
Fax to Phone Line Connection
• Plug the third phone cord into the answering machine
Wall Jack
Answering Machine
Hand Set (Phone)
(Phone Cord included with Canon printer)
Previous
(Existing Phone Cord)
(Existing Phone Cord)
Next
10
Setting Default Mode - Page 11
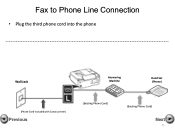
Fax to Phone Line Connection
• Plug the third phone cord into the phone
Wall Jack
Answering Machine
Hand Set (Phone)
(Phone Cord included with Canon printer)
Previous
(Existing Phone Cord)
(Existing Phone Cord)
Next
11
Setting Default Mode - Page 12
Fax to Phone Line Connection
Before
Wall Jack
Hand Set (Phone)
After
Wall Jack
(Existing Phone Cord)
(Phone Cord included with Canon printer)
Previous
(Existing Phone Cord)
Hand Set (Phone)
Next
12
Setting Default Mode - Page 13
Fax to Phone Line Connection
• Plug the provided phone cord into the wall jack
Wall Jack
(Phone Cord included with Canon printer)
Previous
(Existing Phone Cord)
Hand Set (Phone)
Next
13
Setting Default Mode - Page 14
Fax to Phone Line Connection
• Plug the provided phone cord into the "L" jack located on the rear of the multifunction
Wall Jack
(Phone Cord included with Canon printer)
Previous
(Existing Phone Cord)
Hand Set (Phone)
Next
14
Setting Default Mode - Page 15

Fax to Phone Line Connection
• Remove the white plug (D) from the upper jack. Wall Jack
(Phone Cord included with Canon printer)
Previous
(Existing Phone Cord)
Hand Set (Phone)
Next
15
Setting Default Mode - Page 16

Fax to Phone Line Connection
• Plug the second phone cord into the "telephone" jack located on the rear of the multifunction
Wall Jack
(Phone Cord included with Canon printer)
Previous
(Existing Phone Cord)
Hand Set (Phone)
Next
16
Setting Default Mode - Page 17
Fax to Phone Line Connection
• Plug the second phone cord into the phone
Wall Jack
(Phone Cord included with Canon printer)
Previous
(Existing Phone Cord)
Hand Set (Phone)
Next
17
Fax Setup Guide - Page 7
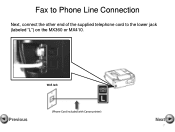
Fax to Phone Line Connection
Next, connect the other end of the supplied telephone cord to the lower jack (labeled "L") on the MX360 or MX410. Wall Jack
Previous
(Phone Cord included with Canon printer)
Next
7
Similar Questions

I Am Trying To Set Up My New Printer. After I Have Installed The Ink Cartridges
I am trying to set up my new printer. After I have installed the ink cartridges, (they are all lit u...
I am trying to set up my new printer. After I have installed the ink cartridges, (they are all lit u...
(Posted by chow209 7 years ago)

Lost My Canon Mx360 Setup Software & User's Guide Cd-rom Can I Download It
(Posted by jdrobe 9 years ago)


Lost Cd Rom From Mx360. Need To Reload On Computer. What Can I Do?
(Posted by texomaknight 10 years ago)

I Lost My Pixma Mx432 Setup Software Cd And Want To Reinstall On My Computer
I lost my pixma MX432 setup software CD and need to reinstall it on my computer(s).Is it possible to...
I lost my pixma MX432 setup software CD and need to reinstall it on my computer(s).Is it possible to...
(Posted by burydenise 11 years ago)