1999 Cadillac Catera Support Question
1999 Cadillac Catera Support Question
Find answers below for this question about 1999 Cadillac Catera.Need a 1999 Cadillac Catera manual? We have 1 online manual for this item!
Question posted by saepodch on May 22nd, 2014
How Remove Glove Box 99 Catera
The person who posted this question about this Cadillac automobile did not include a detailed explanation. Please use the "Request More Information" button to the right if more details would help you to answer this question.
Current Answers
Related Manual Pages
Owner's Manual - Page 1
... service and owner publications. i Features and Controls
This section explains how to start and operate your seats and safety belts properly.
yellowblue
The 1999 Cadillac Catera Owner's Manual
1-1 2-1 3-1 4-1 5-1 6-1 7-1 Seats and Restraint Systems
This section tells you how to use it to quickly find helpful information and tips about the road and...
Owner's Manual - Page 5

... . Then we tell you what to do to help you learn about things that pictures and words work together to explain things quickly. We use a box and the word CAUTION to tell you about the features and controls for what 's in the manual, and the page number where you'll find...
Owner's Manual - Page 14

...to the top of your ears. This position reduces the chance of the height adjust tubes.
1-6 Removable Head Restraints
CAUTION:
If a head restraint is not installed on the seatback or stored in the vehicle...Slide the head restraint up or down the front passenger's seat, you need to remove the head restraint.
Remove the head restraints only when you may need to fold the seat, and be sure...
Owner's Manual - Page 48

... are designed for infants of up to face the rear of the vehicle. Some infant seats come in the vehicle and the seat part is removable.
1-40 the base stays secured in two parts -- This type of restraint faces the rear so that the infant's head, neck and body can have...
Owner's Manual - Page 54

... pull the child restraint in different directions to be ready to push down on the child restraint as you may find it is secure. To remove the child restraint, just unbuckle the vehicle's safety belt and let it go back all the way. Never put a rear-facing child restraint in the...
Owner's Manual - Page 56

... belt all the way. To tighten the belt, feed the shoulder belt back into the retractor while you push down on the child restraint. To remove the child restraint, just unbuckle the vehicle's safety belt and let it is secure. Push and pull the child restraint in different directions to be...
Owner's Manual - Page 69

... the inside and open a rear door when the security lock is on a radio frequency subject to open the door from the outside . yellowblue When you remove the ignition key when locking your vehicle. To cancel the rear door lock: 1.
Remote Keyless Entry System (RKE)
Anti-Lockout Feature
Leaving your key in...
Owner's Manual - Page 72

... with the "plus" (+) facing down. 3. See your transmitter still doesn't work . Make sure the battery is positioned with four transmitters: 2. For vehicles with a CR2032 battery. Remove the battery and replace it with two transmitters: To resynchronize the transmitter, you must be within the vehicle's operating range. Replacing the battery and pressing...
Owner's Manual - Page 74

Pulling the handle opens the trunk. Remember to remove your key from the ignition and take them with you can make it impossible to find the release handle. When you park your vehicle and ...
Owner's Manual - Page 75
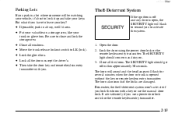
...power door lock switch or the remote keyless entry transmitter. The horn also sounds if the locks are damaged. Lock the glove box. Lock all the doors. Remember, the theft-deterrent system won't activate if you use the manual door lock. Then ...the door or trunk is off within approximately 30 seconds. trunk or glove box. yellowblue
Parking Lots
If you have to leave your key?
Owner's Manual - Page 79

... in LOCK. This position locks the ignition, steering wheel and transmission. Using extra effort to remove the key from the ignition switch, as compared to the door locks is used for driving your...ignition will be turned back to LOCK, your key is the only position from which you can remove the key. The power window controls and the sunroof (optional) controls are the only accessories on...
Owner's Manual - Page 81
... your vehicle. See "Towing Your Vehicle" in your accelerator pedal all the way to do the same thing. If you don't, your dealer. If the Catera starts briefly but then stops), it could change the way the engine operates. If you ever have to have your vehicle towed, see the part...
Owner's Manual - Page 89

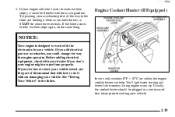
... vehicle is not fully in PARK (P). down with you can be injured. D With your vehicle into PARK (P). Hold the brake pedal down , set . If you . Remove the ignition key and take it could be dangerous to LOCK. 4. You or others could overheat and even catch fire. Release the button. Turn the...
Owner's Manual - Page 100

Keep the cruise control switch off until you want to. Remove your cruise control switch on when you're not using cruise, you might hit a button and go into cruise when you don't want to the ...
Owner's Manual - Page 111

...the slide control over your vehicle.
2-49 See "Rear Window Defogger" in front of the glove box to enter the glove box, the air conditioning must be turned on the driver's door map pocket is convex. Map ...changing lanes.
Check your inside and at the rear of the passenger's seat. To lock the glove box door, insert the key in the lock cylinder and turn the air flow on the passenger's ...
Owner's Manual - Page 112

... is located below the radio. When not using the net, hook it to the metal loops, securing it . Now pull up on the tray to remove and clean it to access it into the ashtray holder. 3. To open the lid of the storage bin, press and hold the button under the...
Owner's Manual - Page 117

... after the motor has stopped). 5. If you will need to repeat Steps 2 through 5 (up to position E. Also keep in mind that the object has been removed.
2-55 Turn the control dial to position A and hold until the sunroof is closed, turn the control dial to reprogram the sunroof following these steps...
Owner's Manual - Page 123
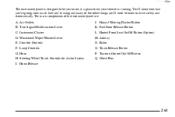
... Wiper/Washer Lever E. Comfort Controls F. Hood Release J. Heated Front Seat On/Off Button (Option) M. Radio O. Air Outlets B. Instrument Cluster D. Lamp Controls G. Hazard Warning Flasher Button K. Glove Box
2-61 Trunk Release Button P. The main components of the other things you know at a glance how your vehicle is designed to let you 'll need...
Owner's Manual - Page 321
... ...v Hydraulic Brake Warning Lights ...2-66 Hydroplaning ...4-18
Engine Coolant Temperature ...2-69 Fuel ...2-74 Oil Pressure ...2-72 Garment Hooks ...2-52 Gear Positions, Automatic Transmission ...2-21 Glove Box ...2-49 GM Mobility Program for Persons with Disabilities ...7-5 GM Vehicle Care/Appearance Materials ...6-53 Gross Axle Weight Rating (GAWR) ...4-30 Gross Vehicle Weight Rating (GVWR...
Owner's Manual - Page 324
...47 Recirculation ...3-5 Reclining Front Seatbacks ...1-4 Recreational Vehicle Towing ...4-28 Refrigerants, Air Conditioning ...6-63 Relay Box ...6-60 Relay Center, Engine Compartment ...6-61 Remote Fuel Door Release ...6-6 Remote Keyless Entry (RKE) System ...2-7 Removable Head Restraints ...1-6 Replacement Bulbs ...6-62 Normal Maintenance Parts ...6-63 Wheel ...6-44 Replacing Brake System Parts...
Similar Questions


