Brother International XL 5500 Support Question
Brother International XL 5500 Support Question
Find answers below for this question about Brother International XL 5500 - 42 Stitch Sewing Machine.Need a Brother International XL 5500 manual? We have 1 online manual for this item!
Question posted by Jakfr on February 25th, 2014
How To Unlock A Sewing Machine
The person who posted this question about this Brother International product did not include a detailed explanation. Please use the "Request More Information" button to the right if more details would help you to answer this question.
Current Answers
Related Brother International XL 5500 Manual Pages
Users Manual - English - Page 2

...area, such as a toy. This sewing machine is intended for examination, repair, or electrical or mechanical adjustment.
4.
To reduce the risk of the machine and foot controller free from all ...openings blocked. Do not pull or push fabric while stitching. It may deflect the needle, causing it .
2. SAVE THESE INSTRUCTIONS This machine is not intended for its intended use .
1 ...
Users Manual - English - Page 4

... YOUR SEWING MACHINE 6
Connecting Plugs ...6 Main Power/Sewing Light Switch ...7 Foot Controller ...7 Inserting the Needle ...7 Checking the Needle ...8 Changing the Presser Foot ...8 Converting to Free-arm Style ...9 Steadying the Machine ...9
THE CONTROLS ...10
Pattern Selection Dial ...10 Recommended Widths and Lengths for Stitches 11 Stitch Length Dial ...13 Stretch Stitching ...13 Stitch...
Users Manual - English - Page 5

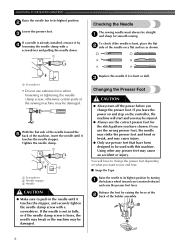
... lowers the presser foot. F Main power/sewing light switch (page 7) You can turn this in the foot controller plug and connect the machine to the power supply. KNOWING YOUR SEWING MACHINE
PRINCIPAL PARTS
1 Bobbin-winding assembly (page 15) This winds the thread onto the bobbin, which you use this to stitch in the reverse direction.
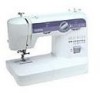
Users Manual - English - Page 9
... an accident or injury. KNOWING YOUR SEWING MACHINE
Raise the needle bar to its highest position by turning 1 the balance wheel toward the 5 back of the machine, insert the needle until it touches ... sewing needle must always be injured.
● Always use the wrong presser foot, the needle may strike the presser foot and bend or break, and may be straight 1 and sharp for the stitch ...
Users Manual - English - Page 11
...SEWING MACHINE
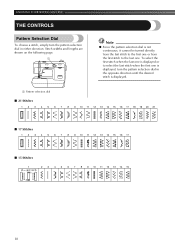
THE CONTROLS
Pattern Selection Dial
To choose a stitch, simply turn the pattern selection dial in either direction. Stitch widths and lengths are shown on the following page.
1
Note
● Since the pattern selection dial is not continuous, it cannot be turned directly from the last stitch... to the first one or from the first stitch to the last one...
Users Manual - English - Page 13
...SEWING MACHINE
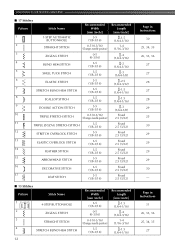
■ 17 Stitches Pattern
1
Stitch Name
1-STEP AUTOMATIC BUTTONHOLE
Recommended Width
[mm (inch)]
3-5 (1/8-3/16)
2
STRAIGHT STITCH
0-5 (0-3/16) (Changes needle position)
3
ZIGZAG STITCH
0-5 (0-3/16)
4
BLIND HEM STITCH
3-5 (1/8-3/16)
5
SHELL TUCK STITCH
3-5 (1/8-3/16)
6
ELASTIC STITCH
3-5 (1/8-3/16)
7
STRETCH BLIND HEM STITCH
3-5 (1/8-3/16)
8
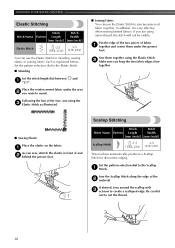
SCALLOP STITCH...
Users Manual - English - Page 14
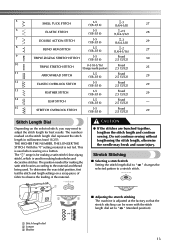
... for best results. CAUTION
● If the stitches are bunched together, lengthen the stitch length and continue sewing. Stretch Stitching
■ Selecting a stretch stitch Setting the stitch length dial to " SS " changes the selected pattern to the material and thread being used.
Do not continue sewing without lengthening the stitch length, otherwise the needle may need to observe...
Users Manual - English - Page 15
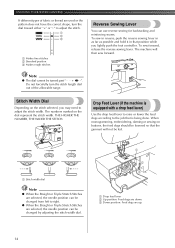
... lever 2 Up position: Feed dogs are down. 3 Down position: Feed dogs are used or the pattern does not have the correct shape, turn the stitch length dial out of the allowable range.
. KNOWING YOUR SEWING MACHINE
If different types of fabric or thread are up.
14 THE HIGHER THE NUMBER, THE WIDER THE...
Users Manual - English - Page 22
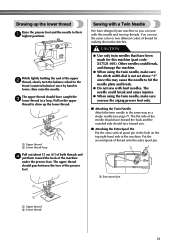
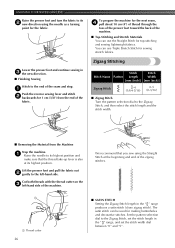
...). The upper thread should pass between the toes of the presser foot.
1
Sewing with a Twin Needle
We have been made for making decorative stitches. The needle could break, and damage the machine.
● When using the twin needle, make sure the stitch width dial is not set above "3" since this needle and two top...
Users Manual - English - Page 23

...stitches.
Locks appear on the surface of the fabric. Using the needle threader may need to adjust it through thread guide 2 Left needle thread passes in a clockwise direction.
Threading the Left Needle 2 Thread the left needle.
2
1
3
■ Possible Problems If the Tension Is Wrong
Upper tension is too loose. KNOWING YOUR SEWING MACHINE... damage the machine. Lower tension...
Users Manual - English - Page 25
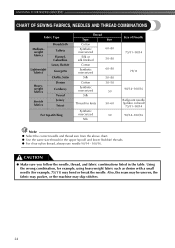
...● For clear nylon thread, always use needle 90/14 - 100/16. KNOWING YOUR SEWING MACHINE
CHART OF SEWING FABRICS, NEEDLES AND THREAD COMBINATIONS
Fabric Type
Mediumweight fabrics
Lightweight fabrics
Heavyweight fabrics
Stretch fabrics
Broadcloth
..., 75/11) may skip stitches.
24
Also, the seam may be uneven, the fabric may pucker, or the machine may bend or break the needle.
Users Manual - English - Page 26
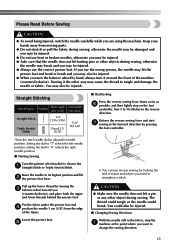
... be injured. ● Always use the correct presser foot. If you are using the machine. Straight Stitching
Stitch Name
Pattern
Stitch Length [mm (inch)]
Stitch Width [mm (inch)]
Straight Stitch
Triple Stretch Stitch
1-4 (1/16-3/16)
Fixed 2.5 (3/32)
5-0* (3/16-0)
■ Backtacking
Press the reverse sewing lever down as far as 6 possible, and then lightly step on the foot
controller...
Users Manual - English - Page 27
... the needle as a turning
point for sewing stretch fabrics. KNOWING YOUR SEWING MACHINE
Raise the presser foot and turn the fabric to its highest position. Lower the presser foot and continue sewing in 3 the new direction. ■ Finishing Sewing
Stitch to the left -hand side of the machine.
■ Top-Stitching and Stretch Materials You can use Triple...
Users Manual - English - Page 29
... presser
foot.
Set the pattern selection dial to mend.
Sew the Scallop Stitch along the edge of fabric together. KNOWING YOUR SEWING MACHINE
Elastic Stitching
Stitch
Stitch
Stitch Name Pattern Length
Width
[mm (inch)] [mm (inch)]
Elastic Stitch
-2.5
3-5
(1/64-3/32) (1/8-3/16)
You can use the Elastic Stitch for decorative edging. Set the pattern selection dial to the...
Users Manual - English - Page 31
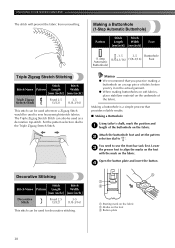
.... Set the pattern selection dial to sew heavyweight stretch fabrics. Stitch
Stitch
2
Stitch Name Pattern Length
Width
[mm (inch)] [mm (inch)]
Decorative Stitch
Fixed 2.5
3-5
(3/32)
(1/8-3/16)
This stitch can be used wherever a Zigzag Stitch would be used to the Triple Zigzag Stretch Stitch. KNOWING YOUR SEWING MACHINE
The stitch will prevent the fabric from unravelling. The...
Users Manual - English - Page 32
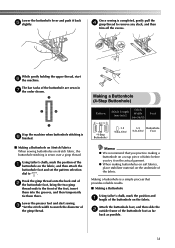
....
The bar tacks of the buttonhole are sewn in 7 the order shown.
3
2
4
1
Stop the machine when buttonhole stitching is completed, gently pull the 4 gimp thread to " ".
PUSH
PUSH
PUSH
While gently holding the upper thread, start sewing. 3 *Set the stitch width to the front of the foot, insert them into the grooves, and then...
Users Manual - English - Page 33
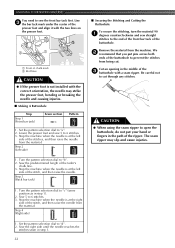
... of the 3 buttonhole with the correct orientation, the needle may slip and cause injuries.
1. Sew the right side until the needle reaches the
stitches sewn in the middle of the stitches, and then raise the needle from the machine. Sew 5 to 6 stitches. 3. We 2 recommend that you put your hand or fingers in step 1).
2. Set the pattern...
Users Manual - English - Page 34
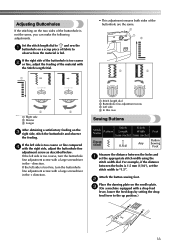
... left side is too coarse, turn the buttonhole fine adjustment screw with a large screwdriver in the - Attach the button sewing foot.
2
Place the darning plate on the needle plate. 3 (On a machine equipped with
the Stitch Length Dial.
1
• This adjustment ensures both sides of the buttonhole are the same.
2
1 3
4
4
10
10
2
2 2
2
3
2
3
10
1 Right...
Users Manual - English - Page 35

... At a slow speed, sew about 10 stitches.
5
Zipper Insertion
Stitch
Stitch
Stitch Name
Pattern
Length
Width
[mm (inch)] [mm (inch)]
Straight Stitch
2-3 (1/16-1/8)
2.5 (center needle position) (3/32)
Foot
Zipper Foot
You can use the zipper foot to sew different types of the zipper foot.
1
2
Remove the material from the machine. KNOWING YOUR SEWING MACHINE
Put a button between the...
Users Manual - English - Page 44
...36
N
Needle Replacement 7 Needle Threader 19
O
Oiling 38 Overedge Stitching 29
P
Pattern Length 11 Pattern Selection Dial 10 Pattern Width 11 Performance Checklist 40 Presser foot lever 4 Presser Foot Replacement 8 Principal Parts 4
Q
Quick Thread-setting System 20
R
Rampart Stitch 11 Recommended Widths and Lengths for Stitches 11 Repacking the Machine 42 Reverse Sewing Lever 14
43
Similar Questions

How To Thread A Brother Sewing Machine Xl-5500
(Posted by CAB14mitk 10 years ago)

How To Use A Brother Sewing Machine Xl-2600i Setting Stitch And Tension
(Posted by v007CCdu 10 years ago)

How To Thread A Brother Sewing Machine Xl-5232
(Posted by Thsou 10 years ago)

How To Change Needle Brother Sewing Machine Ce 5500 Prw
i lost my manual and do not know how to change the needle for a brother sewing machine CE 5500 PRW. ...
i lost my manual and do not know how to change the needle for a brother sewing machine CE 5500 PRW. ...
(Posted by giomariagina 11 years ago)

My Sewing Machine Seems Locked Up
How do you unlock the machine if it seems frozen
How do you unlock the machine if it seems frozen
(Posted by angelabnease 13 years ago)