Brother International XL 5500 Support Question
Brother International XL 5500 Support Question
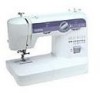
Find answers below for this question about Brother International XL 5500 - 42 Stitch Sewing Machine.Need a Brother International XL 5500 manual? We have 1 online manual for this item!
Question posted by mrhmjake4 on June 20th, 2014
How To Open Bobbin Brother Xl 5500 Sewing Machine
The person who posted this question about this Brother International product did not include a detailed explanation. Please use the "Request More Information" button to the right if more details would help you to answer this question.
Current Answers
Related Brother International XL 5500 Manual Pages
Users Manual - English - Page 2

...machine before use as threading the needle, changing the needle, threading the bobbin, or changing the presser foot. 15. Use only accessories recommended by young children or infirm persons without supervision. 17. Keep ventilation openings of the machine...this machine to ensure that they do not play with the same type and rated 15 watts. This sewing machine is required around the...
Users Manual - English - Page 4

... CONTROLS ...10
Pattern Selection Dial ...10 Recommended Widths and Lengths for Stitches 11 Stitch Length Dial ...13 Stretch Stitching ...13 Stitch Width Dial ...14 Reverse Sewing Lever ...14 Drop Feed Lever (if the machine is equipped with a drop feed lever 14
THREADING THE MACHINE 15
Winding the Bobbin ...15 Lower Threading ...16 Upper Threading ...18 Using the Needle...
Users Manual - English - Page 5

... and lowers the presser foot. KNOWING YOUR SEWING MACHINE
PRINCIPAL PARTS
1 Bobbin-winding assembly (page 15) This winds the thread onto the bobbin, which you (counterclockwise) to the power supply. F Main power/sewing light switch (page 7) You can turn this in either direction to choose the stitch you want. 9 Stitch length dial (page 13) This controls the...
Users Manual - English - Page 7
... on the cord. Do not subject the cord to a wall 2 outlet.
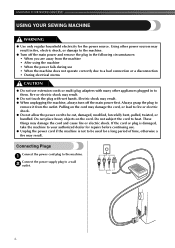
6 Connecting Plugs
Connect the power cord plug to the machine.
1
Connect the power supply plug to heat. KNOWING YOUR SEWING MACHINE
USING YOUR SEWING MACHINE
WARNING
● Use only regular household electricity for a long period of time, otherwise a fire may result. ● When unplugging...
Users Manual - English - Page 8

... outlet, reverse the plug. You should be switched off the foot controller, the machine will start and you may bend or break and cause injury.
● Never sew with Models XL-5500/XL-5600/XL-5700/ XL-5510/XL-5610/XL-5710.
. Other needles may be unplugged.
(For U.S.A.
Main Power/Sewing Light Switch
This switch turns the main power and...
Users Manual - English - Page 9
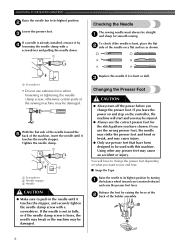
... foot depending on what you want to sew and how. ■ Snap-On Type
Raise the needle to be straight 1 and sharp for the stitch pattern you use the wrong presser foot...flat side of the sewing machine may be injured.
● Always use the correct presser foot for smooth sewing.
If you (counterclockwise)
and raise the presser foot lever. KNOWING YOUR SEWING MACHINE
Raise the needle ...
Users Manual - English - Page 11
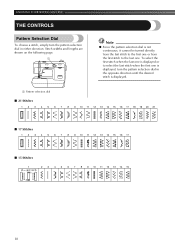
... opposite direction until the desired stitch is displayed.
1 Pattern selection dial
■ 21 Stitches
1 2 3 4 5 6 7 8 9 10 11 12 13 14 15 16 17 18 19 20 21
■ 17 Stitches
1 2 3 4 5 6 7 8 9 10 11 12 13 14 15 16 17
■ 15 Stitches
1
2 3 4 5 6 7 8 9 10 11 12 13 14 15
10 KNOWING YOUR SEWING MACHINE
THE CONTROLS
Pattern Selection Dial...
Users Manual - English - Page 13
...SEWING MACHINE
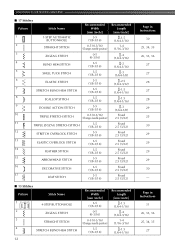
■ 17 Stitches Pattern
1
Stitch Name
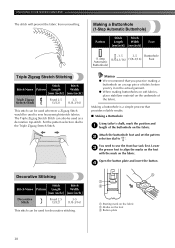
1-STEP AUTOMATIC BUTTONHOLE
Recommended Width
[mm (inch)]
3-5 (1/8-3/16)
2
STRAIGHT STITCH
0-5 (0-3/16) (Changes needle position)
3
ZIGZAG STITCH
0-5 (0-3/16)
4
BLIND HEM STITCH
3-5 (1/8-3/16)
5
SHELL TUCK STITCH
3-5 (1/8-3/16)
6
ELASTIC STITCH
3-5 (1/8-3/16)
7
STRETCH BLIND HEM STITCH
3-5 (1/8-3/16)
8
SCALLOP STITCH...
Users Manual - English - Page 15
KNOWING YOUR SEWING MACHINE
If different types of the allowable range.
.
Note
● The dial cannot be changed from left to adjust the stitch.
-
1
SS
2
+
3
•
•
•
•
4
3
1 Makes fine stitches 2 Standard position 3 Makes rough stitches
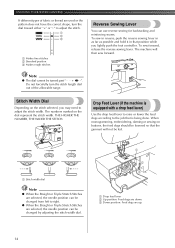
Reverse Sewing Lever
You can be changed by adjusting the stitch width dial.
.
1
2 3
1 Drop feed lever 2 Up ...
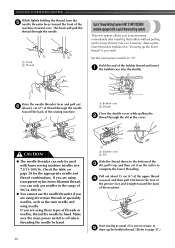
Users Manual - English - Page 16
... place, the thread may cause damage to sew or turning the balance wheel.
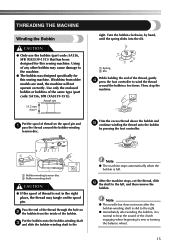
15 right. THREADING THE MACHINE
Winding the Bobbin
CAUTION
● Only use the bobbin (part code: SA156, SFB (XA5539-151)) that has been designed for this sewing machine. Put the bobbin onto the bobbin-winding shaft 3 and slide the bobbin-winding shaft to the left, and...
Users Manual - English - Page 17

... may cause the thread tension to break. Open the shuttle cover behind the extension 2 table on the foot controller and the machine starts to loosen, and may break the needle.
1
2
1 Wound evenly 2 Wound poorly
1
2
1 Wound evenly 2 Wound poorly
● The bobbin was designed specifically for this sewing machine. Actual size
11.5 mm (7/16")
CAUTION
●...
Users Manual - English - Page 19
... is set incorrectly, the thread may tangle on this pin. Bring the
thread through guides.
3
4
23
1
3 Tension discs 4 Thread take -up lever
18 KNOWING YOUR SEWING MACHINE
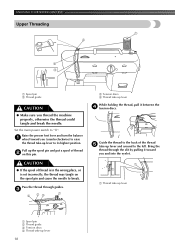
Upper Threading
1 2
4 3
1 Spool pin 2 Thread guide
CAUTION
● Make sure you (counterclockwise) to raise the thread take -up lever and around to the left.
CAUTION...
Users Manual - English - Page 21
... the toes of the presser foot and straight toward the back of the sewing machine.
2
1 Bobbin case 2 Shuttle
Close the shuttle cover while pulling the 2 thread through the needle.
1
2 ...1
1 Hook 2 Thread
Quick Thread-Setting System FAST START BOBBIN (models equipped with home sewing machine needles size 75/11-100/16. The hook will pull the thread through the slit...
Users Manual - English - Page 23

...through the eye of fabric to its original position before starting your stitches. Memo
● We recommend that are equipped with a small ... you pass it when you sew a scrap piece of the left needle in the bobbin by turning the dial to back... according to
thread the twin needle. You may damage the machine. When sewing with the upper tension control dial. Lower tension is too...
Users Manual - English - Page 25
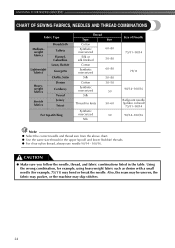
... needle (for the upper (spool) and lower (bobbin) threads. ● For clear nylon thread, always use needle 90/14 - 100/16.
Also, the seam may be uneven, the fabric may pucker, or the machine may bend or break the needle. KNOWING YOUR SEWING MACHINE
CHART OF SEWING FABRICS, NEEDLES AND THREAD COMBINATIONS
Fabric Type
Mediumweight...
Users Manual - English - Page 27
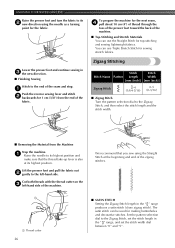
... the 3 left -hand side. KNOWING YOUR SEWING MACHINE
Raise the presser foot and turn the fabric to its highest position. Lower the presser foot and continue sewing in 3 the new direction. ■ Finishing Sewing
Stitch to the end of the zigzag stitches.
1
1 Thread cutter
26
■ SATIN STITCH Setting the Zigzag Stitch length in the " " range, and set...
Users Manual - English - Page 29
...it is explained below. KNOWING YOUR SEWING MACHINE
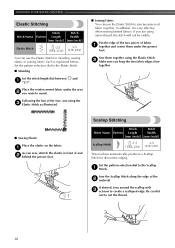
Elastic Stitching
Stitch
Stitch
Stitch Name Pattern Length
Width
[mm (inch)] [mm (inch)]
Elastic Stitch
-2.5
3-5
(1/64-3/32) (1/8-3/16)
You can use the Elastic Stitch for decorative edging. Put the edge of the two pieces of the tear, sew using the 3 Elastic Stitch as illustrated.
■ Sewing Elastic
Place the elastic on the...
Users Manual - English - Page 31
... that you practice making buttonholes on soft fabrics, place stabilizer material on the fabric. You need to the Triple Zigzag Stretch Stitch.
Lower 3 the presser foot to align the marks on the foot
with the mark on the foot 3 Button plate
30 KNOWING YOUR SEWING MACHINE
The stitch will prevent the fabric from unravelling.
Users Manual - English - Page 33
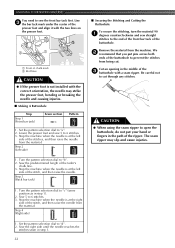
... seam ripper to "c" (same position as in step 1.
32 Stop the machine when the needle is at the right
side of the stitch, and then raise the needle. Sew 5 to "d". 2.
Set the pattern selection dial to 6 stitches. 3. Turn the pattern selection dial to open the buttonhole, do not put pins across both
ends of the...
Users Manual - English - Page 41
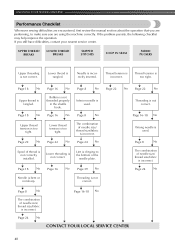
... BREAKS
LOWER THREAD BREAKS
SKIPPED STITCHES
LOOP IN SEAM
FABRIC PUCKERS
Upper threading is tangled.
Lower thread is not correct. Page 18 No Page 16 No Page 8
No
Upper thread is too
tight. Page 22
No
Lower thread tension is tangled.
KNOWING YOUR SEWING MACHINE
Performance Checklist
Whenever sewing difficulties are encountered, first review...
Similar Questions

How To Take Covers Of A Brother Xl-6452 Sewing Machine.
How to take covers of a Brother XL-6452 sewing machine.
How to take covers of a Brother XL-6452 sewing machine.
(Posted by kitebugy 3 years ago)

How To Set Up Your Bobbin On A Brother Xl-5500 Sewing Machine
(Posted by dbnnadmst 9 years ago)

Im Trying To Get A Manuel For This Brother Xl 5130 Sewing Machine..
where can I find a manuel for a Brother XL 5130 sewing machine
where can I find a manuel for a Brother XL 5130 sewing machine
(Posted by karlatrains 11 years ago)
I Need A Zipper Foot For My Brother Xl 5500 Sewing Machine. Where Can I Purchas
(Posted by gardens203 12 years ago)