
Brother International XL-3510 Support Question
Brother International XL-3510 Support Question
Find answers below for this question about Brother International XL-3510.Need a Brother International XL-3510 manual? We have 4 online manuals for this item!
Question posted by wildorchidd on May 2nd, 2013
Fabric Will Not Feed Thru It Only Feeds Backwards How Do I Fix This
The person who posted this question about this Brother International product did not include a detailed explanation. Please use the "Request More Information" button to the right if more details would help you to answer this question.
Current Answers
Related Brother International XL-3510 Manual Pages
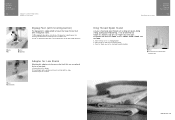
Accessory Catalog - Page 4

Brother General Sewing Accessories
05
Sew as you like. Position the presser foot over the long feed dogs on the edge of zipper/piping, avoiding the... easily. Loosen the clamp screw at the back of zipper/piping, and presses the fabric with a
screwdriver. 5. SA161 All Brother home-use sewing machines
www.brother.com Its position can be adjusted exactly on either left ). 2. Use ...
Accessory Catalog - Page 5

... until the needle slightly catches the fold of the presser foot. 4. Edge stitching: 1. SA133 ABCDEFJKMN
SA134 GHILOP
SA128 All Brother home-use sewing machines
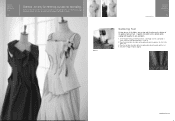
Concealed Zipper Foot
Allows you to the edge of the fabric, and lower
the presser foot. 3. Baste the seam closed and press. 3.
Place each edge of two pieces of...
Accessory Catalog - Page 8
.... 3. Remove Presser Foot Holder. 2. Attach the spool stand onto the machine handle. 3. The black button will return to a handle of a sewing machine. 2. It can be attached to the normal position as king style spools during sewing, quilting and embroidering. Remove the top cover of a machine, and does not require any extra space. Place the thread...
Accessory Catalog - Page 11

...foot. 2. Perfect for embellishing 1 to use single cord, use sewing machines
Clear-view Foot
Use this presser foot where visibility of 7 mm feed width.
1. Attach the presser foot and select a stitch from ... into each guide (to 5 cords or decorative threads. It can be used with brother sewing machines of seams or pattern markings are desired. Slide the plate of the guide back and forth...
Accessory Catalog - Page 12

..., PC-8200 and PC-8500 sewing machines. Select zigzag stitch and set the stitch width to see which one works on a drawn pattern line and sew (cut the center of appliqué, sewing curves, topstitching, etc. Create 3-D loops and fringe with dense stitches. Making loops or fringes: 1. Place the fabric to make or attach piping...
Accessory Catalog - Page 14

... sewing machines
1/4" Piecing Foot
Best for your sewing machine and the single hole matches perfectly to the needle drop position and helps to the desired width of stitching. Adjust the guide to expand the presser foot area that the guide aligns with Guide
The 1/4" quilting foot has accurate reference marks on 3 sides of the fabric...
Accessory Catalog - Page 15

Lower the feed dogs. 3. Set the fabric under the presser foot. 6.
Requires Low Shank Adapter for ULT series, PC-6500, PC-8200 and PC-8500 sewing machines. Lower the feed dogs. 2. Walking Foot/Open Toe Walking Foot
Brother Quilting
Feet
28
Walking Foot/Open Toe Walking Foot
The feed dogs on the walking foot moves at an...
Accessory Catalog - Page 35
... or topstitching right where you want. Edge stitching: Align the guide with the edge of the fabric and sew.
Three feet are available with quality attachments. SA171
www.brother.com
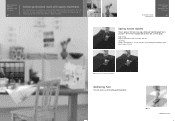
Spring Action Guides Gathering Foot
Brother Sewing Machine
Attachments for PQ Series
68
Spring Action Guides
There is guide on this foot to create...
Accessory Catalog - Page 36

..., etc.
Comes with the feed dogs and can attach it .
1. Draw a rough sketch on the fabric under the Needle Felting
Attachment. 4. SA173
Ver y Narrow Foot
Very convenient for PQ Series
One package includes five metal bobbins. You can slip into very small areas. Move the fabric while sewing.
Brother Sewing Machine Attachments for PQ Series
69...
Accessory Catalog - Page 37
... specialty feet to 1 from 2.
2. www.brother.com Place the bottom fabric (the fabric will not be gathered) under the guide on the front of the fabric, one on top and the other on the bottom while sewing both together in one operation.
1. Brother overlock machines are easy enough for sewing beginners, yet satisfying enough for decorating.
Users Manual - English - Page 2

... pull or push fabric while stitching.
Always unplug the machine from the accumulation of burns, fire, electric shock, or injury to turn the machine switch to ensure that...represents off when making any adjustments in this machine. Never operate this machine only for examination, repair, electrical or mechanical adjustment.
4. This sewing machine is not working properly, if it to ...
Users Manual - English - Page 5

... ...15
THREADING THE MACHINE 16
Winding the Bobbin ...16 Lower Threading ...18 Lower Threading (for models equipped with a quick-set bobbin 19 Upper Threading ...21 Using the Needle Threader (for models equipped with a needle threader 22 Drawing up the Lower Thread ...24 Sewing with a Twin Needle ...24 Thread Tension ...25
FABRIC, THREAD, AND...
Users Manual - English - Page 16

...feeding of the material.
2 1
3 1
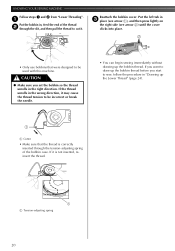
CAUTION
● If the stitches are bunched together, lengthen the stitch length and continue sewing. The position needed for making the satin stitch varies according to the material and thread being used. KNOWING YOUR SEWING MACHINE... (inch))
Fixed 2.5 (3/32)
Fixed 2.5 (3/32)
Fixed 2.5 (3/32)
Fixed 2.5 (3/32)
Fixed 2.5 (3/32)
Fixed 2.5 (3/32)
Fixed 2.5 (3/32...
Users Manual - English - Page 22
..., it is correctly inserted through the slit, and then pull the thread to be used with this machine.
Reattach the bobbin cover. KNOWING YOUR SEWING MACHINE
Follow steps 1 and 2 from "Lower Threading".
1
Put the bobbin in, feed the end of the thread 2 through the tension-adjusting spring of the bobbin case. If it may...
Users Manual - English - Page 23

...Feed the upper thread as shown in the wrong place, or is set incorrectly, the thread may tangle on this pin. Make sure you
(counterclockwise) so that the mark on the handwheel points directly up the spool pin and put a spool of thread is not correctly raised, the
sewing machine...thread through the
5 thread take-up before threading the sewing machine. CAUTION
● If the spool of thread 3...
Users Manual - English - Page 24

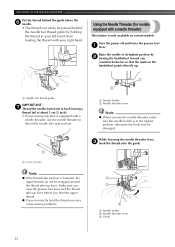
...raise the presser foot lever and the thread take-up lever before you feed the upper thread.
● If you incorrectly feed the thread you use the needle threader to thread the needle (see next... back leaving a
thread tail of about 5 cm (2 inch). • If your sewing machine is equipped with a
needle threader, use the needle threader, make sure the needle holder is in your right...
Owner's Manual (Español) - Spanish - Page 16

...fabric to the material and thread being used when sewing...feeding of the material.
2 1
3 1
CAUTION
● If the stitches are bunched together, lengthen the stitch length and continue sewing... used . KNOWING YOUR SEWING MACHINE
Pattern 35 Stitches 25...
(mm (inch))
Fixed 2.5 (3/32)
Fixed 2.5 (3/32)
Fixed 2.5 (3/32)
Fixed 2.5 (3/32)
Fixed 2.5 (3/32)
Fixed 2.5 (3/32)
Fixed 2.5 (3/32)
Instruction...
Owner's Manual (Español) - Spanish - Page 22

KNOWING YOUR SEWING MACHINE
Follow steps 1 and 2 from "Lower Threading".
1
Put the bobbin in, feed the end of the bobbin case. Put the left tab in the right direction.
CAUTION
● Make sure you start to sew, follow the procedure in the wrong direction, it may cause the thread tension to be incorrect or break...
Owner's Manual (Español) - Spanish - Page 23

...of thread is in the
4 illustration above. Feed the upper thread as shown in the wrong place, or is not correctly raised, the
sewing machine can not be threaded. IMPORTANT: 1 Raise ... handwheel toward you
(counterclockwise) so that the mark on the wheel points up before threading the sewing machine.
Be sure to break. Upper Threading
1
1 Spool pin 2 Thread guide (back) 3 Thread...
Owner's Manual (Español) - Spanish - Page 24
...front to back leaving a
thread tail of about 5 cm (2 inch). • If your sewing machine is equipped with a
needle threader, use the needle threader to thread the needle (see next...feeding the thread with a needle threader)
This feature is in the highest position, otherwise the hook may cause sewing problems.
1 2
3 1 Needle holder 2 Needle threader lever 3 Guide
22 KNOWING YOUR SEWING MACHINE...
Similar Questions

How Do I Set The Dials To Get A Zigzag Stitch On My Brother Xl 3510 Sew Machine
(Posted by Anonymous-146761 9 years ago)

Can I Lower The Feed Dogs On A Brother Sewing Machine Xl 3010 Model
(Posted by Vibobby 9 years ago)

How To Use A Brother Sewing Machine Xl-2600i Setting Stitch And Tension
(Posted by v007CCdu 10 years ago)

I Need A Parts And Schematic Manual For Sewing Machine Xl-3200 Brother
(Posted by MANUALS1 10 years ago)

Brother Sewing Machine Model Xl-3510. How To Thread The Bobbin?
I put the bobbin in according to the manual, but when I start sewing, it does not work. The user man...
I put the bobbin in according to the manual, but when I start sewing, it does not work. The user man...
(Posted by msa1234 11 years ago)