
Brother International PE770 Support Question
Brother International PE770 Support Question
Find answers below for this question about Brother International PE770 - Computerized Embroidery Machine.Need a Brother International PE770 manual? We have 3 online manuals for this item!
Question posted by 98boots6 on June 16th, 2014
How To Make The Font Big On The Brother Pe770
The person who posted this question about this Brother International product did not include a detailed explanation. Please use the "Request More Information" button to the right if more details would help you to answer this question.
Current Answers
Related Brother International PE770 Manual Pages
Users Manual - English - Page 1
GETTING READY EMBROIDERY APPENDIX
Computerized Embroidery Machine
Operation Manual
Users Manual - English - Page 2
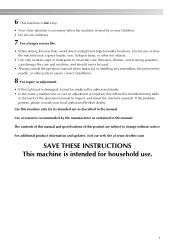
... the build up of the electrical outlet. Keep ventilation openings of the machine free from the electrical outlet when removing covers, lubricating, or
when making any adjustments mentioned in the instruction manual.
• To unplug the machine, switch the machine to the symbol "O" position to the nearest authorized dealer or service center for examination...
Users Manual - English - Page 3
...site at www.brother.com
SAVE THESE INSTRUCTIONS This machine is required, first follow the troubleshooting table
in the back of this product are subject to inspect and adjust the machine yourself. Use ...event a malfunction occurs or adjustment is intended for its intended use as contained in this machine only for household use outdoors.
7 For a longer service life:
• When storing ...
Users Manual - English - Page 5

... buttons ...10
Operation panel ...11
GETTING READY
13
Embroidery Step by Step 14 Attaching the Embroidery Unit 15
Embroidery unit precautions ...15 Attaching the embroidery unit ...15 Removing the embroidery unit ...16
Turning the Machine On/Off 18
Power supply precautions ...18
Turning on the machine ...19 Turning off the machine ...19
LCD (Liquid Crystal Display) Operation 20...
Users Manual - English - Page 6

Using an embroidery card (sold separately) ...55
Embroidering ...56
Embroidering attractive finishes...56
Embroidering a pattern... Bobbin thread is tight ...68
APPENDIX
69
Care and Maintenance ...70
Cleaning the machine surface ...70 Cleaning the race ...70
Attaching the Embroidery Foot 72
Attaching the embroidery Foot "Q" ...72
Troubleshooting ...74
Error messages ...78
Adjusting the LCD ...81 ...
Users Manual - English - Page 7

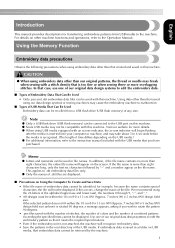
Introduction
Thank you have finished reading this embroidery machine.
d Embroidery You can start embroiderying without pulling up the bobbin thread (page 28). In addition, after embroidering (page 51). Machine Features
1
23
4
a Simple bobbin-winding The bobbin can be cut automatically after you for the correct operation of the various functions.
b Quick-set bobbin You ...
Users Manual - English - Page 8
....
14.
15.
16.
17.
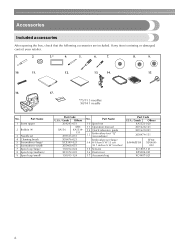
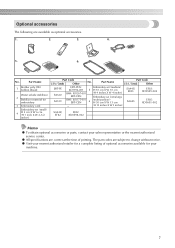
*75/11 3 needles 90/14 1 needle
No.
Part Name
10 Spool net
11 Operation manual
12 Quick reference guide
13
Embroidery foot "Q" (on machine)
Embroidery set
4 Cleaning brush 5 Screwdriver (large) 6 Screwdriver (small) 7 Spool cap (large) 8 Spool cap (medium) 9 Spool cap (small)
Part Code
U.S.A. / Canada Others
X54243-051
SA156
SFB...
Users Manual - English - Page 9
...center.
Part Name
Part Code
U.S.A. / Canada
Other
EBT-PE SA520 SA519
EBT-PEN:
Embroidery set (medium)
XC5996-001 5 H 10 cm X W 10 cm
BM4: X81267-001
(H 4 inches X W 4 inches)
EBT-CEN
Embroidery set (small)
4
H 2 cm X W 6 cm (H 1 inch X W 2-1/2
inches)
Part Code
U.S.A. / Canada
Other
No.
Part Name
1
Brother poly #90 bobbin thread
Water solude stabilizer
2 Stabilizer...
Users Manual - English - Page 10

... cover to check the position of thread on the spool pin.
m Needle threader lever Use the needle threader lever to the machine, and then attach the embroidery frame.
k Embroidery unit Attach the embroidery unit to thread the needle.
l Thread cutter Pass the threads through the window to place the spool of the take -up...
Users Manual - English - Page 11

... case Remove the bobbin cover, and then insert the bobbin into the power supply jack.
a Handle Carry the machine by its handle when transporting the machine. c Embroidery card slot Insert the embroidery card.
Needle and embroidery foot section
Right-side/rear view
a Thread guide disk Pass the thread through the needle bar thread guide.
d Air...
Users Manual - English - Page 18
....
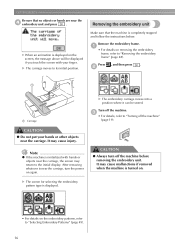
• For details on again. GETTING READY
Be sure that the machine is completely stopped and follow the instructions below.
Removing the embroidery unit
• When an animation is initialized with your hands or other objects near the
d embroidery unit and press
. Make sure that no objects or hands are near the carriage. CAUTION...
Users Manual - English - Page 21
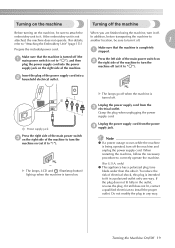
... turned on the right side of the machine to turn it off.
1
refer to "Attaching the Embroidery Unit" (page 15).)
Prepare the included power cord. Turning the Machine On/Off 19 Turning on the machine
Turning off the machine
Before turning on the machine, be sure to turn the
machine off (set it to "|"). X The lamps, LCD...
Users Manual - English - Page 42

... If you want to raise the needle. Not using a stabilizer may not easily pierce the fabric, causing the needle to use stabilizer for embroidery machines. Note
z For good quality embroidery designs be sure to break. The needle may result in injury.
● Be careful when embroidering overlapping patterns. For details, refer to "Optional...
Users Manual - English - Page 50
... breakage.
1
a Lever
2
1
1 2
a Mounting brackets b Pins
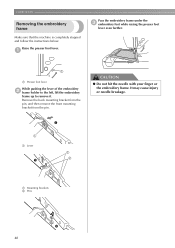
3 48 Make sure that the machine is completely stopped and follow the instructions below.
Raise the presser foot lever. CAUTION
● Do not hit the needle with your finger or the embroidery frame. EMBROIDERY
Removing the embroidery frame
Pass the embroidery frame under the c embroidery foot while raising the presser foot
lever...
Users Manual - English - Page 60
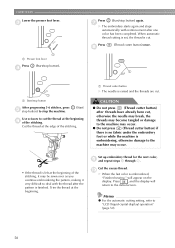
.../stop the machine.
(Start/
Use scissors to deal with reinforcement after the pattern is embroidered,
"Finished sewing."
Cut the thread at the beginning. a Thread cutter button
X The needle is cut the thread at the beginning of the stitching, it may be sewn over as you continue embroidering the pattern, making it very difficult...
Users Manual - English - Page 68

... turned off the machine. Press (Start/stop the a machine.
e
• Always remove the embroidery unit when you move the machine.
Check the current needle count on the machine and select the pattern.
Memo
z When the machine is stopped before turning off , the embroidery size and layout return to the embroidery screen.
66
Turn off the machine. d
If the needle...
Users Manual - English - Page 76
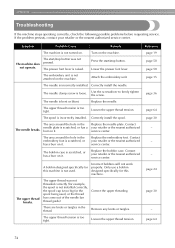
... the presser foot lever.
The upper thread tension is loose.
The area around the hole in the embroidery foot is too big for the spool being used .
Replace the bobbin case. A bobbin designed specifically for this machine is scratched, or has a burr on it .
Remove any knots or tangles. Reference page 19 page...
Users Manual - English - Page 85
...Brother poly #90 bobbin thread 7
buzzer 82
machine settings 21
, main power switch 9 19
C
characters 52
maintenance 70
manual needle threading 34
, memory key 11 63
cleaning 70
cleaning brush 6
N
D
dust cover 6
E
, embroidery card 7 55
embroidery card slot 9
, Embroidery foot "Q 6 9
embroidery foot attachment 72 embroidery frame 43 embroidery frame attachment 47 embroidery...
USB GUIDE - Multi - Page 3
... embroidery data is recognized. (The length of combined patterns exceeding the specified limits cannot be displayed.
This applies to the Operation Manual. We recommend using our data design systems or sewing machines may take about 5 to the instruction manual included with a stitch density that you wish to rotate the pattern 90 degrees. • .pes...
USB GUIDE - Multi - Page 7
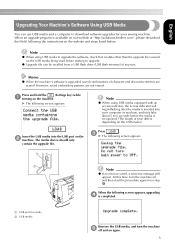
... website at "http://solutions.brother.com", please download the file(s) following screen appears, upgrading d is upgraded, saved combinations of character and decorative stitches are not erased.
When an upgrade program is recognized. (The length of time differs depending on the USB media.)
Insert the USB media into your sewing machine. Remove the USB...
Similar Questions

How To Clean Brother 10 Needle Embroidery Machine
(Posted by pythiabdo 9 years ago)
Brother Bas 423a Embroidery Machine Powers On, But Will Not Display Or Move.
The power in my shoppe went out 2 days ago, and since that time my embroidery machine will power on,...
The power in my shoppe went out 2 days ago, and since that time my embroidery machine will power on,...
(Posted by Anonymous-140596 9 years ago)

Service Manual For The Brother Pc-8200 Embroidery Machine
I am looking for the Service Manual for the Brother PC-8200 embroidery machine. I have the Operation...
I am looking for the Service Manual for the Brother PC-8200 embroidery machine. I have the Operation...
(Posted by rialeslj 9 years ago)

How To Download Fonts For Brother Pe770 From Memory Stick
(Posted by horrsaihn 10 years ago)

How To Enlarge Font On Brother Pe770
(Posted by pedsemin 10 years ago)