
Brother International PE770 Support Question
Brother International PE770 Support Question
Find answers below for this question about Brother International PE770 - Computerized Embroidery Machine.Need a Brother International PE770 manual? We have 3 online manuals for this item!
Question posted by kjjacek1 on January 16th, 2014
Images On Usb Wont Read On Embroidery Machine
The person who posted this question about this Brother International product did not include a detailed explanation. Please use the "Request More Information" button to the right if more details would help you to answer this question.
Current Answers
Related Brother International PE770 Manual Pages
Users Manual - English - Page 1
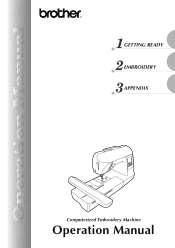
GETTING READY EMBROIDERY APPENDIX
Computerized Embroidery Machine
Operation Manual
Users Manual - English - Page 5

... buttons ...10
Operation panel ...11
GETTING READY
13
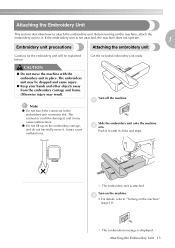
Embroidery Step by Step 14 Attaching the Embroidery Unit 15
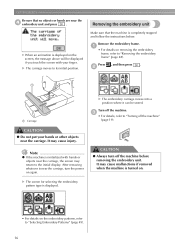
Embroidery unit precautions ...15 Attaching the embroidery unit ...15 Removing the embroidery unit ...16
Turning the Machine On/Off 18
Power supply precautions ...18
Turning on the machine ...19 Turning off the machine ...19
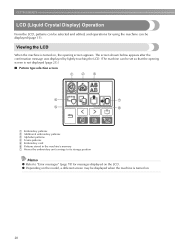
LCD (Liquid Crystal Display) Operation 20...
Users Manual - English - Page 6

Using an embroidery card (sold separately) ...55
Embroidering ...56
Embroidering attractive finishes...56
Embroidering a pattern... Bobbin thread is tight ...68
APPENDIX
69
Care and Maintenance ...70
Cleaning the machine surface ...70 Cleaning the race ...70
Attaching the Embroidery Foot 72
Attaching the embroidery Foot "Q" ...72
Troubleshooting ...74
Error messages ...78
Adjusting the LCD ...81 ...
Users Manual - English - Page 7

... can be cut automatically after you for purchasing this embroidery machine. d Embroidery You can start embroiderying without pulling up the bobbin thread (page 28). Machine Features
1
23
4
a Simple bobbin-winding The bobbin can quickly and easily be wound with thread (page 24).
Before using the machine, carefully read the "IMPORTANT SAFETY INSTRUCTIONS", and then study this manual...
Users Manual - English - Page 8
...
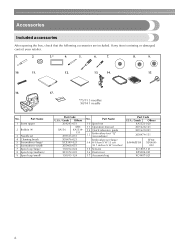
After opening the box, check that the following accessories are included.
Part Name
10 Spool net
11 Operation manual
12 Quick reference guide
13
Embroidery foot "Q" (on machine)
Embroidery set
4 Cleaning brush 5 Screwdriver (large) 6 Screwdriver (small) 7 Spool cap (large) 8 Spool cap (medium) 9 Spool cap (small)
Part Code
U.S.A. / Canada Others
X54243-051
SA156
SFB...
Users Manual - English - Page 9
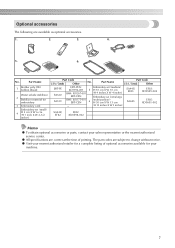
... correct at the time of optional accessories available for your
machine.
7 The part codes are subject to change without notice.
z Visit your nearest authorized retailer for a complete listing of printing. Part Name
Part Code
U.S.A. / Canada
Other
EBT-PE SA520 SA519
EBT-PEN:
Embroidery set (medium)
XC5996-001 5 H 10 cm X W 10 cm
BM4: X81267...
Users Manual - English - Page 10

... lower the presser foot
j Operation buttons Use these descriptions to learn the names of the machine parts. Before using the machine can be displayed (page 11).
8
h Embroidery unit connector slot Plug in the connector for using the machine, carefully read these buttons to check the position of thread on the spool pin.
g Operation panel From...
Users Manual - English - Page 11

... to pages 8 through 11 while you (counterclockwise) to thread the needle. f Embroidery foot "Q" This presser foot is used . a Handle Carry the machine by its handle when transporting the machine.
c Embroidery card slot Insert the embroidery card. Do not cover the air vent while the machine is lowered, it enters the hole in the needle plate.
Needle...
Users Manual - English - Page 13
g
f Embroidery key Press to get help on the LCD to display the settings screen. h Help key Press to display the pattern type selection screen. a
c
d
e
b h
f
a LCD (liquid crystal display) (touch panel) Touch the keys displayed on using the machine. g Settings key Press to perform operations. b Back key
Press to return to display the previous...
Users Manual - English - Page 15

... to start embroidering are described in this chapter.
Embroidery Step by Step 14 Attaching the Embroidery Unit 15
Embroidery unit precautions 15 Attaching the embroidery unit 15 Removing the embroidery unit 16 Turning the Machine On/Off 18 Power supply precautions 18 Turning on the machine 19 Turning off the machine 19 LCD (Liquid Crystal Display) Operation 20...
Users Manual - English - Page 16

.... frame
For details, refer to the fabric. GETTING READY
Embroidery Step by Step
The basic steps for embroidery are as follows.
1
Attaching the embroidery unit
Attach the embroidery unit. (If the embroidery unit is not attached, the machine does not operate.) For details, refer to "Attaching the embroidery unit" (page 15).
↓
2 Checking the needle
Use a needle...
Users Manual - English - Page 17
... it clicks and stops. Note
z Do not touch the connector in until it . Turn off the machine. X The confirmation message is not attached, the machine does not operate.
1
Embroidery unit precautions
Attaching the embroidery unit
Cautions for the embroidery unit will be dropped and cause injury.
● Keep your hands and other objects away from...
Users Manual - English - Page 18
... moves into a position where it can be displayed if you touch the screen with hands or objects near the
d embroidery unit and press
. It may cause malfunctions if removed when the machine is turned on the screen, the message above will be stored. Press , and then press
.
a
• For details on again...
Users Manual - English - Page 19
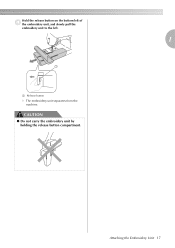
CAUTION
● Do not carry the embroidery unit by holding the release button compartment. Attaching the Embroidery Unit 17
Hold the release button on the bottom left of
d the embroidery unit, and slowly pull the embroidery unit to the left.
1
a
a Release button
X The embroidery unit separates from the machine.
Users Manual - English - Page 22
... is turned on, the opening screen is not displayed (page 21).)
■ Pattern type selection screen
a
b
c
d
g
e
f
a Embroidery patterns b Additional embroidery patterns c Alphabet patterns d Frame patterns e Embroidery card f Patterns stored in the machine's memory g Moves the embroidery unit carriage to its storage position
Memo
z Refer to "Error messages" (page 78) for using the...
Users Manual - English - Page 42

... pattern you continue embroidering when the bobbin thread is enough bobbin thread. We recommend stabilizer material for embroidery machines. CAUTION
● Do not embroider fabrics that matches the size of fabric a little larger than the embroidery frame that are too thick. Otherwise, the needle may not easily pierce the fabric, causing the needle...
USB GUIDE - Multi - Page 3
... that saved using our data design systems or sewing machines may break when sewing with a stitch density that created and saved in file names. Using data other than our original patterns, the thread or needle may cause the embroidery machine to the machine. Note
z Only a USB flash drive (USB flash memory) can be retrieved by "~" and a number appear...
USB GUIDE - Multi - Page 4
... also, reduce the number of designs saved on the screen. c
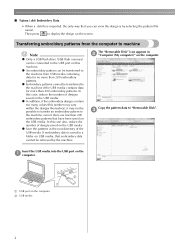
Insert the USB media into the USB port on the computer b USB media
2
Copy the pattern data to the USB port on the USB media. If embroidery data is by the machine.
■ Tajima (.dst) Embroidery Data
• When a .dst file is imported, the only way that you...
USB GUIDE - Multi - Page 5
... embroidery designs may contain too many colors (although there may be removed, disconnect the USB media from the total number of pages
•When
/
is shown in alphabetical order. In this case, unplug the USB media from the machine, plug it back into the USB port on the machine, and then repeat procedures starting from the USB...
USB GUIDE - Multi - Page 7
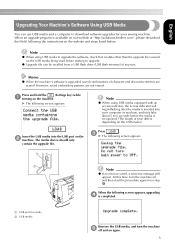
..., saved embroidery patterns are erased. The media device should only
contain the upgrade file. a USB port for your computer or machine, and may...machine e off , and then start the procedure again from a USB flash drive (USB flash memory) of time differs depending on the USB media.)
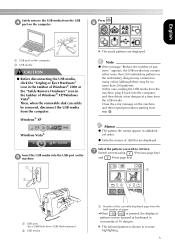
Insert the USB media into your sewing machine.
English
Upgrading Your Machine's Software Using USB...
Similar Questions

Brother Pe 770 Embroidery Machine
Can you provide the touch screen panel part number for the brother pe770 embroidery machine?
Can you provide the touch screen panel part number for the brother pe770 embroidery machine?
(Posted by sandymichelle144 2 years ago)

Brother Pe770 Wont Read Usb
(Posted by toGreenf 9 years ago)

How To Get Design From Computer To Embroidery Machine Pe770
(Posted by Sogorsher 10 years ago)

You Tube Videos On Threading The Bobbin On My Pe-770 Embroidery Machine
(Posted by Mlitweak 10 years ago)
Brothers Embroidery Machine Pe 770
My bobbin thread shows on top of my work. I have tried setting the tensions but haven't been able to...
My bobbin thread shows on top of my work. I have tried setting the tensions but haven't been able to...
(Posted by crafjan 12 years ago)