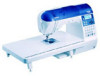
Brother International NX-650Q Support Question
Brother International NX-650Q Support Question
Find answers below for this question about Brother International NX-650Q.Need a Brother International NX-650Q manual? We have 2 online manuals for this item!
Question posted by luzicaz on July 18th, 2012
I Can Not Start Bobbin Of Inov Nx650 Because Start Button Is Red.
The person who posted this question about this Brother International product did not include a detailed explanation. Please use the "Request More Information" button to the right if more details would help you to answer this question.
Current Answers
Related Brother International NX-650Q Manual Pages
Accessory Catalog - Page 15

..., etc.
1. Requires Low Shank Adapter for ULT series, PC-6500, PC-8200 and PC-8500 sewing machines. When quilting is needed.
1.
Screw on the Open Toe Quilting Foot, with the needle to allow...an even pace in order to feed the fabric consistently. While starting to sew, press the needle position button twice to pull the bobbin thread
to guide the fabric. 4. Use both hands to hold...
Users Manual - English - Page 8

... free to automatically cut the thread at the front of the various functions. In addition, after you for purchasing this sewing machine. d One-touch lower threading You can start sewing without pulling up the bobbin thread (page 26).
g Knee lifter Use the knee lifter to raise and lower the presser foot with thread (page 22...
Users Manual - English - Page 13

..., red or orange, depending on top of each other special threads, use the thread cutter on the side of sewing while the button is moved to the right for winding the bobbin thread onto the bobbin
b "Reverse/Reinforcement Stitch" button
Press the "Reverse/Reinforcement Stitch" button to the machine may occur. For details, refer to "Starting to adjust the sewing...
Users Manual - English - Page 23

... inch)
This model
Other model
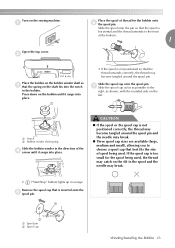
Winding the bobbin
Wind the thread around the bobbin to prepare the bobbin thread. 1
a Bobbin winder
Memo
z The order that the machine should be threaded for this sewing machine.
CAUTION
● Only use the bobbin (part code: SA156, SFB(XA5539-151)) designed specifically for winding the bobbin is indicated by a broken line on the...
Users Manual - English - Page 24
...correctly, the thread may break.
• ("Start/Stop" button) lights up in the bobbin. Press down on the bobbin until it snaps into place.
1
•...Bobbin winder shaft spring
Slide the bobbin winder in the direction of thread for the spool being used , the thread may catch on the shaft fits into place. g Slide the spool cap as far as shown, with the rounded side on the sewing machine...
Users Manual - English - Page 26

..., press ("Start/Stop" button) once to a suitable length.
Pass the end of the thread through the guide l slit in the bobbin winder seat, and then pull
the thread to the right to cut the end of the thread
o wound around the bobbin winder shaft.
CAUTION
● When the bobbin winding becomes slow, stop the machine.
z Be...
Users Manual - English - Page 27

... careful not to install the bobbin so that the bobbin thread should be passed through the bobbin case is turned after winding the bobbin, the machine will be incorrect.
26 a
1
2
Memo
z When the sewing machine is started or the handwheel is indicated by marks around the bobbin case. this sewing machine.
Remove the bobbin cover. b
Hold the bobbin with your left .
● The...
Users Manual - English - Page 28

...).
1
a Cutter
X The cutter cuts the thread. Winding/Installing the Bobbin 27 Be sure to the procedure in "Pulling up the bobbin thread. Reattach the bobbin cover.
If you wish to pull up the bobbin thread before starting to sew, pull up the thread according to thread the machine as shown, and f then pull the thread out toward...
Users Manual - English - Page 36

...the needle may break or the machine may be damaged. k
• For details on the stitches that the needle does not touch the presser foot.
Start sewing. Press
l
(Needle mode ...sewing direction, press ("Needle Position" button) to "Selecting stitching" (page 72). X Two lines of stitching are sewn parallel to select the twin needle setting, otherwise the needle may break or the machine...
Users Manual - English - Page 40

... a bent needle is being operated. CAUTION
● Before replacing the needle, be straight according to turn off the sewing machine. Replacing the Needle 39 Use the
since the needle may occur if ("Start/Stop" button) is accidentally pressed and the machine starts sewing.
Press ("Needle Position" button) once or a twice to prevent the needle from falling into the...
Users Manual - English - Page 42

... needle may result in injuries or damage to bend or break.
● Only use presser feet designed specifically for this sewing machine. Turn off the sewing machine, otherwise injuries may occur if ("Start/Stop" button) is accidentally pressed and the machine starts sewing. Raise the presser foot lever. c
a
a Presser foot lever
X The presser foot is raised.
Press ("Needle Position...
Users Manual - English - Page 43

....
If the wrong presser foot is attached before starting to be used with the
notch in the
presser foot holder. b
a Black button b Presser foot holder
X The presser foot holder...different presser foot below the holder e so that the correct presser foot is installed, turn off the sewing machine, attach the correct presser foot, and then select the desired stitch again.
a
b
c
a Presser...
Users Manual - English - Page 45

...button
X The needle is raised. b
a
a Presser foot holder screw
44
Raise the presser foot lever. If the needle hits the presser foot, the needle may touch the presser foot, causing it to bend or break.
● Before starting to raise the needle.
Note
z When sewing... screw. This is useful when sewing fabrics that the needle does not touch the presser foot. Turn off the sewing machine.
Users Manual - English - Page 52

...now positioned to the starting point of the presser foot" (page 43). Positioning the fabric
Be sure that the fabric pieces are aligned correctly. e
1
a "Needle Position" button
Place the fabric under.... Press ("Needle Position" button) once or b twice to "Adjusting the pressure of the stitching.
1
a Presser foot lever
X The fabric is positioned on the sewing machine.
Memo
z To adjust the...
Users Manual - English - Page 53

... to hold ("Start/Stop" button) pressed immediately after the sewing starts, the machine will sew at a faster speed. 1
a Sewing speed controller
• If you are ready to start or stop sewing.
1
a "Start/Stop" button
X The machine starts sewing.
■ Using the operation buttons Sewing can start the sewing machine. SEWING BASICS
Starting to sew
Press
b
("Start/Stop" button) once...
Users Manual - English - Page 54

... controller.
Insert the foot controller plug into its jack on b the side of the sewing machine.
1
Once you are ready to start sewing, slowly e press down on the foot controller, otherwise damage to the machine or injuries may occur.
● If the machine is plugged in,
("Start/Stop" button) cannot be used to start
or stop position" (page 61).
Users Manual - English - Page 55

...
b
on the foot controller.
X The machine starts sewing. After sewing 3 to sew" (page 52). Keep ("Reverse/Reinforcement Stitch" button) held down, the machine sews at a low speed.
After sewing back to the beginning of the thread. X The machine starts sewing in the normal
sewing direction
1
a "Start/Stop" button
• For details, refer to "Starting to 5 stitches, press c ("Reverse...
Users Manual - English - Page 91

... The sewing machine automatically stops after sewing reinforcement stitches.
• If additional strength is finished, cut the upper thread and the i bobbin thread at the beginning of the stitching on the wrong side of the stitching to secure the button, perform the button-sewing operation twice.
• Do not press ("Thread Cutter" button).
Place the button into button-sewing foot...
Users Manual - English - Page 152

... to firmly tighten the screw. authorized service center. The "Start/Stop" button was pressed, even though the foot controller is
appropriate for the type of stitch that are appropriate for the type of stitch
you wish to sew.
Only use a bobbin designed specifically for this machine is not used is not Attach the presser foot...
Users Manual - English - Page 156

... without connecting the foot controller while the setting for adjusting the stitch width using the sewing speed controller is set up because the thread is raised.
Troubleshooting 155 Error messages
If ("Start/Stop" button) is pressed before the sewing machine is correctly set to [ON].
Otherwise, the stitch settings are being saved. The message
will...
Similar Questions

How To Set Up Your Bobbin On A Brother Xl-5500 Sewing Machine
(Posted by dbnnadmst 9 years ago)

How To Repair The Bobbin Winder On Brother Xl-2230 Sewing Machine
(Posted by vivivkgk 9 years ago)

How Do You Thread The Bobbin In A Brother Xl-5340 Sewing Machine
(Posted by jugmath 9 years ago)

How To Put A Bobbin Case In A Singer 5500 Sewing Machine
(Posted by toydoy 10 years ago)

Needle Will Not Grab Bobbin Thread On Brother S-6200a Sewing Machine. What Up
(Posted by charlesjeffries 11 years ago)