
Brother International LS-2125i Support Question
Brother International LS-2125i Support Question
Find answers below for this question about Brother International LS-2125i - Basic Sewing And Mending Machine.Need a Brother International LS-2125i manual? We have 2 online manuals for this item!
Question posted by patEB on March 10th, 2014
Brother Ls2125i How To Open The Flat Bed Attachment
The person who posted this question about this Brother International product did not include a detailed explanation. Please use the "Request More Information" button to the right if more details would help you to answer this question.
Current Answers
Related Brother International LS-2125i Manual Pages
Users Manual - Multi - Page 2

... ventilation openings of the sewing machine and foot controller free from all instructions before using." Keep fingers away from the accumulation of burns, fire, electric shock, or injury to the off , then remove plug from the electrical outlet immediately after using and before changing the light bulb. "IMPORTANT SAFETY INSTRUCTIONS"
When using the sewing machine, basic...
Users Manual - English - Page 1
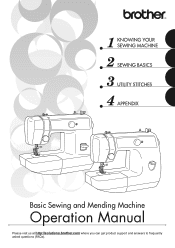
KNOWING YOUR SEWING MACHINE SEWING BASICS UTILITY STITCHES APPENDIX
Basic Sewing and Mending Machine
Operation Manual
Please visit us at http://solutions.brother.com where you can get product support and answers to frequently
asked questions (FAQs).
Users Manual - English - Page 3

.... 9. Switch the sewing machine to break. 12. "SAVE THESE INSTRUCTIONS" "This sewing machine is required around the sewing machine
needle. 11. "IMPORTANT SAFETY INSTRUCTIONS"
When using the sewing machine, basic safety precautions should always... it has been dropped or damaged, or dropped into any openings. 6. This sewing machine is used or where oxygen is not working properly, if ...
Users Manual - English - Page 6

... ...30 Changing the sewing direction ...30 Sewing curves ...30 Sewing thick fabrics ...30 Sewing thin fabrics ...31 Sewing stretch fabrics ...31 Using a free-arm style ...31
3. KNOWING YOUR SEWING MACHINE 6
NAMES OF MACHINE PARTS AND THEIR FUNCTIONS 6
The main parts ...6 Needle and presser foot section ...8 Flat bed attachment ...8
ACCESSORIES ...9 USING YOUR SEWING MACHINE 10
Power supply...
Users Manual - English - Page 8

... (page 26) Turn the pattern selection dial to use. e Flat bed attachment with accessory storage (page 8 and 31)
f Reverse sewing lever (page 28) Press and hold down the reverse sewing lever to adjust buttonhole stitching when it is not uniform. KNOWING YOUR SEWING MACHINE
1 KNOWING YOUR SEWING MACHINE
NAMES OF MACHINE PARTS AND THEIR FUNCTIONS
The main parts
a Buttonhole fine...
Users Manual - English - Page 10
....
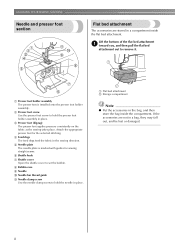
c Presser foot (Zigzag) The presser foot applies pressure consistently on the fabric as the sewing takes place. e Needle plate The needle plate is installed onto the presser foot holder assembly.
KNOWING YOUR SEWING MACHINE
Needle and presser foot section
Flat bed attachment
The accessories are not in a bag, they may fall out, and be lost or...
Users Manual - English - Page 11
... flat bed attachment. only)
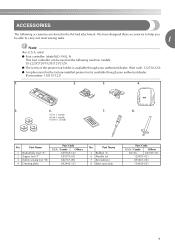
● Foot controller: Model KD-1902, N This foot controller can be able to carry out most sewing tasks.
1
Note
(For U.S.A.
Part Name
5 Bobbin (3) 6 Needle set 7 Screwdriver 8 Extra spool pin
Part Code
U.S.A. / Canada
Others
SA156
XA5539-151
129583-021
X55467-021
130920-021
9 ACCESSORIES
The following machine models: LS-2220/2720/1520/2125/2125i...
Users Manual - English - Page 16

...were designed to be used , the machine will not operate correctly.
CAUTION
● Winding the bobbin improperly may cause the thread tension to sew, you set the bobbin so the ...inches) of the same type (part code: SA156, SFB: XA5539-151).
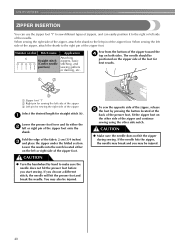
Open the shuttle cover behind the flat bed b attachment at the front of the machine. If the thread unrolls in injury.
1
2
a Wound evenly b Wound ...
Users Manual - English - Page 23
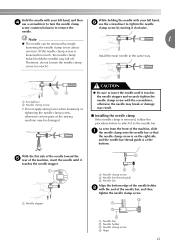
...flat side of the needle toward the e rear of the machine, insert the needle until it
touches the needle stopper. a Needle stopper
a Needle clamp screw b Needle bar thread guide c Needle bar
Align the bottom edge of the sewing machine...needle clamp If the needle clamp is removed, follow the procedure below to attach it clockwise.
Note
1
● The needle can be damaged.
Install...
Users Manual - English - Page 27
...p
4 Start sewing.
Attach the presser foot appropriate for the area to be sewn. When sewing is in injuries...machine, refer to "Power supply" (page 10). p
2 Select the stitch.
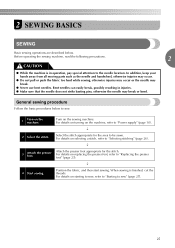
General sewing procedure
Follow the basic procedures below . For details on the machine. For details on the sewing machine.
2 SEWING BASICS
SEWING
Basic sewing operations are described below to sew...
Users Manual - English - Page 33
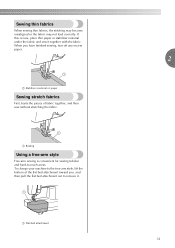
... then pull the flat bed attachment out to -reach areas. a Flat bed attachment
2
31 If this occurs, place thin paper or stabilizer material under the fabric and sew it . To change your machine to the free-arm style, lift the bottom of fabric together, and then sew without stretching the fabric. a Stabilizer material or paper
Sewing stretch fabrics
First, baste...
Users Manual - English - Page 35

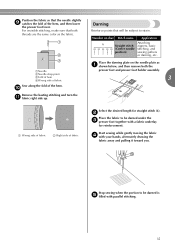
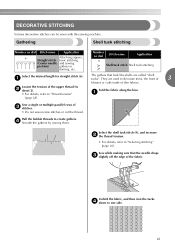
... the b hem, and press.
Number on dial
Stitch name
8 Stretch blind Stitch
Application
Blind hem stitching on dial Stitch name Application
6
Attaching Straight stitch zippers, basic
(Center needle stitching, and
position)
sewing gathers
or darning, etc.
d
• For details, refer to "Starting to "Selecting stitching" (page 26).
a Right side of fabric b Bottom side...
Users Manual - English - Page 36

...inches)
Fold back the fabric inside along the basting. UTILITY STITCHES
Use a chalk to sew onto the h arm, make g free-arm sewing possible.
• For details on the fabric about 5 mm c (3/16 inches) ...correctly,
and then start sewing.
a Wrong side of fabric b Right side of fabric c Edge of fabric
Select the stretch blind stitch (8). f
Remove the flat bed attachment and make sure that ...
Users Manual - English - Page 37
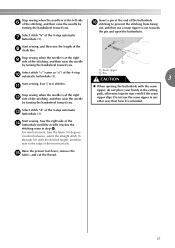
...subject to strain. aNeedle bNeedle drop point cFold of hem dWrong side of fabric
Sew along the fold of fabric
Select the desired length for reinforcement. Number on ... darning plate on dial Stitch name
6
Straight stitch
(Center needle
position)
Application
Attaching zippers, basic stitching, and sewing gathers or darning, etc.
Darning
Reinforce points that the needle slightly i catches...
Users Manual - English - Page 39
... with the desired length, and then sew to the edge of the front bar tack.
Start sewing, and then sew the length of the 4-step
b Pin
j automatic buttonhole (1). a Seam ripper
Select stitch "c" (same as "a") of the h chalk line. Sew 5 to cut towards the pin and open the buttonhole.
2
Stop sewing when the needle is at the...
Users Manual - English - Page 42
... at the
back of the presser foot, fit the zipper foot on dial Stitch name
6
Straight stitch
(Center needle
position)
Application
Attaching zippers, basic stitching, and sewing gathers or darning, etc. To sew the opposite side of the zipper, release e the foot by hand to make sure the needle does not hit the presser...
Users Manual - English - Page 45
... to one side.
43 DECORATIVE STITCHING
Various decorative stitches can be sewn with this sewing machine. Number on dial Stitch name
Application
6
Attaching zippers, Straight stitch basic stitching,
(Center needle and sewing
position)
gathers or
darning, etc. They are called "shell tucks".
Sew while making sure that look like shells are used to "Selecting stitching" (page...
Users Manual - English - Page 48
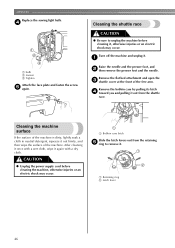
...sewing light bulb.
Cleaning the machine surface
If the surface of the machine is dirty, lightly soak a cloth in neutral detergent, squeeze it out from the retaining e ring to unplug the machine before cleaning the machine...Loosen c Tighten
Attach the face plate and fasten the screw e again. Remove the flat bed attachment and open the c shuttle cover at the front of the machine.
Users Manual - English - Page 49
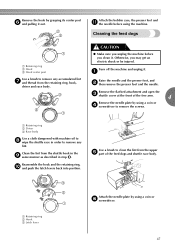
... to remove the screws.
Remove the flat bed attachment and open the
c shuttle cover at the front of the feed dogs and shuttle race body. Clean the lint from the retaining ring, hook,
driver and race body.
a Retaining ring b Hook c Latch lever
Attach the needle plate by using the machine. Attach the bobbin case, the presser foot...
Users Manual - English - Page 55
...basic stitching 33 blind hem stitching 33 bobbin 14 bobbin case 14 bobbin winder 12 button sewing 38 buttonhole foot 36 buttonhole sewing 36
C
cleaning 46
D
darning 35
E
embroidering 41 extra spool pin 22
F
, feed dogs 8 47 , flat bed attachment...of sewing fabrics, needles and threads ..... 19 repacking 48 reverse sewing lever 28
S
satin stitching 32 seam ripper 37 sewing machine ...
Similar Questions

Part Number For Flat Bed Attachment
I have a Brother HS-2000 sewing machine. I need to buy the flat bed attachment (accessory tray). I n...
I have a Brother HS-2000 sewing machine. I need to buy the flat bed attachment (accessory tray). I n...
(Posted by timelessbeauty1304 9 years ago)

Why Does The Thread Keep Breaking When I Sew On A Brother Ls2125i
(Posted by zacskill 10 years ago)

How To Open The Bobbin Case On Brother Ls2125i
(Posted by VES1smd 10 years ago)
Brother Ls2125i How To Open
(Posted by nosyt22gmha 10 years ago)

How Do I Open The Case For Brother Ls2125i
(Posted by bishalber 10 years ago)