
Brother International HC1850 Support Question
Brother International HC1850 Support Question
Find answers below for this question about Brother International HC1850.Need a Brother International HC1850 manual? We have 2 online manuals for this item!
Question posted by Nannewman on September 5th, 2016
Got Thread Wrapped Around Hand Wheel. Lifted Cover Just A Little To Help Remove
Got thread wrapped around hand wheel. Lifted cover just a little to help remove thread, now machine doesn't work.
Current Answers
Answer #1: Posted by waelsaidani1 on September 5th, 2016 9:37 AM
waelsaidani1

Member since:
May 12th, 2013 Points: 19,501,797

Member since:
May 12th, 2013 Points: 19,501,797
Related Brother International HC1850 Manual Pages
Users Manual - English - Page 10
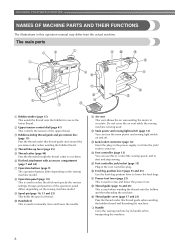
... and specify the various settings.
h Operation panel (page 10) This is used to cut them.
Do not cover the air vent while the sewing machine is used when winding the thread onto the bobbin and then threading the machine.
p Feed dog position lever (page 55 and 65) Use the feed dog position lever to manually raise...
Users Manual - English - Page 11
....
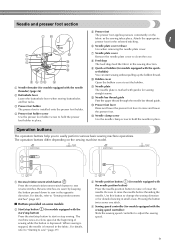
c Presser foot holder The presser foot is depressed. g Needle plate cover
Remove the needle plate cover to raise the needle before threading the needle.
The machine sews at a slow speed at the beginning of sewing while the button is installed onto the presser foot holder.
When sewing is stopped, the needle is marked with guides for models equipped...
Users Manual - English - Page 18
... slack in the spool or the machine may be damaged.
● Three spool cap sizes are available, allowing you to the front at the bottom. a Thread guide cover
16
d With the slightly rounded side of the spool cap
positioned toward the left hand.
Memo
● When sewing with your right hand so that there is moved...
Users Manual - English - Page 19
... button).
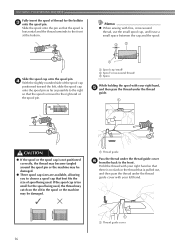
Turn the bobbin clockwise, by hand, until the spring on the shaft slides into the pre-tension disk, otherwise the bobbin may occur when the thread is wound around the bobbin a few times...be wound cleanly.
Note
● If the sewing machine is plugged in as far as possible.
● Pull the thread taut and hold the end of the thread, gently j press the foot controller or press...
Users Manual - English - Page 20
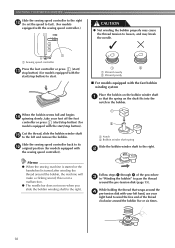
..., and may cause the thread tension to start.
1
2
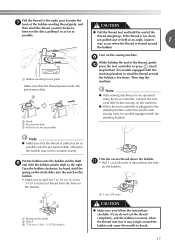
a Wound evenly b Wound poorly
■ For models equipped with the fast bobbin winding system
Place the bobbin on the bobbin winder shaft a so that wraps around the d pre-tension disk with your left and remove the bobbin. KNOWING YOUR SEWING MACHINE
Slide the sewing speed controller to the...
Users Manual - English - Page 22
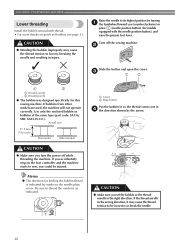
b
Slide the button and open the cover.
a Cover b Slide button
Put the bobbin in so the thread comes out in the wrong direction, it may cause the thread tension to thread the machine as indicated. CAUTION
● Winding the bobbin improperly may cause the thread tension to sew, you (counterclockwise) or
press (needle position button) (for models equipped with...
Users Manual - English - Page 23
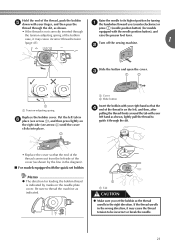
... the right direction. a Tab
CAUTION
● Make sure you (counterclockwise) or
thread through
equipped with the needle position button), and
the tension-adjusting spring of the bobbin
raise the presser foot lever.
c
1
2
1
a Tension-adjusting spring
Replace the bobbin cover. Be sure to be incorrect or break the needle.
21 Turn off the sewing machine.
Users Manual - English - Page 24
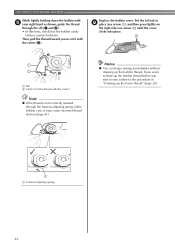
... a), and then press lightly on
the right side (see arrow b) until the cover clicks into place. Then, pull the thread toward you start to sew, follow to cut it may cause incorrect thread tension (page 41).
Replace the bobbin cover. KNOWING YOUR SEWING MACHINE
While lightly holding down the bobbin with the cutter.)
Note
● If the...
Users Manual - English - Page 25
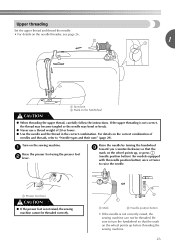
... handwheel c toward you (counterclockwise) so that the mark on the wheel points up before threading the sewing machine.
23 If the upper threading is not raised, the sewing machine cannot be threaded. or
a Mark
b Needle position button
• If the needle is not correctly raised, the sewing machine can not be threaded correctly. a Presser foot lever
CAUTION
● If the presser...
Users Manual - English - Page 28
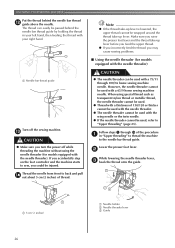
... through m of the procedure a in your left hand, then feeding the thread with your right hand.
1
Note
● If the thread take-up lever. Follow steps a through 100/16 home sewing machine needle.
b
While lowering the needle threader lever, c hook the thread onto the guide. Make sure you may cause sewing problems.
■ Using the needle threader (for...
Users Manual - English - Page 30
... button
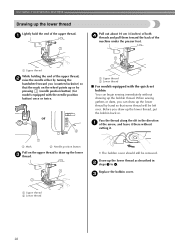
Pull on the wheel points up the lower c thread.
• The bobbin cover should still be left over. Draw up the bobbin thread.
c
a Upper thread b Lower thread
28 a Upper thread
While holding the end of the upper thread, b raise the needle either by hand so that the mark on the upper thread to 4. KNOWING YOUR SEWING MACHINE
Drawing up the lower...
Users Manual - English - Page 32

...sewing.
The factory recommended needle is extremely dangerous since the needle may be straight according to 100/16 needle, regardless of the needle on a flat surface and check that the
mark on the wheel...b Needle position button
Turn off the sewing machine, otherwise injuries may bend or break. CAUTION
● The appropriate fabric, thread and needle combinations are shown in "Checking...
Users Manual - English - Page 34
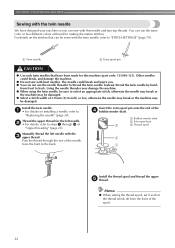
... injure you can sew with this machine (part code: 131096-121). Install the twin needle.
Insert the extra spool pin onto the end of
"Upper threading" (page 23). a Bobbin winder shaft b Extra spool pin c Thread spool
Install the thread spool and thread the upper e thread. Manually thread the left needle. Instead, thread the twin needle by hand,
from front to...
Users Manual - English - Page 35

... the eye of "Upper threading" (page 23).
Turn on the sewing machine.
X Two lines of thread and fabric that can be sewn
with the twin needle left side was threaded.
CAUTION
● When changing the sewing direction, be sure to raise the needle from the front to back. Instead, thread the twin needle by hand, from front to...
Users Manual - English - Page 37
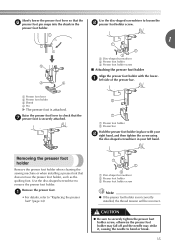
... installed, the thread tension will be incorrect. Use the disc-shaped screwdriver to "Replacing the presser foot" (page 34).
a Disc-shaped screwdriver b Presser foot holder c Presser foot holder screw
Note
● If the presser foot holder is attached.
Removing the presser foot holder
Remove the presser foot holder when cleaning the sewing machine or when...
Users Manual - English - Page 38
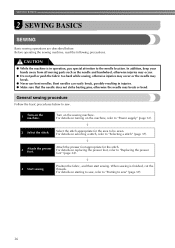
CAUTION
● While the machine is finished, cut the threads.
For details on turning on the machine. Select the stitch appropriate for the stitch.
Position the fabric, and then start sewing. In addition, keep your hands away from all moving parts such as the needle and handwheel, otherwise injuries may occur.
● Do not pull or...
Users Manual - English - Page 94
... problem persists, contact your right hand, place the bobbin in the machine and cannot be done with your dealer or the nearest authorized service center. Turn off the sewing machine. a Lower side of fabric b Lower thread visible from the upper side of the thread with the thread unwinding to the lower thread, it is pulled through the fabric...
Users Manual - English - Page 96
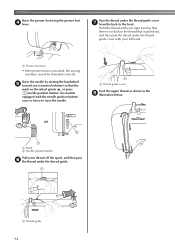
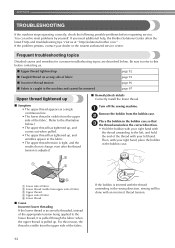
... handwheel e toward you (counterclockwise) so that the
mark on the wheel points up, or press (needle position button) (for models
equipped with your right hand so that is not raised, the sewing machine cannot be threaded correctly. a Thread guide cover
Feed the upper thread as shown in the thread that there is no slack in the h illustration below.
APPENDIX...
Users Manual - English - Page 99
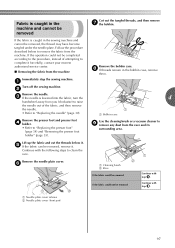
... the race. Remove the needle plate cover.
If the fabric is caught in the bobbin case, remove
them.
Continue with step p. b
Remove the needle.
f
a Cleaning brush b Race If the fabric could be removed
If the fabric could not be removed, remove it . h If threads remain in the machine and cannot be removed
Continue with step j.
a
Turn off the sewing machine. If the...
Users Manual - English - Page 109
...thread guide 9 26 , needle clamp screw 9 31
basic stitching 47 blind hem stitching 48
needle plate 9
, needle plate cover 9 89
bobbin 20
needle position 47
bobbin case 21
bobbin , cover 9 20, 21
needle position button 9
, needle threader 9 26
bobbin winder 8, 15, 18, 101, 102, 106
button sewing... 54 sewing machine needles 29
, sewing speed controller 9 13
sewing the character...
Similar Questions

What Are The Different Diles On This Sewing Machine? I Just Found A Sewing Machi
(Posted by Sherlevy2014 9 months ago)

How To Take Covers Of A Brother Xl-6452 Sewing Machine.
How to take covers of a Brother XL-6452 sewing machine.
How to take covers of a Brother XL-6452 sewing machine.
(Posted by kitebugy 3 years ago)

How To Fix The Brother Sewing Machine Problems With Hand Wheel
(Posted by blipslacov 9 years ago)

How To Use The Hand Wheel In Brothers Sewing Machine
(Posted by sgujef 9 years ago)
How Do I Thread The Brother Sewing Machine Ls2125
I have to use my mother in laws sewing machine and I don't know how to thread it. How do I thread th...
I have to use my mother in laws sewing machine and I don't know how to thread it. How do I thread th...
(Posted by Scampbellsoup79 9 years ago)