
Brother International CE-5500PRW Support Question
Brother International CE-5500PRW Support Question
Find answers below for this question about Brother International CE-5500PRW.Need a Brother International CE-5500PRW manual? We have 3 online manuals for this item!
Question posted by deb52854 on June 21st, 2014
Where Do I Get A Captcha Code In Order To Print A Manuel L
The person who posted this question about this Brother International product did not include a detailed explanation. Please use the "Request More Information" button to the right if more details would help you to answer this question.
Current Answers
Answer #1: Posted by TheWiz on June 21st, 2014 6:55 AM
TheWiz

Member since:
October 13th, 2011 Points: 25,383,424

Member since:
October 13th, 2011 Points: 25,383,424
Related Brother International CE-5500PRW Manual Pages
Users Manual - English - Page 1
Computerized Sewing Machine
Operation Manual
Product Code:885-V60/V61/V62
KNOWING YOUR SEWING MACHINE
SEWING BASICS
UTILITY STITCHES
APPENDIX
Please visit us at http://solutions.brother.com where you can get product support and answers to frequently asked questions (FAQs).
Users Manual - English - Page 6

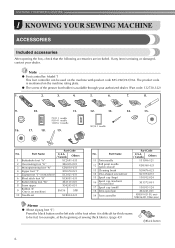
... THEIR FUNCTIONS 8
The main parts ...8 Needle and presser foot section ...9 Operation buttons ...9 Operation panel ...10 Spool pin ...10
USING YOUR SEWING MACHINE 12
Power supply precautions ...12 Power supply ...12 Foot controller ...13 Sewing speed controller (for models equipped with the start/stop button 13 Changing the needle stop position ...13
THREADING THE...
Users Manual - English - Page 8
... foot controller can be fed, for example, at the beginning of sewing thick fabrics. (page 43)
aBlack button
6 Press the black button on the machine with product code 885-V60/V61/V62. If any item is available through your dealer.
The product code is difficult for thick seams to be used on the left...
Users Manual - English - Page 10
... the spool of the upper thread.
m Jack/socket connector (page 12) Insert the plug on the sewing machine model.
r Thread guide (pages 15 and 24) This is being used.
f Flat bed attachment with... guide and around the pretension disc when winding the bobbin thread. KNOWING YOUR SEWING MACHINE
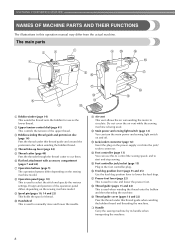
NAMES OF MACHINE PARTS AND THEIR FUNCTIONS
The illustrations in the foot controller plug.
p Feed ...
Users Manual - English - Page 11

... controller to hold the needle in the fabric. Needle and presser foot section
e Presser foot
The presser foot applies pressure consistently on the sewing machine model. i Quick-set bobbin (for sewing straight seams.
l Needle bar thread guide Pass the upper thread through the needle bar thread guide.
d Presser foot holder screw Use the...
Users Manual - English - Page 12
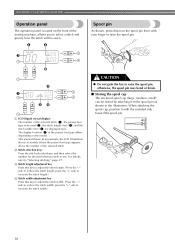
a LCD (liquid crystal display)
The number of the sewing machine, allows you wish to the spool pin as an example, the LCD (... stitch selection keys, and then select the number for the stitch that you to reduce the stitch width;
KNOWING YOUR SEWING MACHINE
Operation panel
The operation panel, located on the model.
c Stitch length adjustment key Press this key to adjust the stitch...
Users Manual - English - Page 13
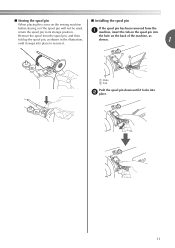
... spool pin into
Remove the spool from the spool pin, and then
the hole on the sewing machine
before storing or if the spool pin will not be used, return the spool pin to ...11 ■ Storing the spool pin
■ Installing the spool pin
When placing the cover on the back of the machine, as
fold up the spool pin, as shown in the illustration,
shown.
1
until it locks into place to its...
Users Manual - English - Page 14
... cause fire or electric shock.
To reduce the risk of time. If the plug does not fit fully in any way.
12 KNOWING YOUR SEWING MACHINE
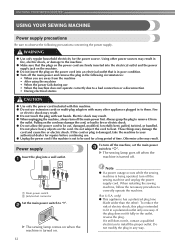
USING YOUR SEWING MACHINE
Power supply precautions
Be sure to observe the following circumstances:
• When you are firmly inserted into the electrical outlet and the power supply...
Users Manual - English - Page 15

... controller
• The speed set to leave the needle in order to build up on the foot controller. Doing so could cause a fire or an electric shock. After turning on the sewing machine, release the "-" side of cloth and dust to prevent the machine from accidentally being started. When you take your foot off...
Users Manual - English - Page 16
...use the bobbin that have been designed for this sewing machine.
KNOWING YOUR SEWING MACHINE
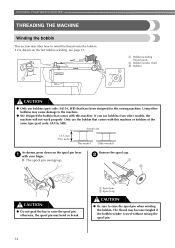
THREADING THE MACHINE
Winding the bobbin
This section describes how to ...a with this machine or bobbins of the same type (part code: SA156, SFB). If you use bobbins (part code: SA156, SFB) that comes with this machine. b
CAUTION
● Do not grab the bar to the machine.
● ...
Users Manual - English - Page 18
...pull out 7 to 10 cm (2-3/4 to
3-15/16 inches) of the thread straight up.
KNOWING YOUR SEWING MACHINE
Pull the thread to the right, pass it under the pretension disk.
Turn on the shaft b Notch...(2-3/4 - 3-15/16 inches)
Trim the excess thread above the bobbin. Note
● If the sewing machine is wound around the bobbin. i
While holding the end of the bobbin-winding thread guide, and
...
Users Manual - English - Page 19
... original position (for models equipped with the start/stop button).
Memo
● When the sewing machine is started or the handwheel is not a malfunction.
● The needle bar does not...bobbin. this is turned after winding the thread around the bobbin, the machine will make a clicking sound;
Slide the sewing speed controller to the right l (to set the speed to fast). (For models
CAUTION...
Users Manual - English - Page 20
... winder seat, the thread may become tangled in the bobbin winder seat.
Note
● If the sewing machine is cut the thread as described. If the bobbin is not a malfunction.
● The needle ...bar does not move when you slide the bobbin winding shaft to the right.
18
KNOWING YOUR SEWING MACHINE
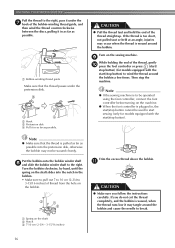
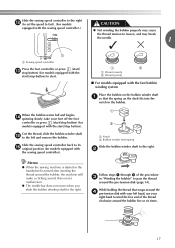
Pull the thread to the right and pass it through e the slit in the bobbin or the ...
Users Manual - English - Page 21

...direction. CAUTION
● Make sure you turn the power off the sewing machine.
Memo
● The direction for this sewing machine. b
● Winding the bobbin improperly may cause the thread tension to be...the needle plate cover. Use only the enclosed bobbin or bobbins of the same type (part code: SA156, SFB). Lower threading
Raise the needle to its highest position by turning a the ...
Users Manual - English - Page 22

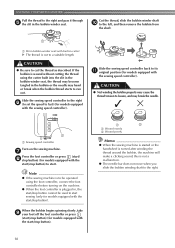
Turn off the sewing machine.
Put the left tab in the right direction. Be sure to thread the machine as shown by turning a the handwheel toward you set bobbin
Memo
●...by marks on
the right side (see arrow a), and then press lightly on the needle plate cover. KNOWING YOUR SEWING MACHINE
Hold the end of the thread, push the bobbin e down with your left hand as shown, lightly pull the...
Users Manual - English - Page 24
...page 28).
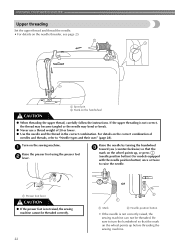
a Presser foot lever
CAUTION
● If the presser foot is not raised, the sewing machine cannot be threaded. Raise the needle by turning the handwheel c toward you (counterclockwise) so that the... and the thread in the correct combination. Turn on the wheel points up before threading the sewing machine. Be sure to raise the needle. For details on the wheel points up , or press...
Users Manual - English - Page 26
... .
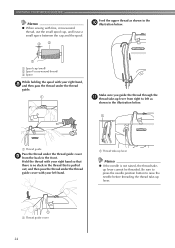
Hold the thread with fine, cross-wound thread, use the small spool cap, and leave a small space between the cap and the spool. KNOWING YOUR SEWING MACHINE
Memo
● When sewing with your right hand so that is not raised, the thread takeup lever cannot be threaded.
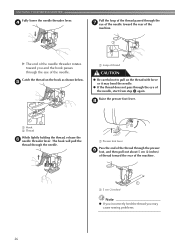
Users Manual - English - Page 27
... and the thread take-up lever before you feed the upper thread.
● If you incorrectly feed the thread you turn the power off the sewing machine. When using the needle threader (for models equipped with the needle threader)
The thread can easily be passed behind the needle bar thread l guide above...
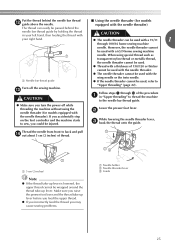
Users Manual - English - Page 28
... 5 cm (2 inches)
of thread toward the rear of the machine. e
a Loop of the needle. a Presser foot lever
Pass the...machine.
Raise the presser foot lever.
h
a Hook b Thread
While lightly holding the thread, release the f needle threader lever. a 5 cm (2 inches)
Note
● If you incorrectly feed the thread you and the hook passes through the needle.
KNOWING YOUR SEWING MACHINE...
Users Manual - English - Page 44
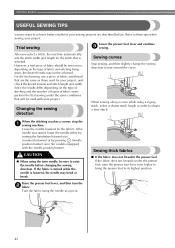
... the sewing direction
Sewing curves
Stop sewing, and then slightly change the sewing direction to these tips when sewing your project. Leave the needle lowered (in order to obtain a finer stitch. Sewing thick...thread tension and stitch length and width.
Refer to sew around the curve. When the stitching reaches a corner, stop the a sewing machine. If the fabric is turned while the needle is...
Similar Questions

How To Thread Bobbin Brother Ce5500prw Sewing Machine
(Posted by mastAES 9 years ago)

How To Make A Baste Stitch On A Brother Project Runway Sewing Machine
(Posted by citrmstr 9 years ago)

How To Wind The Bobbin On A Ce5500prw Brother Sewing Machine
(Posted by Jayaabu 9 years ago)

Auto Threader On Brother Sewing Machine Ce 8080prw
my new brother sewing machine auto threader does not work.have changed needle position and needles s...
my new brother sewing machine auto threader does not work.have changed needle position and needles s...
(Posted by curtisbuchanan48 10 years ago)

How To Change Needle Brother Sewing Machine Ce 5500 Prw
i lost my manual and do not know how to change the needle for a brother sewing machine CE 5500 PRW. ...
i lost my manual and do not know how to change the needle for a brother sewing machine CE 5500 PRW. ...
(Posted by giomariagina 11 years ago)