Bosch WTMC5321US Support Question
Bosch WTMC5321US Support Question
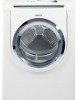
Find answers below for this question about Bosch WTMC5321US - 27" Electric Dryer 500 Series.Need a Bosch WTMC5321US manual? We have 3 online manuals for this item!
Question posted by mkeilty on September 22nd, 2015
Terminal Block Screws
I need to replace the terminal block screws that attach the 3 wire power cord. I don't have the size of the screw.
Current Answers
Answer #1: Posted by TommyKervz on September 22nd, 2015 2:09 PM
TommyKervz

Member since:
January 10th, 2013 Points: 17,776,813

Member since:
January 10th, 2013 Points: 17,776,813
You have to Bosch customer service center using the provided form or phone at
1-800-944-2904 Mon.-Fri.: 5:00 a.m.-6:00 p.m. PST. Sat.: 6:00 a.m.-3:00 p.m. PST.
The help center should be able to give you the correct size. OR simple call this number to place an order: 1-866-404-9810
Related Bosch WTMC5321US Manual Pages
Pedestal Installation Instructions - Page 2

...continuing.
Figure 1 1. 17 mm open end wrench 2. 6 mm Allen (Hex) wrench 3. (4) Socket Head Cap Screws and
(4) Flat Washers 4. (4) Height Adjustable Feet 5. (4) Spacers 6.
d CAUTION
Excessive Weight Hazard Use two or ... result of nonĆobservance of this warning. d CAUTION
CAUTION-
If you need to uninstall your appliance is used to draw the
user's attention to move and...
Pedestal Installation Instructions - Page 3

...pedestal carton) or other suitable protective covering flat on the back of the slotted area. For dryers go directly to the washer drum.
i Your washer was originally
shipped with the Preparing Your... drum during the original setup. If you are installing the pedestal on a new washer or dryer, proceed to washers. New Appliance -If you are installing the pedestal on an appliance that ...
Pedestal Installation Instructions - Page 5

...Screw the feet into the threaded corner holes in any of the pedestal. Figure 10
Figure 12
d CAUTION
When lifting the appliance, be careful not to slide against the floor. d CAUTION
Avoid holding the appliance by the pedestal when lifting it to allow it . For dryers..., and into their threads.
Retain the bolts for all screws (see Figure 10). Install the four new feet that ...
Pedestal Installation Instructions - Page 6

... edges of injuries -Take care when using the wrench. Figure 14 q Completely remove all four feet screwed in
completely (see Figure 17, item 2) it unlevel again.) Each foot of the foot.
6 q... If the bushings do this with the
washer and bushing attached. Slide the appliance to loosen, then pull them until they can make it is leveled. Figure 15...
Pedestal Installation Instructions - Page 8

...is subject to the instructions provided in the washer or dryer Operating, Care and Installation Instructions", supplier will repair or replace any other rights which the pedestal is available by ...province to the Operating, Care and Installation Instructions" that came with the washer or dryer that is installed with any of its mechanical parts if defective in the Installation Instructions...
Installation and Use & Care (all languages) - Page 2

...
Panel 11
Summary of instructions 12
Safety information 13
Before switching on the dryer 13
Using the dryer 13
Protecting the dryer 13
Protection of the environment 13
Before using the dryer for the first time 13
Temporary disconnection of the dryer 13
Laundry 13
Identification of fabrics 13
Drying tips 13
Program selection 14
Automatic...
Installation and Use & Care (all languages) - Page 3
...replace any part of
the appliance or attempt any questions especially concerning installation of the dryer - An obstructed port might reduce the airflow.
14. The interior of the machine and exhaust duct should be exposed to persons and /or damage when using the dryer. Disconnect the power cord...i This symbol is removed from the electrical supply before using your household. High ...
Installation and Use & Care (all languages) - Page 4
... sure to the electrical power supply. 21. For U.S.A. SAVE THESE INSTRUCTIONS
INSTALLATION INSTRUCTIONS
Introduction
Read these instructions the dryer must be used for its intended purpose. 22. In addition to cooking oils in accordance with cooking oils may occur. All packaging materials are a potential fire hazard.
28. Replace worn out power cords and/or loose plugs...
Installation and Use & Care (all languages) - Page 5

...be fitted with dripping
water, - If the dryer is installed in an environment with vents of a specified minimum size. Do not lift the appliance by yourself. ...dryer is supplied without a power cord. The installation room must be connected by qualified persons only. Dimension
Weight
a
27.0" (686 mm) 125 lbs
b
31.8" (808 mm)
(56 kg)
with
c
37.2" (945 mm) packaging
d
19.7" (500...
Installation and Use & Care (all languages) - Page 6
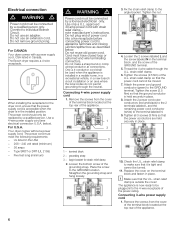
...relief clamp
2. strain relief clamp.
6. Attach the power cord ground conductor (green) to the GROUND location.
below . Your dryer comes without a power supply cord. Tighten all 3 screws (3 Nm) so that it is held securely in the installed position. Loosen the bottom screw of the GROUND terminal.
5. Check the U.L. Replace the cover on the terminal block and fasten in the USA - 208...
Installation and Use & Care (all languages) - Page 7
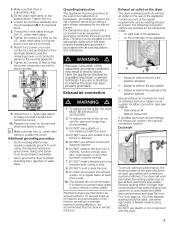
...6. Tighten the screws (2.5 Nm) on the terminal block and fasten in electric shock. Attach the 2 power cord outer conductors (red and black) to the 2 terminals labeled L and the remaining power cord conductor (white) to the optional connection location. Tighten all local regulations and ordinances. strain relief clamp to make sure that it is recommended that the U.L. Replace the cover...
Installation and Use & Care (all languages) - Page 8
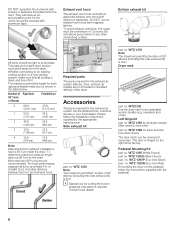
...sure that extend into the duct. Number of each duct section must be obtained from the dryer. i Special tool for cutting the hole in the table below. WTZ 1260 for both... connecting to the chart. no .
Bottom exhaust kit
All joints should be secured with screws or fasteners that all turns by the appropriate manufacturer! For best performance, separate all ducting...
Installation and Use & Care (all languages) - Page 9
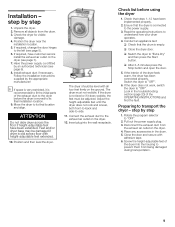
... and find the fault. If the dryer does not work, switch the dryer to "Extra Dry" and then press the Start button. Screw the heightĆadjustable feet of the exhaust duct to the dryer before using the dryer
1. Unpack the dryer. 2. Have the power supply cord fitted by step
1.
The dryer should be level with all objects from...
Installation and Use & Care (all languages) - Page 10
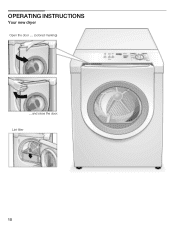
OPERATING INSTRUCTIONS
Your new dryer
Open the door .... (colored marking)
....and close the door. Lint filter
10
Installation and Use & Care (all languages) - Page 11
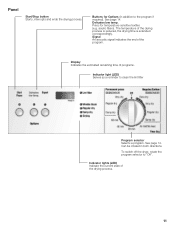
...;sensitive textiles (e.g. acrylic fibers). See page 14. Delicates low temp. Display Indicates the estimated remaining time of the drying process.
11 To switch off the dryer, rotate the program selector to clean the lint filter
Program selector Selects a program. Panel
Start/Stop button Starts, interrupts and ends the drying process. Press...
Installation and Use & Care (all languages) - Page 14
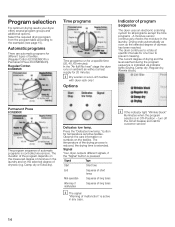
... of the program depends on the measured degree of moisture in the laundry. Delicates low temp. Signal Your dryer outputs different signals, if the "Signal" button is extended. Select the... program sequence is controlled via indicator lights (Drying, Damp dry, Regular dry, Wrinkle block). Signal
Type
Start
Short tone
End
Sequence of short
tones
MalĆoperation
Sequence of...
Installation and Use & Care (all languages) - Page 16
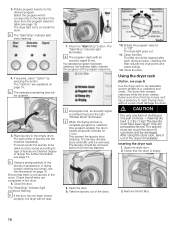
The dryer light turns on page 16.
Close the door. The Start/Stop" indicator light illuminates.
i The program starts with an
acoustic signal (if set ) and the LED Wrinkle block" illuminates. This prevent the laundry from the program selection table (see page 13. The laundry remains loose and fluffy until it is
complete (program or...
Installation and Use & Care (all languages) - Page 19
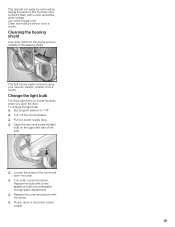
...! Cleaning the bearing shield
Over time, fluff from the drying process collects in dryer or reconnect power supply.
19 q Open the door and locate the light
bulb on inside the drum when you open the cover. Replace the bulb with the screw. q Replace the cover and secure with a new appliance bulb only (obtainable through parts...
Installation and Use & Care (all languages) - Page 20
... does not illuminate. Wrinkle block" indicator lights. Start program.
Remove and reinstall the cover as described on fuse. Select program.
Spin laundry at higher speed in your washer. Select program. Replace/switch on page 18.
Ambient temperature below 41 °F/5 °C.
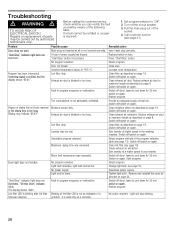
Troubleshooting
d WARNING d
TO AVOID RISK OF ELECTRICAL SHOCK! Repairs or replacement of a problem...
Installation and Use & Care (all languages) - Page 22
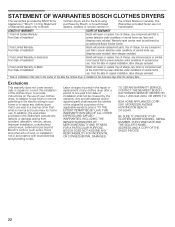
... for home use from the date of original installation, labor charges excluded.
2 Year Limited Warranty on the use of your clothes dryer, to replace house fuses or correct plumbing or the electric wiring in your home or to the first using purchaser by Bosch or its authorized dealers, retailers or service centers in
the...
Similar Questions

Bosch 500 Series Gas Dryer Wrinkle Block Will Not Run
(Posted by okrm 9 years ago)

How To Remove Rear Panel On Bosch Nexxt 500 Series Dryer
(Posted by blackendri 10 years ago)

Bosch 500 Series Dryer
where is the reset switch located on the 500 series dryer?
where is the reset switch located on the 500 series dryer?
(Posted by lyndabland 10 years ago)

Wtmc3321us 500 Series Dryer
My dryer worked yesterday and today when I put a load in it only puts out cold air, not hot. I have ...
My dryer worked yesterday and today when I put a load in it only puts out cold air, not hot. I have ...
(Posted by billywhichway 13 years ago)

Bosch Dryer 500 Electric Dryer Gives Signal E-01 And Does Not Finish Drying.
We have cleaned out the Lint Filter and cleaned the bottom of the lint trap and we have checked the ...
We have cleaned out the Lint Filter and cleaned the bottom of the lint trap and we have checked the ...
(Posted by shermahargrove 13 years ago)