Bosch SHV53T53UC Support Question
Bosch SHV53T53UC Support Question
Find answers below for this question about Bosch SHV53T53UC.Need a Bosch SHV53T53UC manual? We have 2 online manuals for this item!
Question posted by jsstarkey on April 14th, 2016
How Do You Tighten A Loose Handle?
Do we have to remove all the screws on the door to tighten a loose handle? Thanks.
Current Answers
Answer #1: Posted by Odin on April 14th, 2016 1:12 PM
Odin

Member since:
April 10th, 2010 Points: 41,236,690

Member since:
April 10th, 2010 Points: 41,236,690
Hope this is useful. Please don't forget to click the Accept This Answer button if you do accept it. My aim is to provide reliable helpful answers, not just a lot of them. See https://www.helpowl.com/profile/Odin.
Related Bosch SHV53T53UC Manual Pages
Installation Instructions - Page 3
....
Hydrogen gas is properly installed. Removing any work . Do not attempt any cover or pulling the dishwasher from the dishwasher.
Handle with all electrical connections are to ...Make sure electrical work on an uninstalled dishwasher, carefully open the door while supporting the rear of ensuring that the dishwasher electrical installation is completely installed. Avoiding Electrical...
Installation Instructions - Page 4
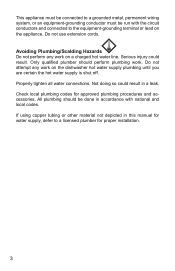
...plumbing procedures and accessories. Do not use extension cords. Avoiding Plumbing/Scalding Hazards Do not perform any work on the dishwasher hot water supply plumbing until you are certain the hot water supply is shut off. Only qualified plumber should be... plumber for proper installation.
3 Do not attempt any work on a charged hot water line. Properly tighten all water connections.
Installation Instructions - Page 11
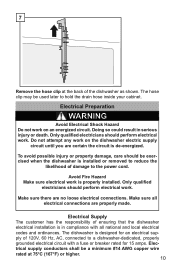
... installed or removed to reduce the
likelihood of ensuring that the dishwasher electrical installation is de-energized. The hose clip may be a minimum #14 AWG copper wire rated at the back of 120V, 60 Hz, AC, connected to a dishwasher-dedicated, properly grounded electrical circuit with all electrical connections are no loose electrical connections. Only...
Installation Instructions - Page 12
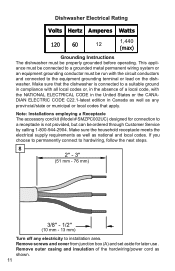
... Amperes Watts
120 60
1125
1,4450 (max)
Grounding Instructions The dishwasher must be run with the NATIONAL ELECTRICAL CODE in the United States or the CANADIAN ELECTRIC CODE C22.1-latest edition in Canada as well as any electricity to installation area. Remove screws and cover from junction box (A) and set aside for connection...
Installation Instructions - Page 13
....
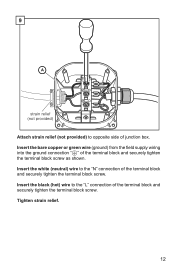
12 Insert the white (neutral) wire to the "L" connection of the terminal block and securely tighten the terminal block screw. Insert the black (hot) wire to the "N" connection of the terminal block and securely tighten the terminal block screw. Insert the bare copper or green wire (ground) from the field supply wiring into the...
Installation Instructions - Page 14
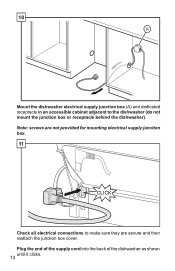
... junction box (A) and dedicated receptacle in an accessible cabinet adjacent to make sure they are secure and then reattach the junction box cover. Note: screws are not provided for mounting electrical supply junction box.
11
Check all electrical connections to the dishwasher (do not mount the junction box or receptacle behind the...
Installation Instructions - Page 15
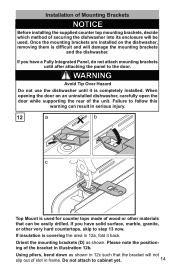
... in 12c such that can result in serious injury.
12
Top Mount is completely installed. Using pliers, bend down as shown. When opening the door on the dishwasher, removing them is covering the area in 12a, fold it is used .
If you have a Fully Integrated Panel, do not attach mounting brackets until it...
Installation Instructions - Page 20
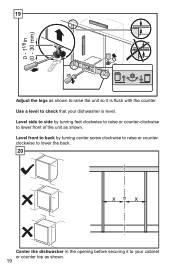
Level side to side by turning center screw clockwise to raise or counterclockwise to lower the back.
20
Center the dishwasher in the opening before securing it is level. Use a level to check that your cabinet or counter top as shown. 19 Level...front of the unit as shown.
11/16
19
Adjust the legs as shown to raise the unit so it to your dishwasher is flush with the counter.
Installation Instructions - Page 21
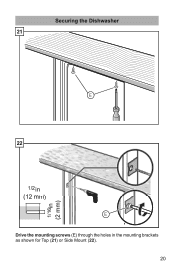
Securing the Dishwasher 21
E
22
E Drive the mounting screws (E) through the holes in the mounting brackets as shown for Top (21) or Side Mount (22).
20
Installation Instructions - Page 23
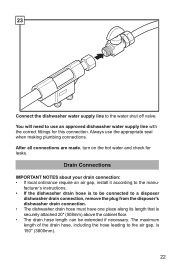
... when making plumbing connections. After all connections are made, turn on the hot water and check for this connection. You will need to a disposer
dishwasher drain connection, remove the plug from the disposer's dishwasher drain connection. • The dishwasher drain hose must have one place along its length that is 150″ (3800mm).
22
Installation Instructions - Page 24
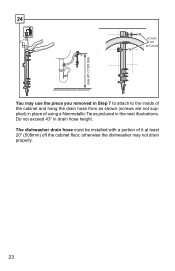
... the next illustrations. otherwise the dishwasher may use the piece you removed in Step 7 to attach to the inside of the cabinet and hang the drain hose from as shown (screws are not supplied) in place of it at least 20" (508mm) off the cabinet floor; The dishwasher drain hose must be installed with...
Installation Instructions - Page 26
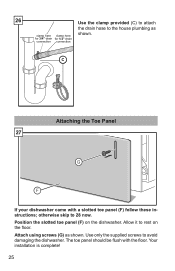
... toe panel should be flush with a slotted toe panel (F) follow these instructions; Use only the supplied screws to 28 now. Attach using screws (G) as
shown.
C
Attaching the Toe Panel 27
G
F
If your dishwasher came with the floor. Position the slotted toe panel (F) on the floor. 26
Use the clamp provided (C) to attach
the...
Installation Instructions - Page 27
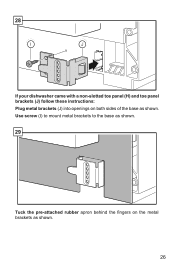
Use screw (I
J
If your dishwasher came with a non-slotted toe panel (H) and toe panel brackets (J) follow these instructions: Plug metal brackets (J) into openings on the metal brackets as shown. 28
I ) to mount metal brackets to the base as shown.
29
Tuck the pre-attached rubber apron behind the fingers on both sides of the base as shown.
26
Instructions for Use - Page 4

... damages or consequences. Never use harsh chemicals to clean your installer for licensed food establishments.
3 NOTICE
Never use the dishwasher in any way not covered in this manual or for soil removal and sanitation efficacy. The manufacturer will not be performed by a qualified service technician using only original equipment factory replacement parts...
Instructions for Use - Page 5
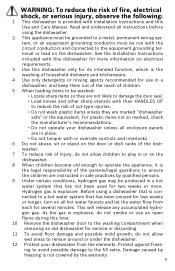
...injury, observe the following:
1 This dishwasher is provided with Installation Instructions and this time.
10 Remove the dishwasher door to the washing compartment when removing an old dishwasher for service or discarding.
11 To ... gas may be produced in a dishwasher, and keep them out of the reach of children.
5 When loading items to be run with their HANDLES UP to reduce the risk of injury...
Instructions for Use - Page 6
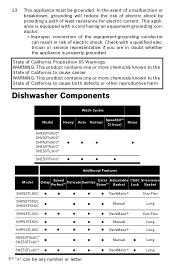
...or more chemicals known to the State of California to cause cancer. Dishwasher Components
Wash Cycles
Model
Heavy
Auto
Normal
Speed60™ (1 hour)
...
Delicate
Sanitize
Extra Shine™
Adjustable Basket
Child Lock
Silverware Basket
SHX53TL5UC SHX53T55UC SHV53T53UC SHV53TL3UC SHP53T55UC SHP53TL5UC SHE53T5xUC* SHE53TFxUC* SHE53TLxUC*
RackMatic® Manual
RackMatic® ...
Instructions for Use - Page 8

...: Tin will rust. Loading the Dishwasher
Do not pre-wash items with wooden handles can usually be hand washed; Refer...loosely attached soiling. Dishware Materials
Note: Before using your water may separate. Hand wash and dry immediately. Items having burned-on, bakedon or starchy soils may loosen. Separate items of bowls, pots and pans are not dishwasher safe and should be removed...
Instructions for Use - Page 11
...downward to create more space. Figure 1
Manual Adjustable Upper Rack (model dependent)
Remove the empty upper rack by pulling it out of the dishwasher until it stops.
2 To lower the rack, push the lever inward.
...sides, the dish- Pull the rack up .
To fold down depending on both sides. washer door will not shut and the top rack spray arm will not connect to load in Figure 1. ...
Instructions for Use - Page 16
Operating the Dishwasher
SHE53T5xUC* A BC
SHE53TFxUC*
ABC
SHE53TLxUC*
A BC
SHP53T55UC, SHX53T55UC ABC
SHV53T53UC SHV53TL3UC SHX53TL5UC
ABC ABC ABC
* "x" can be any number or letter 15
Instructions for Use - Page 21
...
hot water supply plumbing
Dishes are not nesting (see "Loading the Dishwasher" section of the door, the display only illuminates when the door is detected
section in this manual
supply to the
water conditions
dishwasher
3. The following information may help you
2. Problem
Cause
Action
Dishwasher does not start engaged
3. To reset, refer to improve drying...
Similar Questions

Dishwasher Will Not Rinse And Empty. Why?
Machine would not rinse and turn off - it is 10 years old and not used every day at all. Who is reco...
Machine would not rinse and turn off - it is 10 years old and not used every day at all. Who is reco...
(Posted by traksan12 8 years ago)

Handle Cracked/loose
The handle on this wash Her is loose and has a crack in the surrounding plastic. Only a matter of ti...
The handle on this wash Her is loose and has a crack in the surrounding plastic. Only a matter of ti...
(Posted by tonyc9177 9 years ago)

My Bosch Dishwasher Starts And Then Error 24 Pops Up , What Does This Mean ?
(Posted by bkevinhughes 10 years ago)

How To Remove Detergent Door
(Posted by garourke 11 years ago)
How To Remove And Replace The Soap Dispenser
I need to know how to remove the door to remove the soap dispenser. There are 5 screws on both sides...
I need to know how to remove the door to remove the soap dispenser. There are 5 screws on both sides...
(Posted by gantnigel 11 years ago)