Bosch NGM5654UC Support Question
Bosch NGM5654UC Support Question
Find answers below for this question about Bosch NGM5654UC - 36in 5 Burner Gas Cooktop.Need a Bosch NGM5654UC manual? We have 2 online manuals for this item!
Question posted by dgermano on June 29th, 2011
Gas Leak
My new cooktop has a gas odor around the control knobs. Where is it leaking?
Current Answers
Related Bosch NGM5654UC Manual Pages
Use & Care Manual (all languages) - Page 2
...1
Safety 1
IMPORTANT SAFETY INSTRUCTIONS . . . 1
Getting Started 3
Before Using the Appliance for the First Time 3 Parts and Accessories Included 4 Sealed Burners 6 Burner Caps 6 Burner "ON" Light 8 Burner Grates 8 Control Knobs 9 Burner Control Knob Removal 9
Operation 10
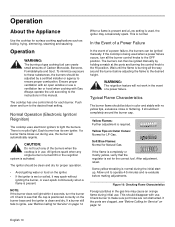
About the Appliance 10 Operation 10 Normal Operation (Electronic Ignition/Reignition 10 In the Event of a Power...
Use & Care Manual (all languages) - Page 3

... only the cooktop burners can only be lit manually.
• To prevent carbon monoxide build-up and operate it up , do not block appliance air vents.
• For proper lighting and performance of burners, keep igniters... out of checking for leaks. Some leaks can be found with the burner control in the ON position and this manual. See "WHAT TO DO IF YOU SMELL GAS" on the list. Kitchen...
Use & Care Manual (all languages) - Page 4
...bubbling and splattering, heat oil slowly on low or medium settings. Do not touch any of the burners when the cooktop is capable of causing extreme burns and injury.
• Never move a pan of hot oil, .... Fire Safety
• Do not use aluminum foil to line any part of the cooktop.
• Set the burner control so that the flame does not extend beyond the edges of the pan. Always use cookware...
Use & Care Manual (all languages) - Page 5

... interest to children should not be a slight odor during the first several uses; This reduces the risk of fires, spills and burns.
• Adjust burner flame size so that are suitable for easy ...The use . WARNING:
To avoid electrical shock hazard, before servicing the cooktop, switch power off the burner and allow the cooktop to cool. allowed to play in its vicinity, whether or not the...
Use & Care Manual (all languages) - Page 8
...on page 7.
See figure "Burners Caps" on page 7.
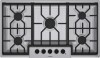
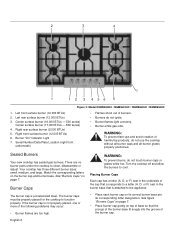
• Place burner cap gently on its correct burner base per its corresponding letter designation. Burner "On" Indicator Light 7. English 6 Left rear surface burner (12,000 BTUs) 3. Sealed Burners
Your new cooktop has sealed gas burners. The burner caps must be properly placed for the cooktop to cool. Turn the cooktop off and allow the...
Use & Care Manual (all languages) - Page 10
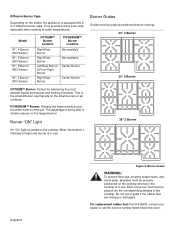
... in the cooktop. This is being able to 3 diffusion burner caps. When illuminated, it indicates at lower temperatures. Model
30", 4 Burner (500 Series) 36", 5 Burner (500 Series) 30", 5 Burner (800 Series)
36", 5 Burner (800 Series)
OPTISIM™ Burner Location
Right Rear Burner
Right Rear Burner
Left Rear Burner & Front Right Burner
Right Rear Burner
POWERSIM™ Burner Location
Not...
Use & Care Manual (all languages) - Page 11
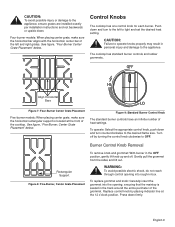
..., Center Grate Placement
WARNING:
To avoid possible electric shock, do not reach through control opening , ensuring that the maintop is located at the 12 o'clock position. Control Knobs
The cooktop has one control knob for each burner.
English 9
Figure 9: Standard Burner Control Knob
The standard burner controls have an infinite number of the left to light and set the desired heat...
Use & Care Manual (all languages) - Page 12
... position. To minimize exposure to these substances, the burners should be adjusted by holding a match at the ports and turning the control knob to ensure proper combustion.
The cooktop has one control knob for Natural Gas. Push down and turn the burner off. Each burner has its own igniter.
If the cooktop is normal. Wait until the flame is required...
Use & Care Manual (all languages) - Page 13

... cooking results, large pans should be heard when the burner is turned off manually. NOTE: An audible "pop" may cook unevenly.
• Cast-iron cookware absorbs heat slowly and cooks more constant cooking temperature.
• Check the food occasionally to see if the control knob should be turned to a lower or higher setting...
Use & Care Manual (all languages) - Page 14

... Properly • A well-fitting lid helps shorten the cooking time. Specialty Cookware
Pans that will do not constitute an endorsement of the burners when the cooktop is a boilover or when the burner does not light even though the electronic ignitors click.
• Do not use .
Canners and pressure cookers must meet the same...
Use & Care Manual (all languages) - Page 15

...; Hot sudsy water; Remove soil immediately.
• Do not use wet sponge or towel on label before using.
English 13 Cooktop Cleaning Chart Cooktop Part / Material
Burner Base Aluminum Alloy
Burner Cap Porcelain Enamel
Control Knobs and Grommets
Exterior Finish Stainless Steel
Suggested Cleaners
Important Reminders
• Detergent and hot water; Formula 409®.
rinse and...
Use & Care Manual (all languages) - Page 16
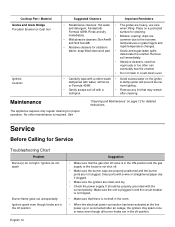
...Burner(s) do not light / Ignitors do not spark
Burner flame goes out unexpectedly Ignitors spark even though knobs are in the off position
Suggestion
• Make sure that the gas shut off valve is not shut off.
• Make sure the burner...A damp igniter will prevent burner
or Formula 409®. Cooktop Part / Material Grates and Grate Bridge Porcelain Enamel on a protected
Formula 409®....
Installation Instructions - Page 2
... You Begin 2
Tools and Parts Needed 2 Parts Included 2 General Information 3 Preparation 3
Installation Procedure 4
Prepare the Countertop 4 Seal the Cooktop with Foam Tape 4 Install the Cooktop 5 Connect Gas Supply 5 Connect Electrical Supply 6 Burner Cap Placement 6 Final Check 8
Service 8
Before Calling Service 8
Product Data Plate 8
This Bosch Appliance is made by BSH Home...
Installation Instructions - Page 3
...IS COMPLETE. Gas Appliance Safety
WARNING:
If the information in the manuals. show the owner where the gas shut-off valve must be a "T" handle gas cock. • Flexible gas connector must be new and not... supplied with natural gas. Equipment and Usage Safety Requirements
• The cooktop must be used .
• The appliance is located. WHAT TO DO IF YOU SMELL GAS
• Do not...
Installation Instructions - Page 4
... the cabinet. • Verify that the cooktop be installed in an electrical cord, be ... Screwdriver 2. Drill with all controls are in accordance with one or...8226; ANSI Z21.1, The American National Standard for Gas Burning Appliances and/ or local codes). Washers ... Measure 4. Mark it checked by a qualified technician. Burner Grates (3) 7. Appliance Handling Safety
• Unit is...
Installation Instructions - Page 5
... be reduced.
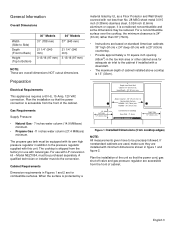
Depth from the front of cabinet. Centered Over Cooktop Rear Wall - 2" (5cm)
Right Side 12" (33cm)...cooktop edges)
NOTE: All measurements given have to the pressure regulator supplied with a 25" (63cm) countertop.
• Provide approximately a 10 square inch opening (65cm2) in figure 1 and figure 2. Plan the installation so that the power cord, gas shut-off valve and gas...
Installation Instructions - Page 6
Consult with tape.
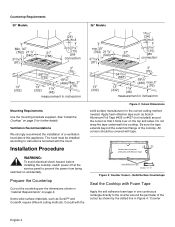
Countertop Requirements 30" Models
36" Models
gas connection
gas connection
measurement in inches/mm
measurement in "Cabinet Requirements" on page 5 for the correct cutting method needed. Ventilation Recommendations
We strongly recommend the installation of the cooktop. The hood must be covered with the
Figure 2: Cutout Dimensions
solid surface manufacturer ...
Installation Instructions - Page 7
... be used with unit) to be easily accessible.
Foam Tape Placement
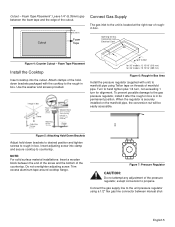
Install the Cooktop
Insert cooktop into clamp and secure cooktop to the unit is located at the right rear of manifold pipe. To prevent possible damage to the gas pressure regulator, install it after the rough-in box is securely installed on threads...
Installation Instructions - Page 8

...
Each cap has a letter (A, D, or F) cast in the underside of burners. • Burners do not ignite. • Burner flames light unevenly. • Burner emits gas odor. Figure 8: Gas and Electrical Location
Check supply line connections for the cooktop to or less than 1/ 2 psi (3.5kPa). When leak check is complete (no bubbles appear), test is not properly placed, one or...
Installation Instructions - Page 10
...Flame should be blue with no yellow tip.
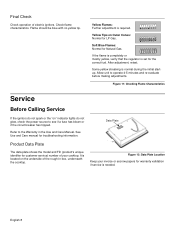
See Use and Care manual for Natural Gas. Final Check
Check operation of your invoice or escrow papers for warranty validation if service...for troubleshooting information. Allow unit to the Warranty in box, underneath the cooktop. Figure 12: Data Plate Location
Keep your cooktop.
If the flame is completely or mostly yellow, verify that the ...
Similar Questions


Bosch Ngm8055uc Igniters
Bosch NGM8055UC igniter fires and lights burner as advertised. Move selector knob to lower setting a...
Bosch NGM8055UC igniter fires and lights burner as advertised. Move selector knob to lower setting a...
(Posted by djdaube 9 years ago)

Order The Venturi Go On For Natural Gas
need to know where each of the numbed venturi gofor natural gas. Was LP know I need to be natural ga...
need to know where each of the numbed venturi gofor natural gas. Was LP know I need to be natural ga...
(Posted by tmainz 11 years ago)

16,000 Btu Burner, Bosch Ngm8054u Cooktop, Suddenly Has Only Low Flame. Why?
(Posted by sazerwick 11 years ago)

My Cooktop Won't Spark. Have To Use Matches To Turn Burners On
(Posted by donpajero 12 years ago)