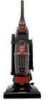
Bissell PowerForce Helix Turbo Bagless Support Question
Bissell PowerForce Helix Turbo Bagless Support Question
Find answers below for this question about Bissell PowerForce Helix Turbo Bagless.Need a Bissell PowerForce Helix Turbo Bagless manual? We have 2 online manuals for this item!
Question posted by sandrahuffman75 on December 6th, 2012
Dirt Canister Assembly
How do I reassemble the dirt canister once removed?
Current Answers
Answer #1: Posted by AskBISSELLCare on December 7th, 2012 11:58 AM
AskBISSELLCare

Member since:
September 20th, 2012 Points: 149,840

Member since:
September 20th, 2012 Points: 149,840
First, insert the filter cup into your machine over the red lever area, then the dirt container. Slide the red lever from left to right to lock the pieces together. If this is not the case, please refer to page 8 and 9 in the user guide.
Here's a link to downloading the user guide if you don't have one.
http://www.bissell.com/user-guides/?cid=ccsocial
Related Bissell PowerForce Helix Turbo Bagless Manual Pages
User Guide - Page 1

USER'S GUIDE
REMANUFACTURED 12B1, 68C7 SERIES 2 Thank You 3 Safety Instructions 4-5 Product View 6 Assembly 7-8 Operations 9-12 Maintenance and Care 13 Troubleshooting 14 Replacement Parts 15 Warranty 16 Product Registration 16 Consumer Care
product images may vary
User Guide - Page 2
... a global leader in 1876. My great-grandfather invented the floor sweeper in the design, manufacture, and service of high quality homecare products like your BISSELL vacuum. Today, BISSELL is well made, and we know about floor care went into the design and construction of us at BISSELL. Bissell Chairman & CEO
2 Thanks...
User Guide - Page 3
... connect to fit a non-polarized outlet or extension cord.
■■ Do not leave vacuum cleaner unattended when it should be observed, including the following:
Read all parts of dust, ...flow.
■■ Keep hair, loose clothing, fingers, and all instructions before plugging or unplugging vacuum cleaner.
■■ Use extra care when cleaning stairs. ■■ Do not pick ...
User Guide - Page 4
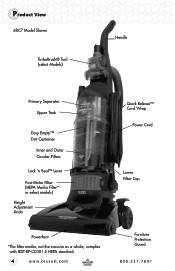
...; Tool (select Models)
Handle
Primary Separator Upper Tank
Easy Empty™ Dirt Container
Inner and Outer Circular Filters
Lock 'n Seal™ Lever
Post-Motor Filter (HEPA Media Filter* in select models) Height Adjustment Knob
Powerfoot *The filter media, not the vacuum as a whole, complies with IEST-RP-CC001.5 HEPA standard.
4
Quick Release...
User Guide - Page 6
...vacuum body.
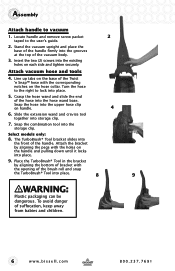
3. WARNING:
Plastic packaging can be dangerous. Assembly
Attach handle to the user's guide.
2. Insert the two (2) screws into the grooves at the top of bracket with the holes on each side and tighten securely. Stand the vacuum... into storage clip.
7. Attach vacuum hose and tools
4. Locate handle and remove screw packet
2
taped to vacuum
1. Select models only:
8. ...
User Guide - Page 7
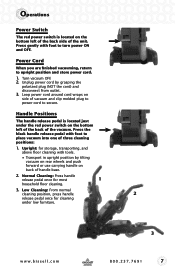
... or use carrying handle on the bottom left of the back side of vacuum and clip molded plug to power cord to upright position and store power cord... Switch
The red power switch is located just under low furniture.
2 3 7 Power Cord
When you are finished vacuuming, return to secure.
Normal Cleaning: Press handle
release pedal once for most
1
household floor cleaning.
3. Press the...
User Guide - Page 8
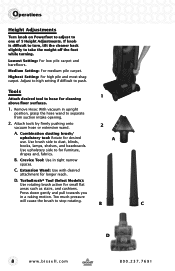
... to for longer reach.
Extension Wand: Use with desired attachment for furniture,
drapes and, fabrics. Too much pressure
will cause the brush to push. Remove Hose: With vacuum in tight narrow spaces.
Use upholstery side to separate from suction intake opening.
2.
B
C
D 8
Combination dusting brush/
upholstery tool: Rotate for cleaning
above floor surfaces...
User Guide - Page 9
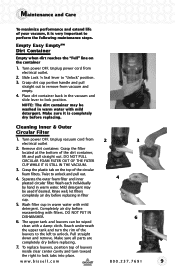
... lever to lock position. Grasp dirt cup portion handle and pull
straight out to remove from electrical outlet.
2. DO NOT PULL CIRCULAR FOAM FILTER OUT OF THE FILTER CUP WHILE IT IS STILL IN THE VACUUM.
3. Wash filter cup in warm water with filters. Completely air dry before
reassembling with mild
detergent. Make sure...
User Guide - Page 10
Maintenance and Care
Cleaning the pre-motor filter
2
The pre-motor filter protects the motor from electrical outlet.
2. Rinse under warm water;
Unplug vacuum cord from debris.
1.
Using a screwdriver, remove the four screws and lift brush cover off.
4. Reposition brush cover and fasten four screws back into place. HEPA Media filter* 3
4
*The filter...
User Guide - Page 11

... you notice
a change in the base, the wand, and the hose.
5. Empty Dirt Container.
3. If the clog persists, follow steps for checking rotating floor brush on rotating brush.
5. Unplug vacuum cord from hose wand base to check for clogs.
1. Remove the screw attaching the hose wand
base to a clog in the space between...
User Guide - Page 12
...outlet.
3
2. Twist collar so opening is at the top and lift clear cover to remove.
4. Twist collar until opening on the cover. Replace brush inside tab at the front... bottom to line up inside belt and place ends into place.
12 Unplug vacuum cord from clip on the sides.
5
6. Turn power OFF. Remove brush from belt and clean debris.
5. Reposition top cover making sure to...
User Guide - Page 13
... not included in home
Check/replace fuse or reset breaker
Vacuum cleaner won 't turn on ... Troubleshooting
!
Please do not return this product to base and body
Dirt tank not installed properly
Check assembly of upper and lower portions, correctly position and secure into place
Dirt tank is fully connected to the store.
Possible causes...
User Guide - Page 14

... Series) Hose Assembly (68C7 Series) Brush Roll Assembly (12B1 Series) Brush Roll Assembly (68C7 Series) Pleated Circular Filter Foam Filter Post-Motor HEPA Media Filter* Pre-Motor Filter TurboBrush® Bracket TurboBrush® Tool
1
2
3
4
5a/5b
6a/6b
7
8
11
12
9
10
*The filter media, not the vacuum as a whole, complies with IEST-RP-CC001...
User Guide - Page 15
..., so the above limitation may also have questions about your warranty, contact BISSELL Consumer Care.
Or Call: BISSELL Consumer Care 1-800-237-7691 Monday -
BISSELL Vacuum
This warranty gives you specific legal rights, and you .
15 Limited 90-Day Warranty
Subject to the *EXCEPTIONS AND EXCLUSIONS identified below, upon receipt of...
Similar Questions

Bisell Powerforce Helix Bagless Wont Suck Up Dirt
(Posted by kpozsbri 9 years ago)

Bissell Powerforce Helix How To Assemble Dirt Part
(Posted by joAy 10 years ago)

How To Assemble Bissell Powerforce Bagless Vacuum
(Posted by Zalekshar 10 years ago)

How To Assemble Bissell Powerforce Helix
(Posted by Narigr 10 years ago)

How To Assembly Bissell Powerforce Compact
(Posted by Anonymous-74221 11 years ago)