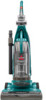
Bissell BISSELL Healthy Home Vacuum Support Question
Bissell BISSELL Healthy Home Vacuum Support Question
Find answers below for this question about Bissell BISSELL Healthy Home Vacuum.Need a Bissell BISSELL Healthy Home Vacuum manual? We have 4 online manuals for this item!
Question posted by BheLEGE on February 27th, 2014
What Tool Do You Need To Remove The Screws On The Bissell Healthy Home Vacuum
The person who posted this question about this Bissell product did not include a detailed explanation. Please use the "Request More Information" button to the right if more details would help you to answer this question.
Current Answers
Related Bissell BISSELL Healthy Home Vacuum Manual Pages
QuickStart Guide - Page 1

..., MI 49501
Quick Start users guide
BISSELL is reclined
2. TurboBrush® Tool
g.
Brush will only activate when brush switch is on and vacuum is happy to turn off brush switch when vacuuming frieze carpet
Telescoping extension Wand
1.
1. To retract, twist to unlock
TurboBrush Tool
1.
1.
e. What's needed
Rotating brush information
1.
2.
1. Telescoping Extension Wand...
QuickStart Guide - Page 2
... on lower right, press down firmly to power button 5. For complete users guide visit www.bissell.com Feed opposite end of vacuum. Slide crevice tool into holder on located next to engage the white suction diverter
6. Snap combination tool into left opening
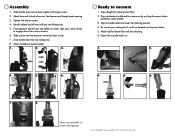
3. Assembly
1. Adjust height for above floor and stair cleaning 6. Slide handle onto...
User Guide - English - Page 1

HEALTHY HOME
VACUUM™
USER'S GUIDE
16N5 SERIES
3 Safety Instructions 4 Product View 5 Assembly 6-9 Operation 10-15 Maintenance and Care 16-17 Troubleshooting 18 Consumer Services 19 Replacement Parts
and Accessories 20 Warranty
User Guide - English - Page 2

... in 1876.
c o m
800.237.7691 By purchasing this complete, high-tech home cleaning system.
We also stand behind it with our commitment to reducing our impact on the environment through an expanding range of us at BISSELL. b i s s e l l . Thank you for buying a BISSELL Healthy Home Vacuum™
We're glad you 'll receive fast, considerate assistance. Thanks...
User Guide - English - Page 3

...hard or sharp objects such as glass, nails, screws, coins, etc. ■ Do not pick up anything that is wider than the other ). www.bissell.com
800.237.7691
3
Do not run ..., basic precautions should be observed, including the following:
Read all controls before plugging or unplugging vacuum cleaner.
■ Use extra care when cleaning stairs. ■ Unplug before attaching the ...
User Guide - English - Page 5
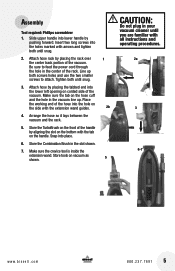
...tabbed end into the holes marked with all instructions and operating procedures.
2a
3
6-7
www.bissell.com
800.237.7691
5 Place
the working end of the hose into lower handle by placing...on the handle. Arrange the hose so it lays between the vacuum and the rack.
5. Assembly
Tool required: Phillips screwdriver
1. Insert two long screws into
the lower left opening on the hose cuff
and the...
User Guide - English - Page 6

...may aggravate this type of the vacuum handle. Repeated strokes in the reclined position and the brush switch is located at the top of carpet.
6 www.bissell.com
800.237.7691
To pick...on the rear wheels.
Height adjustment
There are seven height settings available for quick and easy removal of the cleaner to the lowest practical setting. For high pile and most shag carpet. ...
User Guide - English - Page 8
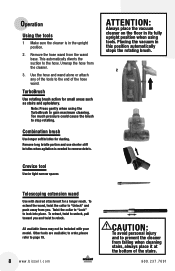
... twist to unlock, pull toward you . Operation
Using the tools
1 Make sure the cleaner is needed to remove debris.
ATTENTION:
Always place the vacuum cleaner on the floor in its fully upright position when using... the collar to gain maximum cleaning. to order, please refer to page 19.
8 www.bissell.com
CAUTION:
To avoid personal injury and to the hose. This automatically diverts the suction ...
User Guide - English - Page 9

... on cleaner by aligning the bottom and pushing back until it snaps into place.
3
www.bissell.com
800.237.7691
9 Operation
Emptying the dirt container
CAUTION:
Make sure vacuum cleaner has been switched off and unplugged before removing dirt container.
Method #1 - hold the dirt container over the bottom 2b of the container.
1. Push...
User Guide - English - Page 10

...filters in place.
10 w w w . Mild detergent may also be required based on individual vacuuming habits and types of electric shock, turn power switch OFF and disconnect polarized plug from filter.... may be taken to clean the dirt container as needed to wash. To reassemble, hold under running water to maintain performance. Remove the lower portion by pressing the front latch on ...
User Guide - English - Page 11

.... Make sure the filter door latches completely. www.bissell.com
800.237.7691
11 To check or remove, unscrew the center 3 screw.
4.
Note: To avoid damaging the HEPA filter ...careful not to tighten the filter cartridge screw until snug. The HEPA filter cartridge is noticeably declining. To remove the HEPA filter cartridge, push in on individual vacuuming habits and types of debris picked up...
User Guide - English - Page 12

...machine for a clog. Empty if needed.
6. While dirt container is reduced at back of the motor or a reduction in the spinning action in the vacuum cleaner. Straighten the hose and check ...power switch off and disconnect polarized plug from the cleaner by removing the 3 screws as necessary (see if dirt container is removed from electrical outlet.
3. Check the HEPA filter cartridge and ...
User Guide - English - Page 13

... internal thermal protector has been designed into your cleaner may need servicing. When the hose wand is present, remove the bottom 3 screws from the outside if a clog is inserted in the maintenance section of the user guide.
4. When the thermal protector activates, the main vacuum motor will be no suction. Turn the cleaner OFF...
User Guide - English - Page 14

... remove the brush roll. b i s s e l l . Unplug cleaner from the brush roll. Carefully cut away any visible hair, fibers or debris from electrical outlet.
2.
Do not attempt to disassemble the vacuum foot or to all instructions in the user guide under normal household conditions. If you feel it needs to be checked or replaced, call BISSELL...
User Guide - English - Page 15

... straight out of vacuum.
2
2. Remove the brush from electrical outlet.
3. Replace the brush inside tab at the front with the opening is at the bottom to lift off .
2. Turn power switch off lens.
4. TurboBrush maintenance
The TurboBrush should be checked regularly for easier access to light bulb and remove 2 screws to lock into slots...
User Guide - English - Page 16
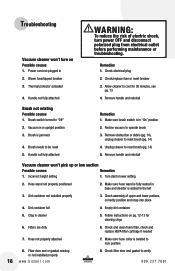
... Remove handle and reinstall
Brush not rotating Possible causes
1. Recline vacuum to verify. 800.237.7691 Unplug cleaner to
lock position
8. Remove handle and reinstall
Vacuum ... cartridge if needed
7.
b i s s e l l . Power cord not plugged in cleaner
5. Brush needs to reset brush (pg. 14)
4. Incorrect height setting
1. Empty dirt container
5. Remove obstruction or debris...
User Guide - English - Page 17

...
Vacuum cleaner is difficult to the store. Check foam filter for selecting a BISSELL product.
www.bissell.com...
800.237.7691
17 Check filter door and gasket
or not installed properly
2. Foam filter missing or not installed properly
2. Dirt container not installed properly
4. Check hose for holes or cracks and replace
if needed...
User Guide - English - Page 19

... attachments may not store on board your retailer, by calling BISSELL Consumer Services or by visiting our website.
Contact BISSELL Consumer Services or visit our website for more .
800.237.7691
19 Replacement parts and accessories
You may purchase parts from your vacuum. Below is a list of these parts may be available. While...
User Guide - English - Page 20

... PRODUCT. Printed in accordance with new or remanufactured components or products), at : www.bissell.com
20 w w w .
BISSELL Healthy Home Vacuum™
This warranty gives you specific legal rights, and you may also have questions about repairs or replacement parts, or if you need additional instruction regarding this warranty or have questions regarding what it may vary...
Parts List - Page 2
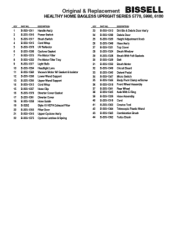
Original & Replacement BISSELL
HEALTHYHOMEBAGLESSUPRIGHTSERIES 5770, 5990, 6100
KCY...Motor Filter Tray 9 8-203-1377 Light Bulb
10 8-203-1W Headlight Lens 11 8-203-1360 Vacuum Motor W/ Gasket & Isolator 12 8-203-1 6 LowerWand Supped
13 8-203-1355 Upper Wand ... Detent Pedal
34 8-203-1347 Micro Switch 35 8-203-1346 Body PivotClampw/Screw 36 8-203-1319 Front Wheel Assembly
37 8-203-1341 Rear Wheel 38...
Similar Questions

How To Remove Rollers From Bissell Healthy Home Vacuum
(Posted by LMniza 9 years ago)

How To Remove Wheels On A Bissell Healthy Home Vacuum
(Posted by heilmph 10 years ago)

How To Take Apart A Bissell Healthy Home Vacuum
(Posted by sekhaPa 10 years ago)

How To Replace Belt On Bissell Healthy Home Vacuum
(Posted by sonnORL 10 years ago)

How To Change Belt On Bissell Healthy Home Vacuum
(Posted by Custyes 10 years ago)