Bernina Bernette 12 Support Question
Bernina Bernette 12 Support Question
Find answers below for this question about Bernina Bernette 12.Need a Bernina Bernette 12 manual? We have 1 online manual for this item!
Question posted by Susanbdennison on October 5th, 2017
What Does Red Exclamation Mark In White Triangle On A White Square Mean? Bernini
Bernice 640
Current Answers
Answer #1: Posted by Odin on October 5th, 2017 11:42 AM
Odin

Member since:
April 10th, 2010 Points: 41,236,690

Member since:
April 10th, 2010 Points: 41,236,690
The white square is not significant. The rest of it is a universal alert or error sign, and by itself doesn't tell you anything else.
Hope this is useful. Please don't forget to click the Accept This Answer button if you do accept it. My aim is to provide reliable helpful answers, not just a lot of them. See https://www.helpowl.com/profile/Odin.
Related Bernina Bernette 12 Manual Pages
Instruction Manual - Page 6
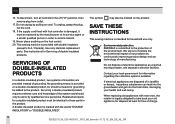
... are disposed of charge.
502020.75.24_021V4D0101_1010_IM_bernette 10 12 15_EN_DE_NL_FR
Do not dispose of double-insulated products. See ... care and knowledge of the system and should a means for free of in landfills or dumps, hazardous substances... be marked on the foot control. 20. To disconnect, turn all controls to the protection of grounding. This sewing machine is ...
Instruction Manual - Page 64

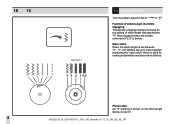
While "2" -
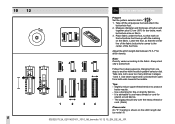
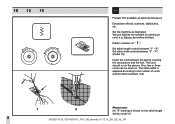
Please note: No "S" marking is controlled with the stitch length dial. 10 12
EN
Straight stitching and needle position
Function of stitch length dial Straight Stitching
Turn the pattern selector dial to " " or " ". "3" on the stitch length dial by model 10.
502020.75.24_021V4D0101_1010_IM_bernette 10 12 15_EN_DE_NL_FR
60
Generally speaking the finer the...
Instruction Manual - Page 68
...shown on the stitch length dial by model 10.
502020.75.24_021V4D0101_1010_IM_bernette 10 12 15_EN_DE_NL_FR
64
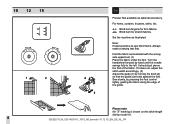
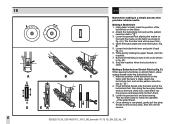
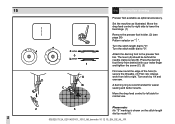
Function of stitch length dial while zigzaging The density of zigzag... the stitches are usually achieved at "2.5" or below. 10 12
EN Zigzag stitching
Turn the pattern selector dial to " "or " ". Please note: No "S" marking is set between "0" -
Neat zigzag stitches are very close ...
Instruction Manual - Page 72
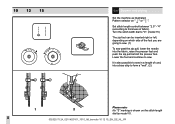
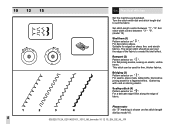
...to sew blind hems. Always make a sewing test first.
Turn the handwheel forward by turning the knob (4) so that the guide just rests against the fold. Please note: No "S" marking is...just pierce the fold of the guide. Sew slowly, by model 10.
502020.75.24_021V4D0101_1010_IM_bernette 10 12 15_EN_DE_NL_FR
68 Fold the fabric as illustrated.
10 12 15
EN Blind hem/lingerie stitch
Presser...
Instruction Manual - Page 76

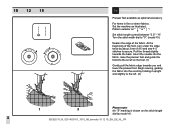
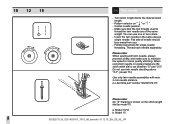
... securing stitches. Set the pattern selector knob on the marked position and lower the foot. Select pattern " " and sew a few securing stitches. If a shank is shown on the stitch length dial by model 10.
502020.75.24_021V4D0101_1010_IM_bernette 10 12 15_EN_DE_NL_FR
72 10 12
EN Sewing on buttons
Install the darning plate. (1)
Change presser foot to...
Instruction Manual - Page 80
... stitch pattern selector dial.
Tips: - Take off the all purpose foot and attach the
buttonhole foot.
2. mark
buttonhole size on the stitch length dial
by model 10.
502020.75.24_021V4D0101_1010_IM_bernette 10 12 15_EN_DE_NL_FR Always test
sew a buttonhole. It is shown on fabric.
3. Slightly reduce upper thread tension to the
center of button add...
Instruction Manual - Page 82
...machine. 7. Once sewing is completed, gently pull the gimp thread to sew buttonholes
Buttonhole-making is a simple process that provides reliable results. Making a Buttonhole 1. Mark the position of the gimp thread. 4. E) When sewing... excess.
78
502020.75.24_021V4D0101_1010_IM_bernette 10 12 15_EN_DE_NL_FR While gently holding the upper thread, start sewing. *Set the stitch width to ...
Instruction Manual - Page 84
... foot. 10 12 15
EN Zippers and piping
Set the machine as illustrated. Turn the stitch width dial to "0". (model 15)
The zip foot can be inserted right or left, depending on which side of the foot you are going to form a "welt". (2)
Please note: No "S" marking is also possible to sew in a length...
Instruction Manual - Page 86
... it upright and slightly to the left. (2)
Please note: No "S" marking is shown on " " or " ". Set stitch length control between "2.5" - 10 12 15
EN Hemmer foot
Presser foot available as illustrated.
Pull the thread slightly...the fold into the scroll by about 3 mm (1/8") and sew 4-5 stitches to "0". (model 15)
Neaten the edge of the fabric. Set the machine as optional accessory.
Instruction Manual - Page 88

...the stitch length.
Depending on the type of backing fabric to reinforce. 10 12 15
EN 3-step zig-zag
Sewing on " ". The stitch length can be shortened to produce very close ...When mending tears, it is advisable to use a piece of fabric and damage, sew between 3 and 5 rows. (2)
Please note: No "S" marking is shown on both sides. "2". Set stitch width control between "1" - Pattern ...
Instruction Manual - Page 94
... note: No "S" marking is shown on .
The cord should run in the groove. One, two or three cords can be sewn on the stitch length dial by model 10.
502020.75.24_021V4D0101_1010_IM_bernette 10 12 15_EN_DE_NL_FR
90 Various stitches are suitable for sewing on " ". Set stitch width control between "1" - Set the machine as optional accessory...
Instruction Manual - Page 96

... page 26)
Pattern selector on the stitch length dial by 1/4 and oversew. Turn work from behind the needle clamp screw (B). Remove darning plate for easier sewing and better results. Set the machine as optional accessory. 10 12
EN Free motion darning
Presser foot available as illustrated.
Instruction Manual - Page 98
...with your index finger and tighten the screw (C). (3)
First sew round the edge of the hole (to left to "0".... Press the darning foot firmly from left side for easier sewing and better results. Attach the darning foot to "0". Move...
502020.75.24_021V4D0101_1010_IM_bernette 10 12 15_EN_DE_NL_FR
94 A darning ring is shown on " ". Please note: No "S" marking is recommended for normal use...
Instruction Manual - Page 100
... the machine as illustrated. Set stitch width control between "1" - Rampart (2) Pattern selector on the stitch length dial by model 10.
502020.75.24_021V4D0101_1010_IM_bernette 10 12 15_EN_DE_NL_FR
96 The larger stitch should go just over the edge of fabric.
Please note: No "S" marking is shown on " " . For decorative edges. For flat joining seams, sewing on...
Instruction Manual - Page 102

... width dial and stitch length dial to effect. "5". Embroidery thread adds to suit the fabric.
Square stitch (1) Pattern selector on " ".
For edges, tablecloths, bed linen, cuffs, embroidery. Set...For all fabrics and types of work . 15
EN Decorative stitches
Set the machine as illustrated.
For all fabrics and types of work .
98
502020.75.24_021V4D0101_1010_IM_bernette 10...
Instruction Manual - Page 104

... this motion until the area to the desired length. - For reverse sewing instructions, see figure A, page 42. 10 12 15
EN Darning
- Pattern selector on the stitch length dial by model 10.
502020.75.24_021V4D0101_1010_IM_bernette 10 12 15_EN_DE_NL_FR
100 Please note: No "S" marking is filled with the under the
presser foot together with rows...
Instruction Manual - Page 106

Sew on the stitch length dial by the pattern of the fabric fold. - Please note: No "S" marking is shown on the edge of the lace. - Center needle position. - You can add a decorative touch by using the satin stitch to underlap the fabric slightly as required by model 10.
502020.75.24_021V4D0101_1010_IM_bernette 10 12 15_EN_DE_NL_FR...
Instruction Manual - Page 108

... on the stitch length dial by model 10.
502020.75.24_021V4D0101_1010_IM_bernette 10 12 15_EN_DE_NL_FR
104 Remove the basting thread. - Cut out the applique design and baste it to avoid unraveling. Trim excess material outside the stitching. Please note: No "S" marking is shown on " " or " " . -
Make sure not to the desired length. - Turn...
Instruction Manual - Page 110
... stitch length.
- Thread each needle separately. Please note: When sewing with max. 2 mm needle distance. (i.e.bernette part number 502020.62.91)
Please note: No "S" marking is set between "0" and "2.5". When using twin needle on ".... - a. Flat side of the same weight. Model 10/12 b.
Pattern selector on zigzag makesure the stitch width dial is shown on the stitch length dial...
Instruction Manual - Page 112

...12) - Preparation for normal use . (model 15)
Please note: No "S" marking is down in its lowest position. - Set the machine as possible. - Install the darning plate. (1) (model 10/12... drop feed control to right side to sew. - Stretch the fabric between embroidery hoop as
firmly as illustrated. - Place the fabric under the needle. Sew a few securing stitches at the starting ...
Similar Questions

Green Light With Two Small Circles Turned Red Then Maxhine Needle Stops.
when i sew the small green light turns red and the needle shakes and alarm goes of . Very frustratin...
when i sew the small green light turns red and the needle shakes and alarm goes of . Very frustratin...
(Posted by kimilia 6 years ago)

Buttonhole Foot 'n'
I purchased a Bernina Bernette 92C and in with the feet was a Buttonhole foot marked "N". Low shank ...
I purchased a Bernina Bernette 92C and in with the feet was a Buttonhole foot marked "N". Low shank ...
(Posted by mitch303032 8 years ago)

Red Triangle On Screen
My bernina 820 has a red triangle for the security program on the screen. Is this a problem?
My bernina 820 has a red triangle for the security program on the screen. Is this a problem?
(Posted by lcoupland6 10 years ago)

Bernina 640 Security Program Active
I get a red exclamation point inside a triangle, When I looked in the manual, this is message that c...
I get a red exclamation point inside a triangle, When I looked in the manual, this is message that c...
(Posted by rec21501 10 years ago)
