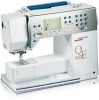
Bernina Aurora 440QE Support Question
Bernina Aurora 440QE Support Question
Find answers below for this question about Bernina Aurora 440QE.Need a Bernina Aurora 440QE manual? We have 1 online manual for this item!
Question posted by debbiehuber on December 18th, 2013
Embroidering Stops Every 10 Stiches.
When using the embroider attachment my machine stops embroidering after about ten stitches and displays the symbol to push the blue start button. I have installed the 64 bit drivers and still stops non-stop. It doesn’t matter if I am doing lettering or design. In acts like I am supposed to change the thread every 10 to 20 stitches.
Current Answers
Related Bernina Aurora 440QE Manual Pages
User Guide - Page 3
...practical stitches, Quilt stitches, Decorative stitches Buttonholes - on PC Starting to embroider Mega-Hoop Stitch ...Display
Display Function buttons Memory
5-7 8-9 10-17 17 18-19 20-21 22
57-58
23 24-25 26-29
Applications
Stitch selection 430 / 440 QE / 450 Temporary altered stitch memory Application of buttonholes / Eyelets / Button sew - Your sewing computer
Accessories Details aurora...
User Guide - Page 4
... the safety instructions!
ponding subject you will find on the corres- In order to improve the product, and for our customers' benefit, all of the sewing and embroidery computer's features, parts, and accessories are subject to unannounced changes and alterations at any time.
User Guide - Page 5
...sewing buttonholes in zippers, Straight stitch
5 Blindstitch foot Blind hem, Edge stitching, Straight stitch Blindstitch • for slide-on table • Instructional presentation CD-ROM • Stitch-pattern card
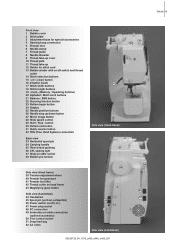
1
A aurora 430 / 440 QE
2
11
A
B
B aurora 450
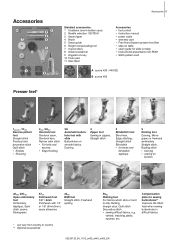
Presser feet*
1430/440 , 1C450 Reverse pattern foot Straight stitch Practical and decorative stitch Quilt stitch...key 10 Foam ...
User Guide - Page 9
...187; (clear) button 16 #-button (hash) 17 Stitch width buttons 18 Stitch length buttons 19 «mem» (Memory / Operating buttons) 20 Alphabet / Motif scroll buttons 21 Balance / BSR button 22 Securing function button 23 Pattern begin button 24 Display 25 Needle position buttons 26 Needle stop up/down button 27 Mirror image button 28 Slide speed control 29 Start / Stop - button 30 Pattern end...
User Guide - Page 11
... presser foot • use slight pressure - The sewing computer must ONLY be moved over free-arm to an authorized BERNINA dealer!
your hands remain free to the right • the feed dog is lowered simultaneously • the feed dog is raised as soon as the first stitch is sewn
Attaching the presser foot lifter...
User Guide - Page 13
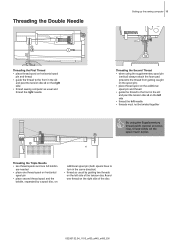
... front in the slit
and past the tension disc A on the right side • thread sewing computer as usual and thread the right needle
Threading the Second Thread • when using the supplementary spool pin
(vertical) always attach the foam pad (prevents the thread from getting caught on the spool pin) • place...
User Guide - Page 16
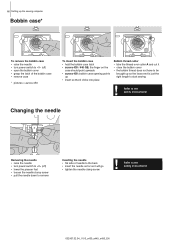
...8226; remove case
* pictures = aurora 450
To insert the bobbin case • hold the bobbin case latch • aurora 430 / 440 QE: the finger on the
case should point upwards • aurora 450: bobbin case opening points
up...needle to the safety instructions!
032907.52.04_1103_a430_a440_a450_EN
Refer to start sewing
! 16 Setting up as it will go • tighten the needle clamp screw
!
User Guide - Page 18
... needle when starting a new sewing project. This system number refers to shank shape as well as to use .
This can get jammed.
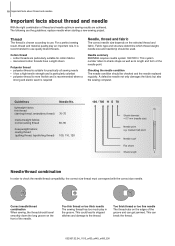
Needle summary BERNINA requires needle system 130/705 H.
medium ball point
Needle scarf Flat shank Shank length
Needle/thread combination
In order to the thread. This could lead to skipped stitches and...
User Guide - Page 27
...8226; always use an appropriate stabilizer as a backing • remove after sewing • thread the lower thread in the finger of saving an
hourglass is visible on the display
hourglass is visible on the display
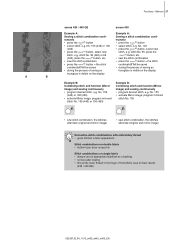
A
B
Example B: Combining stitch and function (Mirror image) and sewing continuously • program desired stitch, e.g.
nuously
nuously
• press the
-button
•...
User Guide - Page 28
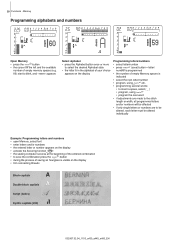
...
• enter letters and/or numbers
• the entered letter or number appears on the display
• activate the Securing function
• the sewing computer secures at the beginning of the entered combination
• to save the combination press the
-button
• during the process of saving an hourglass is visible on the...
User Guide - Page 36
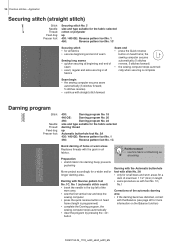
... 1/2" (3cm) in all fabrics. the sewing computer secures automatically (5 stitches reverse, 5 stitches forward) • the sewing computer stops automatically when securing is programmed) • complete the Darning program, the
sewing computer stops automatically • clear the program by pressing the «clr»
button
Reinforcement • use fine fabric or interlining as with foot...
User Guide - Page 46
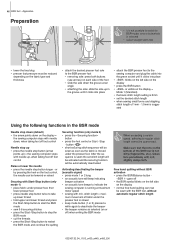
... the BSR button • «BSR» is visible on the display =
Mode 1 (Standard) • the basic stitch length setting is 2mm • set the desired stitch length • when sewing small forms and stippling,
stitch length of the BSR foot is running at an angle • attaching the sole: slide the sole up ) = the sewing computer stops with...
User Guide - Page 52
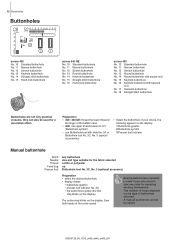
...CVUUPOIPMF /P ,FZIPMFCVUUPOIPMF /P 4USBJHIUTUJUDICVUUPOIPMF /P )BOEMPPLCVUUPOIPMF
BVSPSB No. 10 Standard buttonhole No. 11 Narrow buttonhole No. 12 Stretch buttonhole No. 13 Round buttonhole No...No. 16 Keyhole buttonhole with tapered
end No. 17 Heirloom buttonhole No. 18 Straight stitch buttonhole
#VUUPOIPMFTBSFOPUPOMZQSBDUJDBM DMPTVSFT UIFZDBOBMTPCFVTFEGPSB ...
User Guide - Page 53
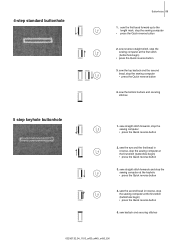
... forward up to the length mark, stop the sewing computer at the first stitch (buttonhole begin ) • press the Quick reverse button
5. sew the bottom bartack and securing stitches
1. sew reverse straight stitch, stop the sewing computer
• press the Quick reverse button
2. sew straight stitch forwards, stop the sewing computer at the first stitch (buttonhole begin)
• press the...
User Guide - Page 55
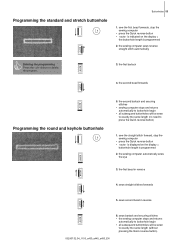
... will be sewn
to delete the program.
3. sew the straight stitch forward, stop the sewing computer
• press the Quick reverse button • «auto» is indicated on the display =
buttonhole length is programmed
2. the sewing computer automatically sews the eye
3. the sewing computer sews reverse straight stitch automatically
& Deleting the programming Press the «...
User Guide - Page 56
... when starting to sew the
next eyelet
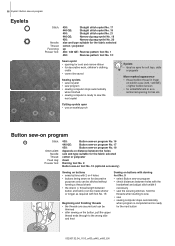
Cutting eyelets open • use an eyelet punch
Eyelets • ideal as eyes for soft toys, dolls
or puppets
More marked appearance • thread bobbin thread in finger
on for the next button
032907.52.04_1103_a430_a440_a450_EN
Button sew-on program
Stitch:
Stitch width: Needle: Thread:
Feed dog: Presser foot:
430:
Button sew-on...
User Guide - Page 63
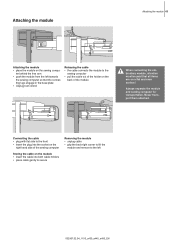
Never transport them attached. Always separate the module and sewing computer for transportation. Connecting the cable • plug with ... the
back of the sewing computer
Storing the cable on the sewing compu-
ter behind the free arm • push the module from the left
032907.52.04_1103_a430_a440_a450_EN Attaching the module
Attaching the module 63
Attaching the module • place...
User Guide - Page 73
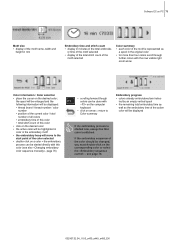
...process is started now, always the first color is represented as
a spool in minutes of the motif is stitched. the spool will be enlarged and the following information will be displayed: •...control» - Embroidery progress • colors already embroidered are indica- ry time of the motif selected • display of the total stitch count of the
motif selected
Color summary • ...
User Guide - Page 75
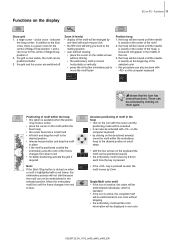
... the blue cross, there is a green cross for the centre of Mega-Hoop position 1 and a red cross for better positioning activate the grid if required
Note: If the Start-/Stop button is clicked... levels) • display of the motif will not start because the motif can be positioned better 3. the grid is exactly in the center of the hoop, a blue point will be embroidered in the center of...
User Guide - Page 85
...
Sewing stitch combinations
26-28
Sewing with BSR
45
Special characters
25
Using compensating plates
21
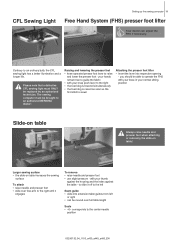
Sewing light (CFL light)
11
Sewing-on elastic
38
Sewing speed
Foot control
10
Speed control
24
Slide-on table
11
Spool discs
5
Spool pin
Horizontal spool pin
12
Supplementary spool pin
13, 14
Stabilizer Stitch patterns
Display Overview Selecting Stitch plate Attaching...
Similar Questions

Bernette 66 Sewing Machine
How do I thread a Bernette 66 sewing machine?
How do I thread a Bernette 66 sewing machine?
(Posted by stringpam 8 years ago)

Fabric Too Thick??
I'm trying to sew through several layers of fabric and batting and my QE 440 just beeps and won't st...
I'm trying to sew through several layers of fabric and batting and my QE 440 just beeps and won't st...
(Posted by rowenabeckett 9 years ago)

I Have A Bernina 1090s Sewing Machine. How You Turn Off The Button Stitch Settin
(Posted by frogg595 10 years ago)
Bernina 1090 S Sewing Machine Manual
I Dont See The User Manual For This Machine For Free Downloading.what User Manual Are The Same As Th...
I Dont See The User Manual For This Machine For Free Downloading.what User Manual Are The Same As Th...
(Posted by cynthianel 10 years ago)

How Is The Front Cover Removed From A Bernina Aurora 440qe Sewing Machine?
My dealer has had two opportunities to repair my machine and did an OK job except for getting the co...
My dealer has had two opportunities to repair my machine and did an OK job except for getting the co...
(Posted by lholdren 11 years ago)