
Bernina Aurora 430 Support Question
Bernina Aurora 430 Support Question
Find answers below for this question about Bernina Aurora 430.Need a Bernina Aurora 430 manual? We have 1 online manual for this item!
Question posted by villawe on November 29th, 2015
790 Machine
error message on Bernina 790 is #1010. It says to restart machine. When I do it still does not work.
Current Answers
Answer #1: Posted by TommyKervz on December 1st, 2015 6:50 AM
TommyKervz

Member since:
January 10th, 2013 Points: 17,776,823

Member since:
January 10th, 2013 Points: 17,776,823
The user manual is does not say anything about this error code' I suggest you send a request for assistance from the support center. see the link https://berninaofamerica.zendesk.com/hc/en-us/requests/new
Related Bernina Aurora 430 Manual Pages
Manual - Page 2
...development Quality innleiails hove beenused loge-thee with functional design techmoues to ac hove
on veer machine. Repeal the process until
you ' complete satislochon and enjoyment. Tmte %pent alM.% stage... result In you cue familial wnh the come oh and then functions.
Befee attempting to sew, hewevet, and to obtain the minimum benefits, please study this booklet carefully lollawina each step ...
Manual - Page 3

... REMOVING FABRIC THREAD CUTTER
18. CONTENTS INSTRUCTION BOOK MODELS 410.420.430.440
Page Title
I. INTRODUCTION 2. CONTENTS
3. CONNECTING MACHINE TO POWER SUPPLY FOOT CONTROL NEEDLE LIGHT
6. SAFETY REGULATIONS 7. UPPER...POSITIONS SEWING PATTERNS MANUALLY TWIN NEEDLE SEWING
17. BUTTONHOLING
20. DARNING
(Not ler Maul 410)
26. MAINTAINING THE MACHINE-NEEDLE PLATE
29. SEWING IN ZIPS
Manual - Page 5
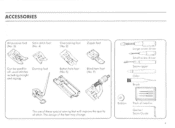
... No. 9'. The use of needles
Quitter / Seam GLPTI
4 Large screw driver
Small screw driver
Seam ripper
Oiler la
Brush Hy=
Bobbin
Pock of these special sewing feet will improve the quality 01 stitch.
The design of the feel rnoy chonge
C.
Manual - Page 6
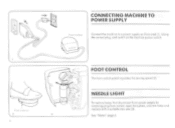
... removing plug from socket. See - and switch on the machine power switch.
`2
3
FOOT CONTROL
The foot control pedal regulates the sewing speed (21. unscrew lamp and replace With ci suitable new one (3). Using the correct plug. CONNECTING MACHINE TO POWER SUPPLY
.1111 (41/1.1.0
Connect the machine too power supply as illustrated (11. Notes" page 6
Manual - Page 7

... by pulling out the mains plug. THIS IS ONLY APPLICABLE TO MACHINES
SAFETY
MANUFACTURED FOR THE UNITED KINGDOM REGULATIONS
IMPORTANT
The wares in this appliance moy not correspond with the coloured markings identifying the terms nols in sewing or after completion of work.
IMPORTANT
The following code: BLUE-
If the terminals of our...
Manual - Page 8
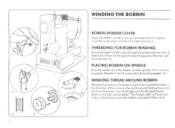
... FOR BOBBIN WINDING
Pass the threod from the spool through the guideot thereat lei',al then back in the direction of the arrow on the machine and holding the end of the thread between your forefinger and thumb, gently press down on the foot control pedal. Needle drive will automatically cut...
Manual - Page 9
2
afizsrc) c-Ff5U7.,5
_Mita
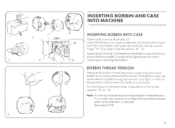
INSERTING BOBBIN AND CASE INTO MACHINE
INSERTING BOBBIN INTO CASE
Open hook cover as illustrated. (1)
a
Insert filled bobbin into cose os decoded. (2) Holding the hinged
latch (3) insert bobbin and case into ...
Manual - Page 12
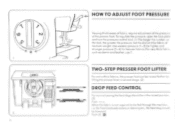
...foot con be ro,sed further by !thing the presser lever o second stage. 121
DROP FEED CONTROL
For normal sewing the eed dogs should be in the raised position 131 When the fobnc is not required to be lowered Push ... hand embroidery or darningetc., the feed dog s'llnuId be fed through the machine. and stronger pressure (5-61 for fabric of the presser foot. Set the dial al 4 for heavier fabrics.
Manual - Page 13

...
rtel ra
SELECTING AND FITTING OF NEEDLE
Select the correct sq.) needle to as .,!poet
Change the needle regularly and at the lust sgn of sewing problems. lased as (2) il lustrated.
12
Manual - Page 16
... thals Choose the settings OCCOr cling to the upplication and effect moodea
OVERLOCK STITCH
HONEYCOMB STITCH
SCALLOP I DECORATIVE STITCH
DOUBLE SCALLOP (DECORATIVE STITCH STITCH
MODEL 430
MODEL 440
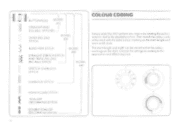
COLOUR CODING
Simply select the stitch pattern you requite ay rotating the peen n CCIOCIOr dial lo the dewed position. OVERLOC.K. E
'11 £1ti...
Manual - Page 17
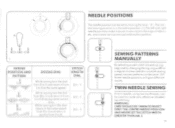
... AND NEVER SET THE STITCH WIDTH GREATER THAN NR. 3 "A" The not
mot sewing poseion rs in 0 regular manner and of o constant sewing speed, various patterns, can be set by stricenj WARNING. ono r ea Tr ... positions (make iteasier to creole very uthactive !doubler by moving the leve. con tre used to sew ciose lothe edge ul lobe rc s
A U
etc.
NEEDLE POSITIONS
The needle positron con be ...
Manual - Page 18
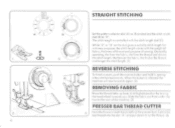
... horn under 'he stitch length is released the
machine sill sew forwards ogain (21
REMOVING FABRIC
Raise the thread take up lever to cut the thread 13) When the button is controlled with the weight of
fabric, thickness of thread and putpose of the machine.
f3t
PRESSER BAR THREAD CUTTER
3
Hold the thread...
Manual - Page 20
... the
sequence illustrated. (71
1
2
2'
r
1
S
4-1
Artery ,.e[ .n itateitt
.6" `3
IA
Pint, rig fur Kars
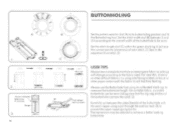
USER TIPS
Always sew o sample buttonhole on some spore fobnc ossettings will change according to old machine feeding. Always use the Buttonhole loot using interfoong (vilene) or tissue or other dillicult fabrics. try using its colibroled markings to its buttonholing position...
Manual - Page 21
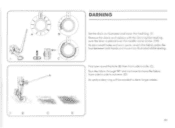
... the hole lel then from side to side to achieve. (Di An embroidery ring will be needed to move it os illustrated whilst sewing. A 1 i
C
I
A
DARNING
Set the idiots as illustrated and lowe the feed dog.
To dorn small holes and worn ports, stretch the fobric under the foot between ...
Manual - Page 22
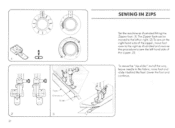
...machine as illustrated and 'ewe: se the procedure to the right as illustrated fining [he Zipper loot. leave needle in the fabric, raise foot and slide d behind the foot Lower the foot and continue.
4 II l The Zipper foot can be moved to the leh or right. (2) To sew... on the right hand side of the zipper, move the "zip slider out of the zipper. (3)
To move foot over to sew the left...
Manual - Page 23
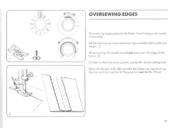
... EDGES
te)
Oversewing edges prevents the fabric from fraying and creates o neat edge Set the rnochine os illustrated selecting o suitable stitch width and length ( l) When sewing, the needle should just pass over the edge of the fabric. a) On fobr.cs that are opt to pucker. use the All Purpose foot not...
Manual - Page 24
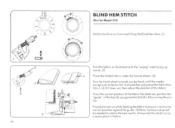
... correct position ogoinst the guide. (3) Note: Some practice will be needed to obtoin the best results. BLIND HEM STITCH
(Net fee Medal 410)
Set the machine os illustroted fining the Blind Hem foot. II /
5
3 23
- 7 h\
Fold the fabric as shown. (3)
Turn the hand wheel towards you by turning the nut (61...
Manual - Page 26
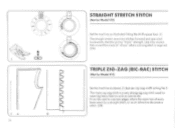
... width setting No 5 The triple sigizog stitch is a very strong sig.:in stitch used for Model 410)
Set the machine os illustrated fining the All Purpose foot. ;11 The sly night stretch sews two stitches forward and one stitch backwards. n" 2 A
STRAIGHT STRETCH STITCH
(Not for
seaming heovy fabrics suck as canvas etc...
Manual - Page 27

Using the Nr. 8 foot will prevent puckering within fobracs
2
2A
26
U Ft_
STRETCH OVERLOCKING AND OVERLOCKING
(Not lot Models 410 and 420
Set the machine os illustrated using the Nr. 3 or Ns. 8 foot
for finer Fobrecs i
for thicker fabricsFT
liil$§
K.! Both these stitches o e designed to seom and overlock the ...
Manual - Page 29
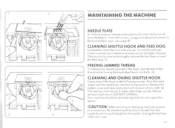
... its top position.Remove the bobbin cose ond clean every port with o brush. Your machine should be disconnected frem the supply by your speciolisi dealer.
(CAUTION) When servicing or ...(1) Remove bobbin case. [see page 8).
2
wna5nu
rr I
.3a83
BNE
h. 3
4
MAINTAINING THE MACHINE
NEEDLE PLATE
To remove snop-on needle plate open hook cover ond pnso off homthebottom-from mound the feed...
Similar Questions

How Can I Purchase The Bernini Aurora 430 Cd. Not The Instructional Presentation
Where can I purchase the Aurora 430 CD. Not the instructional CD. I have that one but the main CD.
Where can I purchase the Aurora 430 CD. Not the instructional CD. I have that one but the main CD.
(Posted by patsy1126 2 years ago)

Bernina Aurora 430 Replacement Parts.
My power cord was damaged on my Aurora 430. Where can I find parts/replacements for my machine.
My power cord was damaged on my Aurora 430. Where can I find parts/replacements for my machine.
(Posted by center6067 8 years ago)

How Can I Get A Replacement Stitch Plate For My Bernina 1260 Sewing Machine
My needle hit the switch plate in a thin section causing it to break and bend. now a section sticks ...
My needle hit the switch plate in a thin section causing it to break and bend. now a section sticks ...
(Posted by Damary312 11 years ago)

Aurora 430 Embroidery Machine Start Stop Icon
start stop icon comes up but it won't start sewing
start stop icon comes up but it won't start sewing
(Posted by Anonymous-95347 11 years ago)

Machine Not Working
my machine switches on and the light works, but when I push the pedal down nothing happens? is there...
my machine switches on and the light works, but when I push the pedal down nothing happens? is there...
(Posted by hubble29124 11 years ago)