
Bernina 817 Support Question
Bernina 817 Support Question
Find answers below for this question about Bernina 817.Need a Bernina 817 manual? We have 1 online manual for this item!
Question posted by karensept on August 5th, 2014
Winding The Bobbin
I have loosened the handwheel and slid the bobbin winding spindle as far to the left as it will go, but when I engage the motor by the foot pedal it revs but doesn't wind the bobbin. Help
Current Answers
Answer #1: Posted by waelsaidani1 on August 6th, 2014 5:35 AM
waelsaidani1

Member since:
May 12th, 2013 Points: 19,501,797

Member since:
May 12th, 2013 Points: 19,501,797
Related Bernina 817 Manual Pages
Manual - Page 2
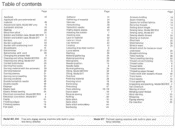
... stitches
16
Basting
26
Blind hem stitch
25
Bobbin and bobbin case, Model 807/810 5
Bobbin and bobbin case, Model 817
6
Borders
22
Border-scalloped
44
Border with ...Winding lower thread
7
Wool darning
33
Wrapping
15
Zigzag sewing
15
Zip insertion
35
Model 807, 810 Free-arm zigzag sewing machine with built-in plain and fancy stitches
Model 817 Fiat-bed sewing machine...
Manual - Page 3
..., presser loot, bobbin or needle plate, when stopping work without supervision and during servicing (cleaning). Dear Bernina Customer,
You are now the happy owner of injury to fingers).
The moving needle is a source of danger (danger of a Bernina.
General information
Max. The sewing machine should be disappointed. reverse stitch length Presser foot lift Passage...
Manual - Page 4
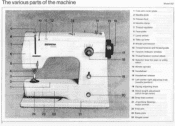
... control wheel 13 Selector lever for plain or utility
stitch 14 Winder spindle 15 Handwheel 16 Handwheel release 17 Left-center-right adjusting knob
(needle position) 18 Zigzag adjusting knob 19 Stitch length adjustment
(stitch length lever) 20 Drop-feed control 21 iiFast-Slow Sewing.. motor control 22 Free-arm 23 Base-plate 24 Hinged cover
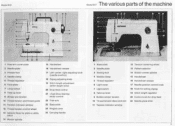
Manual - Page 5
...
8
4
.1,
1
14 15 1
17 18
1 Base-plate 2 Needle-plate 3 Sewing-foot 4 Needle-clamp 5 Thread regulator 6 Light cover 7 Light switch 8 Take-up lever 9 Bobbin winder tension 10 Thread tension discs and slot 11 Tension indicator window
12 Tension centering wheel 13 Pattern selector 14 Bobbin winder spindle 15 Handwheel 16 Handwheel release 17 Needle position control knob 18 Knob...
Manual - Page 6
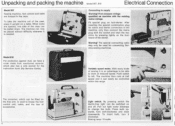
... the case, place it is used for connecting Bernina sewing machines.
Push switch to change the bulb. The machine can now be placed without difficulty wherever it upright on machine with the socket and start the ma- Variable speed motor. Pull out light cover sideways to left. Press bulb upwards, turn it can easily be controlled...
Manual - Page 7
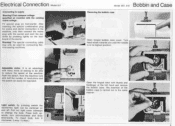
... the speed of the left hand and remove the bobbin case. Light switch. Electrical Connection Model 817
Connecting to change the bulb. The insertion of the starter. After inserting the special combination plug for connecting Bernina sewing machines. Adjustable motor. Push the switch. Now the machine runs with the socket and start the machine by pressing lightly on...
Manual - Page 8
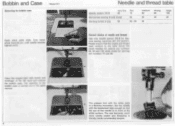
... table above. Bobbin and Case
Removing the bobbin case
Model 817
f Open stitch plate slide.
Open the hinged latch with the white plate is thereby made considerably simpler.
The insertion of needle and thread.
The usual needles for sewing are numbers 80. 90 and 100 while those for Bernina sewing machines 807, 810 and 817. Needle and...
Manual - Page 9
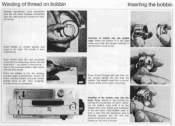
... arrow when unwinding.
011111144)
Insertion of thread.
*P'
7 Winding of bobbin into the bobbin case. Draw thread from the reel clockwise round the pre-tensioning device (9) and from there - Start motor with the left hand.
Release handwheel with thumb and forefinger
of the arrow. Insertion of thread on winder spindle and press to top position by turning the...
Manual - Page 10

... to the sewing sign.
'.1-i • Pull the needle thread slightly and the bobbin thread will go with the left to the darning sign. Lowering the feed dog. For all sewing work the ... sewing work the lever must be set to the needle eye. Threading the machine. Pull both threads under the presser foot and lay them there sideways. Model 817 Darning. Push the needle upwards as far as...
Manual - Page 11
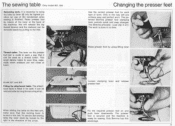
...The presser
foot is secured and the machine is finished. Raise presser foot by pulling ...handwheel when sewing is
ready for each type of the arrow. The attachment table is turned to bring the take-up lever (8) into its highest position by using lifting lever
Loosen clamping lever and release presser foot
ss
Fix the required presser foot on the free arm. This small device helps...
Manual - Page 12

...turning the knob to 4 - rately adjusted with the Bernina Models )307, 810 or 817. The spacing - depending on the scale at CO".
If the knob is turned knob is at the... (2)
V
Zigzag stitch (1)
\ A
Straight stitch (0)
10 from 0 to the left. the needle You can be moved
while sewing but when the machine Is
stationary only if the needle Is out of the
material. The knob may be...
Manual - Page 16

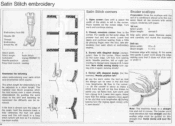
... Thread: adapted to the foot, fingers on the edge, you will easily get a neat finish. As a general rule the following is valid: zigzag not too wide, stitch length not too long. Finishing Edges
Stitch width:
2'h-4
Stitch length:
1-2
Needle position: centre
Automatic:
zigzag WNWW (1)
Drop feed control: sewing
If you guide the work...
Manual - Page 28
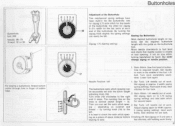
... of toot opening.
Bar Tack: Lift needle out of work
left
1.
by hand. ing on the buttonhole
foot.
If not do one
for zigzag 1,75 satin stitch for ...sew a
starting to width approx. Move needle downwards to foot level and check that needle comes to check the satin stitch spac- turning handwheel by turning knob (19) to approx. 3 width (using spring setting). Lift foot. Sew...
Manual - Page 34
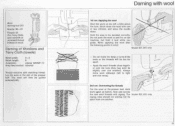
...sew across the new wool threads with matching thread. Lay the wool in mind:
Model 807, 810 only
- The wool will be too far apart.
- Always move work sideways (left to and fro on the left, a little above the hole. 121V-I1
Wool darning foot...:
zigzag WMWV (1)
Drop feed control: lowered
Thread machine with zigzag. Hold work on the machine, but hold it taut while you guide.
Manual - Page 37
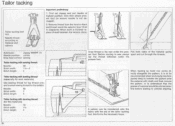
... basting thread for the bobbin. and normal sewing thread for top thread...foot. Needle:
90
Stitch width:
2
Stitch length:
4
13
When tacking by machine (saves time) to transfer the pattern onto the material with chalk and then remove the pattern. Only then attach pres-
0! lay the thread sideways under the pres-
Tailor tacking
Tailor tacking toot 419
Needle thread: according to sew...
Manual - Page 45
...). sew slowly! Note: The machine feeds in a straight line and not in the corner. The material may block progress when the foot moves over a seam already embroidered. Mark all the corners with paper.
Put needle on the outer edge. again and continue sewing (help a little
by placing linger near the foot. Needle position, left !
Closed, oversewn corner: Sew...
Manual - Page 48
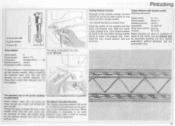
... yet.) Insert and thread the The regular spacing between the tucks
twin needle. Lift presser foot. Drop feed control: sewing
Lower presser foot. Lift presser foot. Insert bobbin case. (Do not bring up the machine The gimp is threaded like this: model 817 for pintucking
1 Inrarm nr.n; N
N
Pintuck loot 028 Double needle Thread: 50
Koho-ommel
Stitch...
Manual - Page 51

...monograms.
will run
write with button- Set zigzag.
the middle of the bobbin case the work will remain open and unattractive work
Bold frame as when ...machine to run more securely the work is drawn through the
material, sow a few straight stitches To produce a perfect monogram a great
and cut the thread ends. The drawn line must be carried out without
a foot.
hole sewing...
Manual - Page 54
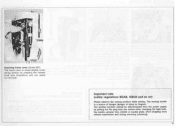
... the plug from the socket when changing the light bulb, the needle, presser foot, bobbin or needle plate, when stopping work without supervision and during servicing (cleaning).
The moving needle Is a source of danger (danger of injury to fingers). The sewing machine should be removed. Important note (safety regulations BEAB, OSHA and so on...
Manual - Page 55

... as a precautionary measure.
The sewing machine should be removed. when stopping work without supervision and during servicing (cleaning). Tilt head After cleaning pour a few drops of oil
of injury to the left. into the shuttle race. Test by pulling out the plug from the power supply by turning the handwheel as screwdrivers and scissors...
Similar Questions

Bobbin Screw Replacement
The Tiny screw on the side of my 817 bobbin case and I cannot find it. Where can I get a new one? Wh...
The Tiny screw on the side of my 817 bobbin case and I cannot find it. Where can I get a new one? Wh...
(Posted by Suzannef3545 2 years ago)

Bernina 817 Belts
Bernina 817 sewing machine is making noises. I think the belts are worn out. Don't know which belts ...
Bernina 817 sewing machine is making noises. I think the belts are worn out. Don't know which belts ...
(Posted by marlenemartin 7 years ago)

Bernina 1090 S Sewing Machine Manual
I Dont See The User Manual For This Machine For Free Downloading.what User Manual Are The Same As Th...
I Dont See The User Manual For This Machine For Free Downloading.what User Manual Are The Same As Th...
(Posted by cynthianel 10 years ago)
Looking For A Manual On A Berenia 640 Sewing Machine. Artista
Cannot get a manual to download from the website WWW.bernia usa
Cannot get a manual to download from the website WWW.bernia usa
(Posted by jsue 11 years ago)

Presser Foot Immobile
Model 817 Manual doesn't include the inner workings of the presser foot. Mine does not move at all w...
Model 817 Manual doesn't include the inner workings of the presser foot. Mine does not move at all w...
(Posted by kcdubois2707 11 years ago)