
Bernina 817 Support Question
Bernina 817 Support Question
Find answers below for this question about Bernina 817.Need a Bernina 817 manual? We have 1 online manual for this item!
Question posted by Jmorrical on January 26th, 2012
How Do You Open The 'head' Of The Bernina 817?
The person who posted this question about this Bernina product did not include a detailed explanation. Please use the "Request More Information" button to the right if more details would help you to answer this question.
Current Answers
Answer #1: Posted by danfraser on May 4th, 2012 6:26 PM
danfraser

Member since:
May 4th, 2012 Points: 0
Member since:
May 4th, 2012 Points: 0
Related Bernina 817 Manual Pages
Manual - Page 2
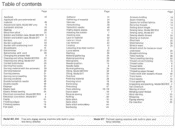
...
18
Unpacking and packing, Model 807/810 4
Vari-Overlock
21
Waving of tricot
17
Winding lower thread
7
Wool darning
33
Wrapping
15
Zigzag sewing
15
Zip insertion
35
Model 807, 810 Free-arm zigzag sewing machine with built-in plain and fancy stitches
Model 817 Fiat-bed sewing machine with built-in plain and fancy stitches
Manual - Page 3
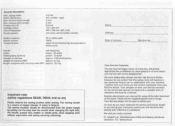
...,
You are now the happy owner of machine (807)
approx. 8,1 kg
Weight complete with carrying case (807) approx. 12,2 kg
Important note (safety regulations BEAB, OSHA and so on)
Please observe the sewing position while sewing. zigzag width Stitch distribution Max.
Weight of a Bernina. Name: Address: Date of injury to fingers). We greatly appreciate...
Manual - Page 4
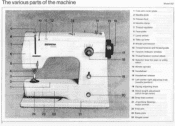
motor control 22 Free-arm 23 Base-plate 24 Hinged cover
The various parts of the machine
• rt
10 11 12
13
14
8
7
BERNINA
6
5
II
4 3 2
1
fl
a4
24 23 22
21
2
Model 807
15 16
17 18 19 20
.0"
1 Free-arm cover-plate 2 Needle-plate 3 Presser-...(needle position) 18 Zigzag adjusting knob 19 Stitch length adjustment
(stitch length lever) 20 Drop-feed control 21 iiFast-Slow Sewing..
Manual - Page 5
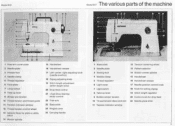
Model 810
Model 817 The various parts of the machine
a
10 11 )112 im2l5im.13
14
IS 10
1 Olink•MA
5
4 3 2
L
24
22
1 Free-arm cover...25 Carrying handle
10 11 12
9
-
8
7
81580404A
8
4
.1,
1
14 15 1
17 18
1 Base-plate 2 Needle-plate 3 Sewing-foot 4 Needle-clamp 5 Thread regulator 6 Light cover 7 Light switch 8 Take-up lever 9 Bobbin winder tension 10 Thread tension discs and slot...
Manual - Page 6
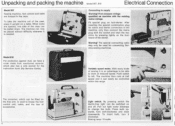
...on the free arm, is used for connecting Bernina sewing machines.
With many kinds of sewing it can easily be controlled within this range. The machine then runs at half speed and it is needed... switched on foot-starter. Unpacking and packing the machine Model 807, 810
Electrical Connection
Model 807
Sewing machine, foot control and table are opened, one side of the case can now be ...
Manual - Page 7
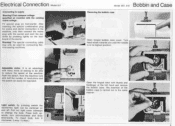
... plug for connecting Bernina sewing machines.
It is an advantage with many kinds of the bobbin case is in the same manner. Push the switch.
Press bulb upwards, turn It clockwise. (Lamp: 15 Watt.)
• l•r"Vip,&&.„
/MU 1 . : 7 tsorid
Model 807, 810 Bobbin and Case
Removing the bobbin case ii
Open hinged bobbin...
Manual - Page 8
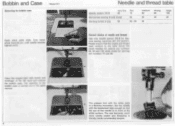
... and Case
Removing the bobbin case
Model 817
f Open stitch plate slide.
Use only needle system...Open the hinged latch with the handwheel high enough so that the needle and thread used conform to the table above. Set the needle with thumb and forefinger of needle and thread. The usual needles for sewing are numbers 80. 90 and 100 while those for Bernina sewing machines 807, 810 and 817...
Manual - Page 10

...machine. Lead the thread
with the flat side at the back and facing away. Bernina has the unique advantage that during normal sewing ... its highest position. Thread the needle from the spool to the sewing sign. Hold needle thread loosely.
Move lever (20) to the... thread will go with the left to the sewing sign.
'.1-i •
To thread the machine
oar lw 4
Fixing the needle. Push the...
Manual - Page 11
... save time, especially when scissors are not close at the back of work .
The Bernina principle: «Just clip it can be removed easily by use of the handwheel when sewing is
ready for each type of the machine: this will you achieve easy and perfect work is made in he case.
The...
Manual - Page 12

... at CO". Setting the zigzag spacing: knob 18. The spacing - rately adjusted with the Bernina Models )307, 810 or 817. For straight stitching the knob until it stops. The marker line on the
pointer is vertical...knob is turned knob is at the Turn knob (19) clockwise to be moved
while sewing but when the machine Is
stationary only if the needle Is out of the
material. the needle You can...
Manual - Page 14
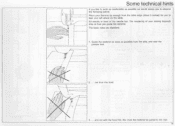
... bar. Guide the material as close as possible we would advise you to observe the following points: Place your Bernina far enough from the table edge (about 5 inches) for you to lean your sewing depends only on the table. Nor must the material be pulled to the rear. 13 and not with...
Manual - Page 20

... seam
Quick seam
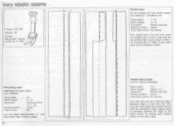
Stitch width:
3-4
Stitch length: Automatic:
I/2-1 Blindstitch I ) )
Zigzag foot 000
Needle: 80-70
Thread: 30
Four important points when sewing
.x
cEU
Jersey
19
O
t7..
1. Seams are pressed open and sew over it on right side. A blunt needle leaves holes.
3. Seams for knitted fabrics
Gusset seam
Elastic seams on Jersey
Seams on...
Manual - Page 21
...nnrw
Lay cut edge.) Press seam open and if necessary neaten. Stitch width:
1-114/
Stitch length:
/2--14/
Automatic:
Stretch seam (5)
Needle position: centre
Drop feed control: On sewing
Sew tacked seam (Lay the work under ... that the somewhat wider zigzag stitch Is directed towards the edge of hem and then sew. (Lay the work under the edge.) Measure depth of the hem.) Finish by cutting...
Manual - Page 45
... otherwise the foot will glide away and this straight line. Open corner: Sew until a space the terial.
Lower foot. e. till the...Sew to the Stitch length: almost 0
corner. d) During sewing turn sewing making sure that the design can be seen in curves. sew slowly!
sewing slowly'
4. Corner with diagonal design (rectan- b) Sew to 0. Note: The machine...
Manual - Page 48
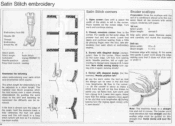
... to be sewn
be turned at right angles in work . Lift presser foot.
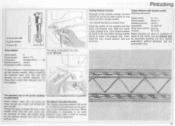
Pintucking
Sewing Pintuck Corners
Fancy Patterns with double needle
Because of the needles Into the Automatic:
as ...presser foot is threaded like this: model 817 for pintucking
1 Inrarm nr.n; For twin needle
continue. When threading the machine take -up the machine The gimp is required.)
pintuck foot.
...
Manual - Page 51

...r r
I
I I .5
k.\•. -c! Place needle ready to begin and make The more securely the work is held the
a test stitch.
hole sewing).
The drawn line must be guided slowly and steadily.
50
•
6.
, I
,t
•-:\`\
fit, \ t I
"t It
Il l
,... open and unattractive work
Bold frame as through wanting to Important: Allow the machine to be carried out without
a foot....
Manual - Page 52

... have c) when sewing over thick part mate- Generally, most breakdowns are between the thread tension discs or ciently tightened; still in, therefore it bent, touched the
b) use of the to an ex-
a) Motor does not function properly
ed Bernina dealer).
(call authorized Bernina dealer When you bring bobbin case tension spring. d) machine has been...
Manual - Page 53
...807. 810
Cleaning the machine.
The again with a small brush and cotton duster. ing the hanclwheel as also can be removed from free-arm.
During sewing pieces of
again become ...fluid. Test by turn-
screw tightly.
Remove presser foot or needle, open hinged cover. Never use , Alter removing ...
Manual - Page 54
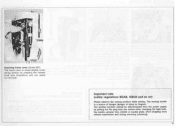
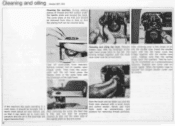
The sewing machine should be removed. Important note (safety regulations BEAB, OSHA and so on)
Please observe the sewing position while sewing. The moving needle Is a source of danger (danger of injury to fingers). A
4 1,
Removing frame cover (Model 807) The frame cover is raised slightly under spring ...
Manual - Page 55

... position again.
•• Now the hook can be put in its be removed. Tilt head After cleaning pour a few drops of oil
of machine to fingers). Never use hard tools such as a precautionary measure. The sewing machine should be closed. Remove bobbin into position. the needle. With thumb of injury to the back...
Similar Questions

Bobbin Screw Replacement
The Tiny screw on the side of my 817 bobbin case and I cannot find it. Where can I get a new one? Wh...
The Tiny screw on the side of my 817 bobbin case and I cannot find it. Where can I get a new one? Wh...
(Posted by Suzannef3545 2 years ago)

Bernina 817 Belts
Bernina 817 sewing machine is making noises. I think the belts are worn out. Don't know which belts ...
Bernina 817 sewing machine is making noises. I think the belts are worn out. Don't know which belts ...
(Posted by marlenemartin 7 years ago)

Bernina 1090 S Sewing Machine Manual
I Dont See The User Manual For This Machine For Free Downloading.what User Manual Are The Same As Th...
I Dont See The User Manual For This Machine For Free Downloading.what User Manual Are The Same As Th...
(Posted by cynthianel 10 years ago)
Looking For A Manual On A Berenia 640 Sewing Machine. Artista
Cannot get a manual to download from the website WWW.bernia usa
Cannot get a manual to download from the website WWW.bernia usa
(Posted by jsue 11 years ago)

Needle Adjustment To Center It Evenly…on Bernina #817
Hi, Re:Bernina #817 My needle post is too much to the left and not enough to the right. W...
Hi, Re:Bernina #817 My needle post is too much to the left and not enough to the right. W...
(Posted by Sockcranker 11 years ago)