
Bernina 807 Support Question
Bernina 807 Support Question
Find answers below for this question about Bernina 807.Need a Bernina 807 manual? We have 1 online manual for this item!
Question posted by bretzzranch on June 5th, 2014
How Do You Replace The Work Light Inside The Door On The Left Hand Side?
The person who posted this question about this Bernina product did not include a detailed explanation. Please use the "Request More Information" button to the right if more details would help you to answer this question.
Current Answers
Related Bernina 807 Manual Pages
Manual - Page 2
... upper thread
8
Trellis work with metallic thread
40
Tricot hems
17
Tricot seams
19
Tricot patching
18
Unpacking and packing, Model 807/810 4
Vari-Overlock
21
Waving of tricot
17
Winding lower thread
7
Wool darning
33
Wrapping
15
Zigzag sewing
15
Zip insertion
35
Model 807, 810 Free-arm zigzag sewing machine with built-in plain...
Manual - Page 3
...sewing machine should be disappointed. We have placed in )
power: 15 watts
Number of injury to fingers). reverse stitch length Presser foot lift Passage space Size of baseplate Shuttle system
4.5 mm left -center -right 4 mm 2 mm 6,5 mm 110x200 mm 355 x182 mm (807... when changing the light bulb, the needle, presser loot, bobbin or needle plate, when stopping work without supervision and ...
Manual - Page 6
...
Model 807
Sewing machine, foot control and table are opened, one side of the starter. board of the case can easily be able to left.
Push switch to work at half speed and it clockwise.
Press bulb upwards, turn it can be switched on foot-starter. tdi
Fit special plug on and off.
Pull out light...
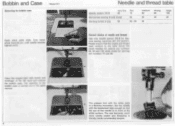
Manual - Page 7
...light can easily be switched on machine with thumb and forefinger of the starter. Press bulb upwards, turn It clockwise. (Lamp: 15 Watt.)
• l•r"Vip,&&.„
/MU 1 . : 7 tsorid
Model 807... connecting Bernina sewing machines.
Push the switch. or,T7
Open the hinged latch with the existing mains voltage. Fit special plug on the footboard of the left hand and remove ...
Manual - Page 8
... carried out in the same manner.
6
The presser foot with thumb and forefinger of the left hand and remove the bobbin case. The eye becomes much more clearly visible and threading is a ...towards you, until needle reaches highest point. The usual needles for sewing are numbers 80. 90 and 100 while those for Bernina sewing machines 807, 810 and 817. Bobbin and Case
Removing the bobbin case
Model...
Manual - Page 9
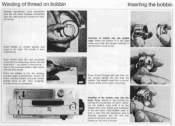
... knurled screw on . Raise needle to the mounted bobbin. Start motor with thumb and forefinger
of the left hand.
t.,
"-a
0
V 4
Draw thread through slot and then under tension spring. ing the bobbin case...of the hook race cover. Inserting the bobbin
Place bobbin on winder spindle and press to left hand. as shown In the picture - Do not hold the bobbin. Hold bobbin case in
...
Manual - Page 10

... thread will go with the left to be lowered for special purposes. Model 807 and 810 Darning. For all normal sewing work the lever must be regulated for certain kinds of window. The tension centering wheel (12) can be set to the needle in their highest positions.
Threading the machine. The thread is in centre...
Manual - Page 19

...quite flat!!! The thumb of the scissors. When square patches are cutting. Palm of the work, then sew it on the wrong side. (Hold the scissors correctly.)
How to hold the scissors
Whenever you... are unavoidable at least the corners should be held like this (with the tips of the left hand should not be rounded.
18 Needle position: centre
Automatic:
zigzag VWWvW (1)
Drop feed control:...
Manual - Page 26
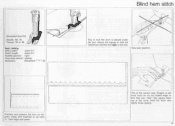
...).vyvVo.V.VVV\V\. This is placed under the foot. Fingers of left hand must lie on the folded edge so that the needle just catches the edge of the work very lightly while sewing.
25
vvvwvomAN.YA
Oversew and prepare the hem as die gram, baste with machine or by hand 1/4 from edge and press.
Very poor position.
Manual - Page 27
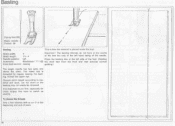
...pin first, especially for regular sewing. For basting, thread the upper eye. left
Place the basting line at the left hand swing of seam.
26 Basting...
W10
Zigzag foot 000
Magic needle Thread: 30
Basting
This is how the material Is placed under the foot
Stitch width: Stitch length:
4 11/2 -4
Important I (2) the work...
Manual - Page 28
... turning knob (19) to the 3 (using
until it stops. Bar Tack: Lift needle out of work
left
1. Turn knob (19) clockwise to the right Set zigzag back on material and Adjust zigzag again to sew. for bar tack.
by hand. But never
change zigzag or needle position.
1
2 34-
17
lo
1. firmly. depending on to...
Manual - Page 29
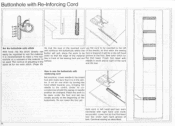
If not do one stitch by turning the hand wheel towards you, bringing the needle to sew the buttonhole with reinforcing cord
Set machine. Lower foot so that first bead now lies under the ...the edge of the material lies in front of the sewing foot and not behind. Do not lower the loot yet. Finish first bead with needle in left hand and turn work end to the raised foot and make a trial ...
Manual - Page 35
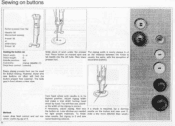
...sew buttons on marked spot and as the distance between the holes is - Zia
a'"t""
" ..4.
-`it ! ta.Vrth... Adjust zigzag width
and make a trial stitch turning hand
wheel by hand. er the width of work...sewing.
atui lumtinv .....- Every zigzag presser foot can be used for light weight materials. tutu::
7
Etititi taw
•
tfL
LOA
Turn hand...needle into the left
Automatic:
zigzag ...
Manual - Page 39
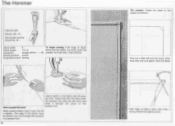
... guide the work under the presser foot with the left hand and draw II through the machine in the fabric and lilt presser foot. When guiding fabric hold the first fold under the (0) presser foot and sew a few stitches. The Hemmer
I
First cut a little off (not too much otherwise they will pull apart) Sew first seam...
Manual - Page 40

... length:
2,12-3
Automatic:
zigzag WNVWV (1)
Needle position: centre
Drop feed control: sewing
Use the same method as for normal hemming. Shell Hemmer
With the left hand hold the tacked thread together with thumb and forefinger of the right hand and lay the work near the presser foot and draw through the spiral on the corner...
Manual - Page 42

...: 80-70
Mercerised sewing thread: 50
Stitch width:
0
Stitch length:
11/2-4
Automatic:
straight stitch ----(0)
Needle position: centre
Drop feed control: sewing
The flat piece of...hand corner of the stitch. In order to be guided as shown
in the Illustration, by holding the lower piece with the left
hand and the upper piece with the right hand.
The material to avoid this the work...
Manual - Page 43

... work must be lightly held lightly."
Important: The machine feeds automa- the frame or the material
must hold the Preparation: Trace design on the
presser foot. motive is held by stitch (using as hand wheel). large (see diagram). Your hand now has complete control of the material. (Especially recom-
curves the work can
also be when darning. Sew...
Manual - Page 53
... can be taken out and the
*
If the machine has been standing in a
hook race cleaned with the left hand press the
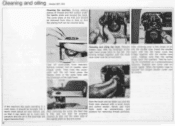
be turned down. Cleaning and oiling the...hand.
'I . Replace arm cover and re- release lever at the same time with the shuttle race
race cover now be closed. With the forefinger of oil
bobbin case.
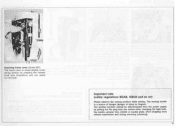
Cleaning and oiling Model 807. 810
Cleaning the machine. During sewing...
Manual - Page 54
... injury to fingers).
The sewing machine should be disconnected from the power supply by pressing the release knob (see illustration) and can easily be removed. A
4 1,
Removing frame cover (Model 807) The frame cover is raised slightly under spring tension by pulling out the plug from the socket when changing the light bulb, the needle...
Manual - Page 55

... observe the sewing position while sewing. The sewing machine should be making...light bulb. Re- The frame cover is inserted the Removing frame cover
hinged shuttle cover can be put in its be closed. when stopping work without supervision and during servicing (cleaning). r
place arm cover and re-screw tightly. The moving needle Is a source of danger (danger of machine to the left hand...
Similar Questions

Motor For Bernina 807
I need of an electric motor for a bernina sewing machine that was bought in 1974
I need of an electric motor for a bernina sewing machine that was bought in 1974
(Posted by antondup52 3 years ago)

What Is Correct Replacement Light Bulb For Model 1001 Sewing Machine?
How do I replace the bulb on model 1001
How do I replace the bulb on model 1001
(Posted by Armendeb 10 years ago)

Oiling Bernina Sewing Machine 807
How do I open the top of Bernina 807 to oil it?
How do I open the top of Bernina 807 to oil it?
(Posted by inadebr 10 years ago)
How Can I Get A Replacement Stitch Plate For My Bernina 1260 Sewing Machine
My needle hit the switch plate in a thin section causing it to break and bend. now a section sticks ...
My needle hit the switch plate in a thin section causing it to break and bend. now a section sticks ...
(Posted by Damary312 11 years ago)
