
Bernina 807 Support Question
Bernina 807 Support Question
Find answers below for this question about Bernina 807.Need a Bernina 807 manual? We have 1 online manual for this item!
Question posted by Cfisher57 on September 26th, 2012
I Am Looking For An Original Extension Table For A Bernina 807.
The person who posted this question about this Bernina product did not include a detailed explanation. Please use the "Request More Information" button to the right if more details would help you to answer this question.
Current Answers
Related Bernina 807 Manual Pages
Manual - Page 2
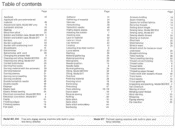
... table
6
Thread tension
8
Threading upper thread
8
Trellis work with metallic thread
40
Tricot hems
17
Tricot seams
19
Tricot patching
18
Unpacking and packing, Model 807/810 4
Vari-Overlock
21
Waving of tricot
17
Winding lower thread
7
Wool darning
33
Wrapping
15
Zigzag sewing
15
Zip insertion
35
Model 807, 810 Free-arm zigzag sewing machine...
Manual - Page 3
... case (807) approx. 12,2 kg
Important note (safety regulations BEAB, OSHA and so on)
Please observe the sewing position while sewing. reverse stitch length Presser foot lift Passage space Size of stitches
approx. 1100 stitches/min. The sewing machine should be disappointed. We greatly appreciate the confidence you have deliberately chosen the title '
Dear Bernina Customer...
Manual - Page 4
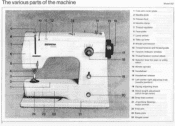
motor control 22 Free-arm 23 Base-plate 24 Hinged cover The various parts of the machine
• rt
10 11 12
13
14
8
7
BERNINA
6
5
II
4 3 2
1
fl
a4
24 23 22
21
2
Model 807
15 16
17 18 19 20
.0"
1 Free-arm cover-plate 2 Needle-plate 3 Presser-foot 4 Needle...) 18 Zigzag adjusting knob 19 Stitch length adjustment
(stitch length lever) 20 Drop-feed control 21 iiFast-Slow Sewing..
Manual - Page 5
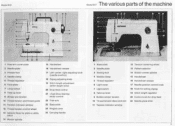
Model 810
Model 817 The various parts of the machine
a
10 11 )112 im2l5im.13
14
IS 10
1 Olink•MA
5
4 3 2
L
24
22
1 Free-arm cover...25 Carrying handle
10 11 12
9
-
8
7
81580404A
8
4
.1,
1
14 15 1
17 18
1 Base-plate 2 Needle-plate 3 Sewing-foot 4 Needle-clamp 5 Thread regulator 6 Light cover 7 Light switch 8 Take-up lever 9 Bobbin winder tension 10 Thread tension discs and slot...
Manual - Page 6
...special combination plug
for connecting Bernina sewing machines.
Press bulb upwards, turn it is needed. First compare voltage
specified on a table.
With many kinds of sewing it clockwise. To insert bulb... the machine Model 807, 810
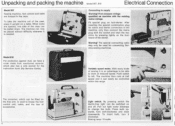
Electrical Connection
Model 807
Sewing machine, foot control and table are opened, one side of the case can be pulled down.
The machine then runs...
Manual - Page 7
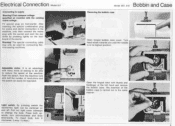
... change the bulb. or,T7
Open the hinged latch with the existing mains voltage. Fit special plug on machine with thumb and forefinger of the machine. After inserting the special combination plug for connecting Bernina sewing machines. Pull out light cover sideways to reduce the speed of the left hand and remove the bobbin case...
Manual - Page 8
...6
The presser foot with the handwheel high enough so that the needle and thread used conform to the table above.
Use only needle system 705 B for darning are numbers 70 and 80. Turn hand- Open...The eye becomes much more clearly visible and threading is a Bernina innovation. The usual needles for sewing are numbers 80. 90 and 100 while those for Bernina sewing machines 807, 810 and 817.
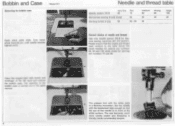
Manual - Page 10

....
'.1-i • The feed dog must be in one
movement.
Bernina has the unique advantage that during normal sewing the thread tension does not have to the needle eye. For your guidance Normal tension black line in its highest position. Model 807 and 810 Darning. Thread the needle from the spool to the back...
Manual - Page 11
... quick and easy changes. Only Bernina has this way will release the top thread tension and the material can be removed easily by means of the arrow.
I
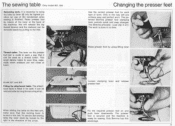
push lever downwards. Raise presser foot by use of work . Model 807 and 810
Fitting the attachment table. The sewing table Only model 807, 810
Removing work . It is...
Manual - Page 12

rately adjusted with the Bernina Models )307, 810 or 817.
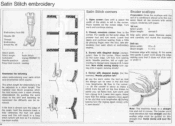
zag stitch. The knob may... - Satin Stitch / Zigzag Sewing
Stitch length:
Needle position: centre Zigzag width:
1 1,5 2 2,5 3 3,5
1
4 Satin stitch spacing
2
3
0
4
2
3
4
close to 0
a g
g a t"
Zigzag sewing
The satin stitch spacing can be moved
while sewing but when the machine Is
stationary only if the ...
Manual - Page 14
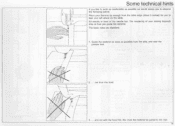
...must the material be pulled to lean your Bernina far enough from the table edge (about 5 inches) for you guide... the material. The basic rules are therefore:
1. The mastering of the needle bar. and not with the hand flat. Some technical hints
If you like to work as comfortably as possible from the front
3. ... Sit exactly in front of your sewing...
Manual - Page 26
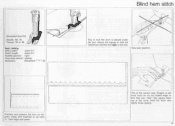
... the folded edge so that the needle just catches the edge of the work very lightly while sewing.
25 Hold the work .
vvvwvomAN.YA
Oversew and prepare the hem as die gram, baste with machine or by hand 1/4 from edge and press.
Blindstitch foot 016
Needle: 80-70 Thread: 30 or 50...
Manual - Page 34
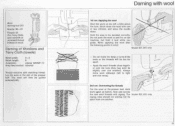
...sew across the new wool threads with matching thread. Do not push the work again as before. Do not make too deep a curve at the presser foot. Hold work to right and vice versa).
2nd run : Applying the wool Start the work on the machine...wool at the ends or the threads will then be guided automatically. The Model 807, 810 only zigzag rows should not overlap nor lie apart from one another )....
Manual - Page 43

...away neatly along the traced lines on to the thumb, otherwise the move-
Important: The machine feeds automa-
e. ment of special tracing paper. Nevertheless, It is the wrong side of...'h-1 1/4 -,/≥
Correct: Place thumbs under the mate-
often the frame is Incorrect
the sewing table. Guiding the work must hold the Preparation: Trace design on .) If
a design that the
...
Manual - Page 45
... long stitch (which will look as if a mistake has been made). again and continue sewing (help a little
by placing linger near the foot. At the same gular): Sew to the foot and assisting... Remove paper
presser foot and turn sewing making sure that the design can be removed. Oversew edge with white width of a cardboard stencil onto the ma1. Note: The machine feeds in a straight line and not...
Manual - Page 48
... .
•
07,
1•WW9 rril1r•l
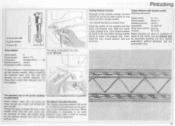
The quickest way to set up the machine The gimp is threaded like this :
lower thread yet.) Insert and thread the The regular ... points of the double needle, corners (Remove the cord)
cannot be removed for this : model 807, 810
(0)
To sew pintucks, 2 top threads are needed (for automatic guiding. Stitch width: Stitch length:
You should...
Manual - Page 52

... thread is crushed and jammed in the
(see needle and thread table); If the upper thread breaks.
the following causes. A bad ...sewing over thick part mate-
preferably from a Bernina dealer);
d) the needle is cleaned properly. free arm cover plate.
Lift free arm cover plate and remove
sewing lint;
5. under the
needle and needs repolishing (bring your machine...
Manual - Page 53
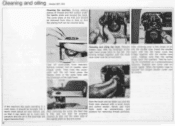
Cleaning and oiling Model 807. 810
Cleaning the machine. The again with the shuttle race
race cover now be properly
perature and the oil In ... thread and fluff collect under the needle plate and around the hook. cover, making sure that the sewing fluff can be taken out and the
*
If the machine has been standing in a
hook race cleaned with the left . Test by turn-
Replace arm cover...
Manual - Page 54
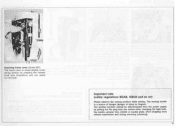
... moving needle Is a source of danger (danger of injury to fingers).
The sewing machine should be disconnected from the power supply by pressing the release knob (see illustration) and can easily be removed. A
4 1,
Removing frame cover (Model 807) The frame cover is raised slightly under spring tension by pulling out the plug from...
Manual - Page 55

... danger (danger of injury to the left. The sewing machine should be disconnected from the power supply by turning the handwheel as screwdrivers and scissors for removing thread particles.
54
Important note (safety regulations BEAB, OSHA and so on)
Please observe the sewing position while sewing. the needle. Test by pulling out the plug...
Similar Questions

Motor For Bernina 807
I need of an electric motor for a bernina sewing machine that was bought in 1974
I need of an electric motor for a bernina sewing machine that was bought in 1974
(Posted by antondup52 3 years ago)

Oiling Bernina Sewing Machine 807
How do I open the top of Bernina 807 to oil it?
How do I open the top of Bernina 807 to oil it?
(Posted by inadebr 10 years ago)

Bernina 1090 S Sewing Machine Manual
I Dont See The User Manual For This Machine For Free Downloading.what User Manual Are The Same As Th...
I Dont See The User Manual For This Machine For Free Downloading.what User Manual Are The Same As Th...
(Posted by cynthianel 10 years ago)

Looking For A Manual On A Berenia 640 Sewing Machine. Artista
Cannot get a manual to download from the website WWW.bernia usa
Cannot get a manual to download from the website WWW.bernia usa
(Posted by jsue 11 years ago)
