Bernina 350PE Support Question
Bernina 350PE Support Question
Find answers below for this question about Bernina 350PE.Need a Bernina 350PE manual? We have 1 online manual for this item!
Question posted by bhunterva1 on July 22nd, 2012
How Do I Switch Presser Feet?
My 350 PE came with the buttonhole foot attached. When I removed it the shank came off. How do I use the shank for other feet? I assume that is what I am supposed to do. I don't want to break the fragile looking buttonhole foot.
Current Answers
Related Bernina 350PE Manual Pages
User Guide - Page 1

... has placed the highest value on your journey to make use of accessory and let yourself be inspired by new sewing projects at the occasional sewer who puts great stock in ...350 and 380 are very ergonomically built and therefore even easier to operate, to help you Swiss precision at the height of personal pride to come. Introduction 1
Dear Bernina Customer, Congratulations! These sewing...
User Guide - Page 2

... responsible way according to the national directive. This sewing computer is required in . 2. Keep ventilation openings of the sewing computer free from all instructions before using this sewing computer. Special care is not intended for purposes as changing the needle or the presser foot, etc.
14. Always use the sewing computer outdoors. 8. Replacement parts for examination, repair...
User Guide - Page 4
... Hook
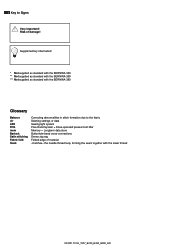
Correcting abnormalities in stitch formation due to Signs
Very important! 4 Key to the fabric Deleting settings or data Sewing light system Free-Hand System = Knee-operated presser-foot lifter Memory = Longterm data store Buttonhole-bead cross-connections Dense zig-zag Folded edge of damage! Supplementary information!
* Not supplied as standard with the BERNINA...
User Guide - Page 6

...without 350 PE) 3 No. 3A Automatic Buttonhole foot with
slide 4 No. 4 Zipper foot 5 No. 5 Blindstitch foot 6 No. 8 Jeans foot **/(without
350 PE) 7 No. 20 Open embroidery sole * 8 No. 37 Patchwork sole (only 350 PE)
Presser Feet - Standard (BERNINA 350/350 PE/380)
1
2
3
4
5
6
7
8
1 No. 1 Reverse pattern foot 2 No. 2 Overlock foot (without 350 PE) 3 No. 3A Automatic Buttonhole foot with...
User Guide - Page 9

...the proper outlet. To reduce the risk of the sewing computer 9
30
37 38
1 Bobbin cover 2 Stitch plate 3 Attachment base for
special accessory 4 LED sewing light 5 Quick reverse button 6 Start/Stop button ...Balance adjuster 35 Foot control socket 36 Feed-dog drop 37 Power switch on head
frame (left) 46 Presser foot lifter 47 Darning hoop connection
(USA/Canada only): The sewing computer has ...
User Guide - Page 10

... █ «0» corresponds to the right until it engages Removing the slide-on table █ raise needle and presser foot █ press button down and pull off slide-on table increases the sewing surface. Attaching the slide-on table █ raise needle and presser foot █ slide over free-arm to the center needle position
033301...
User Guide - Page 11
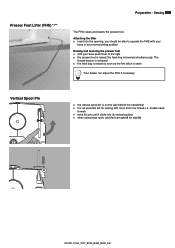
Attaching the lifter █ insert into its vertical position █ when using large reels, add the foam pad A for sewing with your knee push lever to the right █ the presser foot is on the side behind the handwheel &#...your
knee in your normal sitting position Raising and lowering the presser foot █ with more than one thread, i.e. the feed dog is sewn
Your dealer can adjust...
User Guide - Page 12

...switch on (to the left under the spring Pull the thread to «I») █ place empty bobbin on spindle █ place thread on vertical spool pin then, following the direction of the spring. Sewing...; pull thread over thread cutter when removing the bobbin
Bobbin winding while sewing █ place thread spool on spool pin █ attach appropriate spool disc;
Laying the thread ...
User Guide - Page 14

... and F
C E
F
033301.70.04_1007_B330_B350_B380_EN 14 Preparation - Sewing
Needle Threader
A
B
1
2
A
1 Press lever down █ raise needle █ lower the presser foot █ hold thread to the left and back █... frame
3
Threading the Upper Thread
A B
D
Attaching the thread spool █ raise the needle and presser foot █ power switch to the left of the cover and around D, ...
User Guide - Page 16

Sewing
Thread Cutter
On the left of the head frame █ pull both threads from front to back over the cutter █ the threads release automatically as soon as the first stitch is sewn
Changing the Needle
Removing the needle █ raise needle █ power switch to «0» (off) █ lower the presser foot █...
User Guide - Page 17

... of the shaft
3
█ lower the presser-foot lifter and the foot sole will click into position
Changing the Presser Foot
Changing the Presser Foot █ raise the needle and presser foot █ power switch to «0» (off)
Raising the Lever █ raise the clamping lever █ remove the presser foot
Attaching the Presser Foot █ guide the foot upwards over the cone █...
User Guide - Page 18
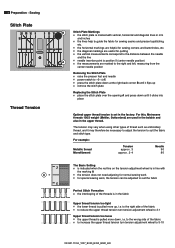
...for sewing seams and precise topstitching,
etc.
█ the horizontal markings are helpful for sewing corners and buttonholes, etc.
█ the diagonal markings are used in...measuring from the
center needle position
Removing the Stitch Plate █ raise the presser foot and needle █ power switch to 5-10
033301.70.04_1007_B330_B350_B380_EN
Sewing
Stitch Plate
Thread Tension
A
B...
User Guide - Page 39

...
When any automatic buttonhole is selected, presser foot no . 3A appear on the fabric! sew the first bead forwards, stop the sewing computer
█ press the Quick reverse button «auto» and the presser foot no . 3 is programmed. Sewing stitches - The slide foot must lie perfectly flat on the display = buttonhole length is indicated on automatic buttonhole foot 3A automatically...
User Guide - Page 40
... 3. the first bead in reverse 2 3 4 5 6 6.
Double-sewn keyhole buttonholes █ keyhole buttonholes can be exactly the same length as the previous one. straight stitches forwards 5. 40 Sewing stitches - sew the straight stitch forward, stop the sewing computer
█ press the Quick reverse button
«auto» and presser foot no
need to press the Quick reverse button...
User Guide - Page 43

... short basting stitches at a right angle to basting direction to remove
Preparation █ lower the feed-dog █ pin work under the presser foot and sew one stitch;
Perfect corners █ activate Pattern end and Needle stop down and pivot the work which should look effect
Upper thread tension Depending on the fabric = increase the...
User Guide - Page 44

..., Maintenance
Cleaning the screen and the sewing computer Wipe with a cloth or brush, never use alcohol, petrol, white spirit or any lint from under the stitch plate and in the hook area. █ power switch to «0» (off) █ pull out plug from electrical outlet █ remove presser foot and needle █ open the free...
User Guide - Page 45

... it upwards █ remove remnants of thread █ attach headframe and retighten screw
█ Fold a piece of the shank must be able to identify and remedy faults by a specialized dealer
█ Use new needle
█ Tighten the needle clamp screw █ Do not pull the fabric during sewing █ Use the correct presser foot for thick material (e.g. Check...
User Guide - Page 47

...; Practical stitch █ Presser foot
Bobbin █ Removing/inserting the bobbin █ Winding
Bobbin case █ Removing/inserting
Button sew-on program
Buttonhole █ 4-steps █ 5-steps █ Automatic █ Balance █ Buttonhole type █ Cutting open █ Important information █ In long-term █ Manual █ Presser feet █ Programming █...
User Guide - Page 48

... computer
Presser foot █ Changing the presser foot █ Display █ Presser feet summary █ Raise/lower the presser foot
Pre-tension
Q
Quilting █ Stitches
R
Reverse sewing █ Button █ Permanent reverse sewing
Running stitch
S
Safety instructions
Saving █ Function button █ Saving stitch pattern combinations
Select █ Alphabets █ Buttonholes...
User Guide - Page 49

...Start-Stop Button
Stitch pattern █ Buttonholes █ Decorative stitches █ Display █ Functions █ Overview █ Practical stitches █ Quilt stitches
Stitch pattern selection █ By number
Stitch plate █ Attaching/removing
Stitchcategory
Straight stitch
Summary █ Screen █ Sewing computer █ Sewing functions █ Stitch patterns
T
Thread...
Similar Questions

Bernina 350 Pe: The Thread Jams.
Bernina 350 PE: The thread jams so that it is difficult to pull it out from both the needle side and...
Bernina 350 PE: The thread jams so that it is difficult to pull it out from both the needle side and...
(Posted by muruthii 11 months ago)

What Kind Of Needle And Thread To Use For Quilting In Bernina 350 Pe
(Posted by ncmeenu 9 years ago)

Bernina 1090 S Sewing Machine Manual
I Dont See The User Manual For This Machine For Free Downloading.what User Manual Are The Same As Th...
I Dont See The User Manual For This Machine For Free Downloading.what User Manual Are The Same As Th...
(Posted by cynthianel 10 years ago)

Bernina 350 Limited Edition
I was sewing and my needle got stuck in the stitch plate/feed dog and I don't know how to fix it thi...
I was sewing and my needle got stuck in the stitch plate/feed dog and I don't know how to fix it thi...
(Posted by Ianwilliams919 11 years ago)

Bernina 350pe Needle Will Not Move, Stuck In Feed Dog Plate
Haad difficulty replacing needle, then sewed approx 6 stitches and the needle was stuck in a downwar...
Haad difficulty replacing needle, then sewed approx 6 stitches and the needle was stuck in a downwar...
(Posted by haswellchris 11 years ago)