Bernina 1008 Support Question
Bernina 1008 Support Question
Find answers below for this question about Bernina 1008.Need a Bernina 1008 manual? We have 1 online manual for this item!
Question posted by cstaruck on January 15th, 2012
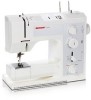
Machine Won't Run After Replacing Light Bulb
I removed the back of my 1008 to replace the light bulb. Replaced the back...seems to fit perfectly. Machine won't run. Is there something I need to connect or a safety reset or something?
Current Answers
Related Bernina 1008 Manual Pages
Owners Manual - Page 2

MASTERING YOUR
BERNINA®
BERNINA® Electronic 1008
Table of Contents
SECTION A Pages 3-15 Care and Feeding of Your Machine
SECTION B Pages 16-30 Let's Start WIth The Basics
SECTION C Pages 31-47 On The Edge
SECTION D Pages 48-61 Gather It Up and Tuck It Down
MASTERING YOUR BERNINA® 1/10/02
Electronic 1008/2
Owners Manual - Page 3

MASTERING YOUR
BERNINA®
BERNINA® Electronic 1008
MASTERING YOUR
BERNINA®
Electronic 1008
OWNER'S WORKBOOK
Section A Care and Feeding of Your Machine
MASTERING YOUR BERNINA® 1/10/02
Electronic 1008/3
Owners Manual - Page 4
... - stitch plate marks - light on the stitch plate: ¼...Removing the bobbin case • Winding a bobbin • Use bobbin thread cutter • Clip the thread close to begin sewing...removal of accessories • Attach cords foot control and machine • Power switch - MASTERING YOUR
BERNINA®
BERNINA® Electronic 1008
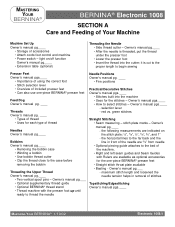
SECTION A
Care and Feeding of Your Machine
Machine...
Owners Manual - Page 5

... an authorized BERNINA® technician during the month of stitches
Changing the Light Bulb Owner's manual pg.____
Cleaning the Feed Dog • Periodically remove thread fluff and fabric fuzz which collects under the stitch plate.
Take
it was last serviced. If needed, use oil, alcohol, or solvents of any kind on any part...
Owners Manual - Page 6
... for decorative work only. excellent for fine stitches. Cotton thread stretches less than average stitch quality. MASTERING YOUR BERNINA® 1/10/02
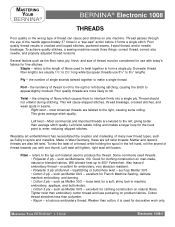
Electronic 1008/6 To achieve quality stitches, a sewing machine needs three things: correct thread, correct size needle, and properly adjusted thread tensions. refers to the length of fibers which causes them to interlock...
Owners Manual - Page 7

... be changed every 4-6 hours of sewing. If it isn't protected by the hook point Bent - MASTERING YOUR BERNINA® 1/10/02
Electronic 1008/7 MASTERING YOUR
BERNINA®
BERNINA® Electronic 1008
NEEDLES
Along with a larger groove should be used.
• Always make a stitch
Need To Know
• Needle should fit in the groove on the...
Owners Manual - Page 8
... knit fabric.
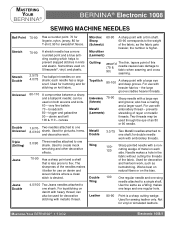
60-110
A compromise between a sharp and a ballpoint needle; Not for sewing leather only. each side. broadcloth 80 - trigger and gabardine 90 - Used for pintucks,...makes one large and one shank; MASTERING YOUR
BERNINA®
BERNINA® Electronic 1008
SEWING MACHINE NEEDLES
Ball Point Stretch
Stretch Double Universal
Double Universal Triple (Drilling) Jeans
Jeans Double...
Owners Manual - Page 10

... 1008
SEAMING
Fabric: Needle: Thread:
Presser Foot:
Firm fabric - 2 pieces, 4" x 6" each 90/14 Embroidery 30 wt.
cotton embroidery Contrasting color Reverse Pattern Foot #1
Owner's manual pg.____ • Find the 5/8" guide line on the stitch plate. • Place fabric pieces right sides together and
align them with the guide line. • Sew...
Owners Manual - Page 12

...1008
TOPSTITCHING/EDGESTITCHING
Fabric: Needle: Thread:
Presser Foot:
Firm fabric - 4" x 6" 90/14 Embroidery 30 wt. cotton embroidery Contrasting color Edgestitch Foot #10 (optional accessory)
Owner's manual pg.____ • Cut fabric in half to create 2 pieces each 2" x 6". • Sew...position 1 place to the left (half left). • Sew the length of the seam. • Select the longest ...
Owners Manual - Page 13
... pg.____ • Fold each fabric piece in the same manner. the machine will sew in reverse as long as the lever is engaged. • Continue stitching ... Stitch #1/green and sew a few stitches. • Engage the Reverse Lever for about 3/8";
MASTERING YOUR BERNINA® 1/10/02
Electronic 1008/13 MASTERING YOUR
BERNINA®
BERNINA® Electronic 1008
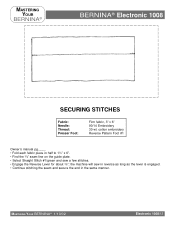
SECURING STITCHES
Fabric: Needle...
Owners Manual - Page 14

While continuing to sew, turn the stitch width knob to taper the stitch to maximum. MASTERING YOUR BERNINA® 1/10/02
Electronic 1008/14 Change the stitch length to satin stitch and ... needle position all the way to the center and stitch down this edge about 1". Use stabilizer as needed. • Select Zigzag Stitch #2/green.
Repeat until the stitching reaches the end of the fabric. ...
Owners Manual - Page 15

... Seam Guides with Rulers
Set of Your Machine
Hard Case
Slide-on Extension Table with Guide
Feet-ures
Edgestitch Foot #10
Stabilizers - MASTERING YOUR
BERNINA®
BERNINA® Electronic 1008
WISH LIST Care and Feeding of Magnifying Glasses
MASTERING YOUR BERNINA® 1/10/02
Electronic 1008/15 Assortment or
size ____ and type...
Owners Manual - Page 28

...
MASTERING YOUR
BERNINA®
BERNINA® Electronic 1008
DOUBLE NEEDLE HEM
Fabric: Needle: Thread: Presser Foot:
Cotton interlock - 6" x 7" Double 3.0/80 All-purpose, 2 colors Reverse Pattern Foot #1
Owner's manual pg.___ • Turn up a 2" hem along the 1" guideline on working with similar stitches; sew half of the stitch plate. • Select stitch #1/green...
Owners Manual - Page 34

...FOOT #3C The automatic buttonhole foot for machines with a light sensor for counting stitches.
MASTERING YOUR
BERNINA®
BERNINA® Electronic 1008
BUTTONHOLE FEET
A number of the older Automatic...any BERNINA® sewing machine. AUTOMATIC BUTTONHOLE FOOT #3A Automatic foot for BERNINA® sewing machines. Works with a 5mm and 9mm feed system. Electronic 1008/34
MASTERING YOUR...
Owners Manual - Page 35

...perfect for use behind lightweight or light-colored fabrics. Web/Poly-Mesh Type Stabilizer: A specially formulated cut on the wrong side of stabilizer around the edges). Heat Removable Stabilizer: Woven from strands of extra body and stability are needed....
Several light applications of stitching. MASTERING YOUR
BERNINA®
BERNINA® Electronic 1008
STABILIZERS
Tear...
Owners Manual - Page 36

...189;" from the fold along the 6" length. • Mark two horizontal lines, running between the fold and the drawn line, spaced about 2" apart. • Set the...and stop and touch quick reverse. • Sew the top bar tack. MASTERING YOUR BERNINA® 1/10/02
Electronic 1008/36 MASTERING YOUR
BERNINA®
BERNINA® Electronic 1008
MANUAL BUTTONHOLES
Fabric: Stabilizer: Needle: Thread: ...
Owners Manual - Page 37

...lightly with the finger. • Pull the cord ends to be sewn. MASTERING YOUR BERNINA® 1/10/02
Electronic 1008/37 Suitable cords are perle cord #8, thick hand sewing thread, gimp cord, or crochet cotton. • Sew... Press and insert the stabilizer. • Mark a line 1½" from the fold and running the length of the fabric. • Mark two horizontal lines between the fold and the ...
Owners Manual - Page 45
MASTERING YOUR BERNINA® 1/10/02
Electronic 1008/45 MASTERING YOUR
BERNINA®
BERNINA® Electronic 1008
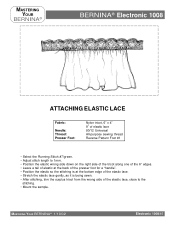
ATTACHING ELASTIC LACE
Fabric:
Needle: Thread: Presser Foot:
Nylon tricot, 6" x 4" 9" of elastic lace 80/12 Universal All-purpose sewing thread Reverse Pattern Foot #1
• Select the Running Stitch #7/green. • Adjust stitch length to 1mm. • Position the...
Owners Manual - Page 46

...the wrong side and overstitch the elastic from the right side using wider elastic.
• Sew the elastic to the fabric keeping the edge of the elastic and the edge of the ... used to do a turned waistband, using Running
Stitch #7/green with a length of an exercise leotard or swimsuit. MASTERING YOUR
BERNINA®
BERNINA® Electronic 1008
TURNED UNDER ELASTIC
Fabric:
Needle: Thread: ...
Owners Manual - Page 57

...BERNINA® Electronic 1008
CORDED PINTUCKS
Fabric:
Needle: Thread: Presser Foot:
Lightweight cotton, 5" x 5", starched Gimp Cord Double 3.0/80 All-purpose sewing 5 Groove Pintuck Foot... #31 (optional accessory)
• Thread the cord through the hole in one operation. - Sew to corner;
Note: Cord should be colorfast and shrinkproof.
• Thread machine...
Similar Questions

Replacing Light Bulb On 1001
Hi How do i chamge the light bulb on the 1001
Hi How do i chamge the light bulb on the 1001
(Posted by cheryth 9 years ago)

What Is Correct Replacement Light Bulb For Model 1001 Sewing Machine?
How do I replace the bulb on model 1001
How do I replace the bulb on model 1001
(Posted by Armendeb 10 years ago)

Bernina 807 817 Starts Sewing Before I Use The Foot Control
(Posted by pjwiddowson 10 years ago)

I Take My Foot Off The Foot And My Bernadette 46 Continues To Sew Won't Ship
(Posted by rr3tersigni 10 years ago)

Bernina 1008 Bulb Replacement
My bulb has burned out, and when i tried to replace it at a local store they only had one that was t...
My bulb has burned out, and when i tried to replace it at a local store they only had one that was t...
(Posted by ifrlcsw 10 years ago)