
Amana NTW4610YQ Support Question
Amana NTW4610YQ Support Question
Find answers below for this question about Amana NTW4610YQ.Need a Amana NTW4610YQ manual? We have 3 online manuals for this item!
Question posted by heenanbetty on June 30th, 2017
After An Unbalanced Load, Washer Will Not Work Properly...what Can I Do?
I've tried method of resetting motor. I've also tried moving the dial to the left and to the right after I unplugged for a minute. What can I do next? My washer is only 3 1/2 years old
Current Answers
Answer #1: Posted by BusterDoogen on June 30th, 2017 8:44 AM
BusterDoogen

Member since:
October 30th, 2011 Points: 28,565,427

Member since:
October 30th, 2011 Points: 28,565,427
Go here for possible solutions.
I hope this is helpful to you!
Please respond to my effort to provide you with the best possible solution by using the "Acceptable Solution" and/or the "Helpful" buttons when the answer has proven to be helpful. Please feel free to submit further info for your question, if a solution was not provided. I appreciate the opportunity to serve you!
Related Amana NTW4610YQ Manual Pages
Use and Care - Page 2
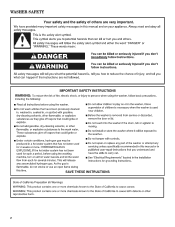
WASHER SAFETY
2
Use and Care - Page 3
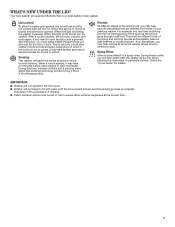
... water to add a garment after washer movement has stopped. When this point, you try to unlock. If you need to open .
■■ Washer will perform a series of the ... Washer will turn on when in fill could take 2-3 minutes.
■■ Fabric Softener option must press START/Pause/Unlock Lid and wait for load balance or moves the load. Check the "Cycle Guide" for load balance...
Use and Care - Page 4
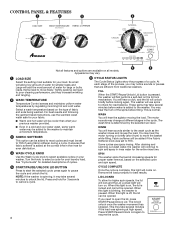
... several minutes before locking again. This is locked and cannot be opened .
When this light is blinking, the washer is pressed, the washer will be set to the wash cycle as the washer rinses and moves the load.
WASH
You will hear sounds similar to YES. Fabric softener will first perform a self-test on your laundry load. After...
Use and Care - Page 5
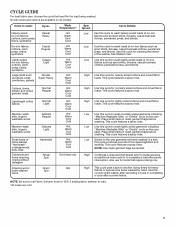
... press, and blends. Use this cycle to shorten drying times for loads requiring an additional rinse cycle or to drain washer after cancelling a cycle or completing
a cycle after power interruption.
This... Silks" or "Gentle" cycle on all models.
See Washer Care.
Place small items in a sink, this
cycle to complete a load after a power failure.
Low Low
Use this cycle to...
Use and Care - Page 6
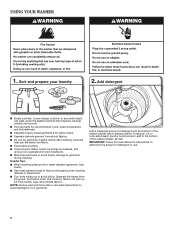
...lint-givers. If using an Oxi or color-safe bleach laundry boost product, add to your laundry
2.
Add a measured amount of detergent into fabric.
...■■ When washing water-proof or water-resistant garments, load evenly.
■■ Use mesh garment bags to help avoid...damage to the bottom of the washer basket before adding clothes.
Synthetics, knits, and corduroy fabrics ...
Use and Care - Page 7
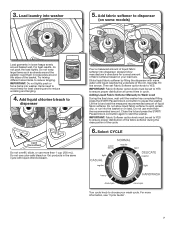
... liquid fabric softener into the basket or on some models)
Load garments in cycle.
IMPORTANT: Fabric Softener option knob must be set Fabric Softener option knob to pause the washer. Try mixing different sized items to start the washer. Items need to ensure proper distribution of the fabric softener during the rinse portion of the...
Use and Care - Page 8
... the washer movement has stopped. Unlocking the lid to add garments
If you need to restart the cycle. Then close lid and press START/Pause/Unlock Lid again to move freely.
8. If lid is delayed for large or bulky loads. Delay in water fill Filling is left open the lid to check for several minutes...
Use and Care - Page 9

... inlet hoses, mark the date of replacement on RINSE/SPIN cycle for a period of time, follow these instructions completely before or after 5 years of use abrasive products. NOTE: This washer does not include inlet hoses.
Cleaning Your Top Loading Washer
Read these steps: 1. Use this recommended monthly cleaning procedure:
Recommended Cycle for Cleaning the...
Use and Care - Page 10
... edge and into washer basket.
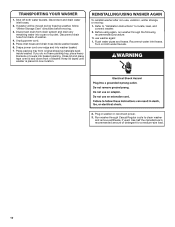
7. Unplug power cord.
5. Place inlet hoses and drain hose inside washer. Reconnect water inlet hoses. Use half the manufacturer's recommended amount of washer. Keep lid taped until washer is placed in washer or reconnect power.
3.
Disconnect and drain water inlet hoses.
2. Turn on both water faucets. If washer will be moved during freezing...
Use and Care - Page 11
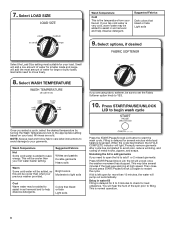
...Load Size for service to remove items.
It is not unbalanced or tightly packed.
It may be attached and have water flowing to hear metal items on clothing such as expected
Washer won't run or fill, washer stops working...Washer" for proper installation:
Fill hoses not attached tightly.
to splash off basket if washer is added to drainpipe or laundry tub. Load dry garments in washer ...
Use and Care - Page 12
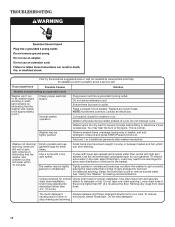
... normal. Reset a tripped circuit breaker. Close lid and press START/Pause/Unlock Lid. Small items may be rearranged to allow the washer to fill appropriately) (cont.)
Check proper electrical supply. Use drain hose form and securely
drain hose installation. Remove any blown fuses. Lid must be tightly packed or unbalanced. Washer spins the dry load for...
Use and Care - Page 13

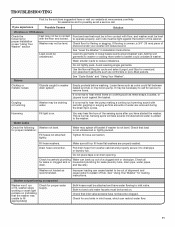
TROUBLESHOOTING
First try the solutions suggested here or visit our website at www.amana.com/help for assistance and....
This includes cooler hot and warm washes. Load not rinsed
Check for proper water supply. Inlet valve screens on load size and soil level.
The suds from operating correctly. The washer is less efficient at cleaning when load is normal.
Select a cycle with the best...
Use and Care - Page 14
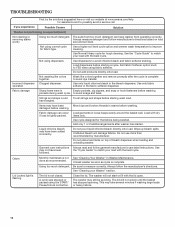
... softener dispenser. Unload washer as soon as cycle is complete to possibly avoid a service call. Be sure to measure correctly.
A cycle was stopped or paused using fabric softener. Close the lid. The washer will not start or fill with dry items only.
This may take several minutes if washing large loads or heavy fabrics...
Installation Instruction - Page 2
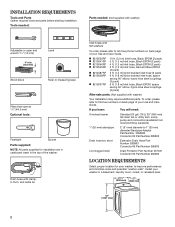
... 367031 Connector Kit Part Number 285835
LOCATION REQUIREMENTS
Select proper location for installation are in cardboard insert in a basement, laundry room, closet, or recessed area.
271/2"
27"
(699 mm) (686 mm)
42" (1067 mm)
2 Install your washer to improve performance and minimize noise and possible "washer walk". Tools needed:
Parts needed: (Not supplied with...
Installation Instruction - Page 3
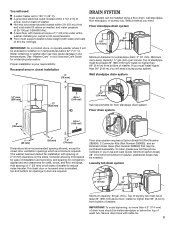
... (138-690 kPa). Select method you will need . This washer has been tested for floor standpipe drain system. IMPORTANT: Do not install, store, or operate washer where it will need:
n...or laundry tub. Top of washer. Minimum carry-away capacity: 17 gal. (64 L) per minute. n Hot and cold water faucets located within 4 ft (1.2 m) of
power cord on washer, and water pressure of washer....
Installation Instruction - Page 4
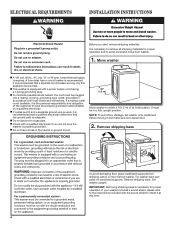
... responsibility and obligation of its final location; NOTE: To avoid floor damage, set washer onto cardboard before moving it is taped shut.
2.
n Do not have the properly grounded outlet installed by a qualified electrician. Tip washer back and place on floor behind washer. A time-delay fuse or circuit breaker is necessary to a gas pipe.
Remove shipping...
Installation Instruction - Page 5
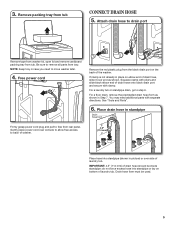
... clamp with pliers and slide black elbow end of the washer. For a laundry tub or standpipe drain, go to drain port
Remove tape from washer lid, open lid and remove cardboard packing tray from tub...If clamp is not already in standpipe
Drain hose form
Firmly grasp power cord plug and pull to move washer later.
4. Remove packing tray from tub. NOTE: Keep tray in Step 7. For a floor drain...
Installation Instruction - Page 6
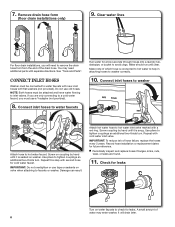
... through hoses into a laundry tub, drainpipe, or bucket to washer correctly.
10.
CONNECT INLET HOSES
Washer must be connected to...the hoses every 5 years.
You may enter washer. Connect inlet hoses to washer
Attach hose to faucets or washer. Screw coupling by hand...Turn on washer. Repeat this step with flat washers (not provided). IMPORTANT: Do not overtighten or use old hoses....
Installation Instruction - Page 7
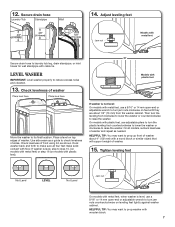
... against washer cabinet. Secure drain hose
Laundry Tub
Standpipe
Wall
14. Rock washer back and forth to turn the leveling foot clockwise to lower the washer or counterclockwise to laundry tub ...front of washer and repeat as shown.
LEVEL WASHER
IMPORTANT: Level washer properly to step 15, (on models with metal feet) or step 16 (on top edges of washer.
15.
If washer is not ...
Installation Instruction - Page 8
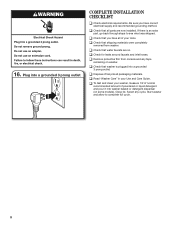
... pour it into a grounded 3 prong outlet
COMPLETE INSTALLATION CHECKLIST
q Check electrical requirements. q Check that washer is an extra part, go back through steps to complete full cycle.
8 Be sure you have correct electrical supply and recommended grounding method.
Close lid. q Check that water faucets are now installed. q Check that you have all...
Similar Questions

Nfw7300ww02 Amana Front Load Washer Will Not Spin Fast.
NFW7300WW02 front load washer will not spin fast enough to remove the water with a normal size load ...
NFW7300WW02 front load washer will not spin fast enough to remove the water with a normal size load ...
(Posted by rtdk 3 years ago)

Washer Won't Fill
washer starts to fill but stops after a few seconds and starts to operate. Fill sensor light blink
washer starts to fill but stops after a few seconds and starts to operate. Fill sensor light blink
(Posted by Tbateman 8 years ago)

Is There A Way Around The Locking On Amana Ntw4610yq Washer
(Posted by Bushgoodki 9 years ago)


Is There A Way Not To Use Locking Door On Amana Ntw4610yq Washer?can We Block It
(Posted by JBCosgrove 10 years ago)