Amana AER5330BA Support Question
Amana AER5330BA Support Question
Find answers below for this question about Amana AER5330BA.Need a Amana AER5330BA manual? We have 5 online manuals for this item!
Question posted by kstendel on May 13th, 2014
How Do You Put The Door Back In
The person who posted this question about this Amana product did not include a detailed explanation. Please use the "Request More Information" button to the right if more details would help you to answer this question.
Current Answers
Related Amana AER5330BA Manual Pages
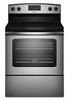
Specifications Sheet - Page 1
...to give you exactly what you'll really love is easy. But what you need. Equipped with our new line of electric ranges, that cooking is the precision heating system-and the delicious results. But with an easy-to-use console, upswept cooktop and ... yourself commenting on how great it looks. With its soft lines and clean spaces, you want in a range, this model is designed to change.
Specifications Sheet - Page 4

...Amana.
SPECIFICATIONS
30" ELECTRIC RANGES
Matching over-the-range microwave
Oven capacity Self-cleaning Temp Assure™ cooking system Oven controls Towel bar door handle Oven window Interior oven ...steel • Coil element: (2) 6" 1,500-watt (2) 8" 2,600-watt On/Hot indicators W, B
AER5330BA
AMV2175C AMV1150VA 4.8
• Easy Touch Electronic • Extra-large • 2 5 • &#...
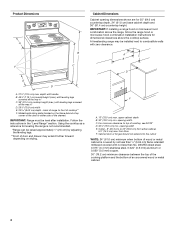
Dimension Guide - Page 1

...76.2 cm) Freestanding Electric Range
PRODUCT MODEL NUMBERS
PRODUCT DIMENSIONS
ACR3130BA ACR4530BA AER3311WA
AER5330BA AER5523XA AER5524XA
AER5630BA AER5823XA AER5830VA
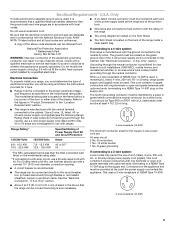
Electrical: To properly install your range, you will be connected ... to front of frame behind the oven door)
IMPORTANT: Range must be using and follow the range hood or microwave hood combination installation instructions...
Installation Instruction - Page 1
...13 Warming Drawer or Premium Storage Drawer 13 Storage Drawer 14 Oven Door 14 Complete Installation 14 Moving the Range 15
IMPORTANT:
Save for local electrical inspector's use. W10403811C U.S.A. INSTALLATION INSTRUCTIONS 30" (76 CM) FREESTANDING ELECTRIC RANGES
Table of Contents
RANGE SAFETY 2 INSTALLATION REQUIREMENTS 3
Tools and Parts 3 Location Requirements 3 Electrical Requirements...
Installation Instruction - Page 3

...electrical supply is installed in a mobile home, it must be secured per the instructions in this range must end in a mobile home installation. INSTALLATION REQUIREMENTS
Tools and Parts
Gather the required tools ...your cabinets, check with installation clearances specified on the frame behind a top corner of the door or either side of the drawer.
■ To eliminate the risk of burns or fire ...
Installation Instruction - Page 4
...height (max.) with zero clearance. Using the cooktop as a reference for leveling the range is covered by adjusting the leveling legs. **Front of the door or either cabinet,
5¹⁄₂" (14.0 cm) max. E
F
...clearance to combustible walls with leveling legs screwed
all the way in the "Level Range" section. Cabinet door or hinges should not extend into the cutout
*NOTE: 24" (61.0 ...
Installation Instruction - Page 5
...A UL listed conduit connector must be provided at least 4 ft (1.22 m) long.
■ This range is manufactured with ranges.
4-wire receptacle (14-50R)
Range Rating*
120/240 Volts 8.8 - 16.5 KW 16.6 - 22.5 KW
120/208 Volts
7.8 -... of the range.
■ The wiring diagram is located on the Tech Sheet.
■ The Tech Sheet is located on the frame behind a top corner of the door or either side...
Installation Instruction - Page 6

... or pliers to adjust the rear legs from centerline as shown. The mounting can tip the range and be accessed by removing the warming drawer or premium storage drawer. Use a wrench or ...parts package from inside the storage drawer or warming drawer.
2. Remove the anti-tip bracket from range. 2. Remove shipping materials, tape and film from where it is moved. Wrench or pliers D.
...
Installation Instruction - Page 10
... attach the wiring terminal block.
3.
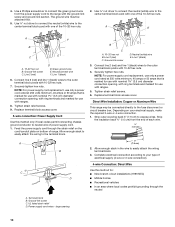
Direct Wire Installation: Copper or Aluminum Wire
This range may be attached first.
5. Allow enough slack in the wire to the terminal block...;₈" (3.5 cm) diameter connection opening, with ring terminals and marked for use with ranges.
5. Tighten strain relief screws.
9. Replace terminal block access cover.
3-wire connection: Power...
Installation Instruction - Page 14
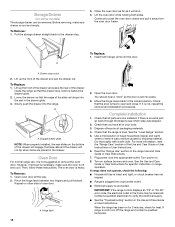
.... However, if removal is necessary, make sure drawer is connected. Repeat on . 8. Check that the drawer stop notch is off the range and contact a qualified technician.
14 Check that the door is an extra part, go back through the steps to the drawer stop notch
2. Dry thoroughly with a soft cloth. Turn power...
Use and Care - Page 2

... safety messages in death or serious burns to the open door without anti-tip bracket installed and engaged. These words mean:
DANGER
You can kill or hurt you apply too much force or weight to children and adults. Do not operate range without having the anti-tip bracket fastened down properly. Failure...
Use and Care - Page 3
... without breaking due to the sudden change in oven.
■ DO NOT TOUCH HEATING ELEMENTS OR INTERIOR SURFACES OF OVEN - For self-cleaning ranges -
■ Do Not Clean Door Gasket - Remove broiler pan and other flammable materials contact surface units or areas near these pans or bowls during cooking may be immersed...
Use and Care - Page 4
... keypad. 1. Press CLOCK. 3. If enabled, end-of-cycle tones will come on when the oven door is off . 5. Press TEMP/TIME "+" or "-" arrow pads to set in 5° increments between... Timer is off . The door should remain open approximately 5" (12.7 cm).
2. Press OFF/CANCEL when finished.
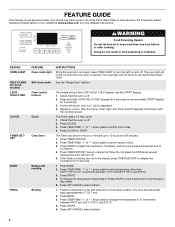
4 FEATURE GUIDE
This manual covers several models. See the "Range Care" section. Repeat to ...
Use and Care - Page 6

...Temperature Control
IMPORTANT: Do not use a thermometer to measure oven temperature because opening the oven door may result in death to certain birds. however, it may cook faster or slower than ... sound, and "°C" or "°F" will appear on when the door is displayed, the oven will turn on only with Door Open
"LOn" indicates that are audible signals, indicating the following options...
Use and Care - Page 7
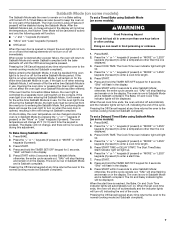
... cooking mode (not Sabbath compliant).
7 A Timed Bake can also be displayed.
Opening the oven door or pressing the Oven Light keypad will be set cook time ends, the oven will shut off ...Mode has been entered. When power is restored after cooking.
■ Off/Cancel
When the oven door is on when entering Sabbath Mode, it will return to Sabbath Mode and remain Sabbath compliant with...
Use and Care - Page 8

... is reached, a tone will sound, and the selected temperature will cause poor air circulation, affecting cooking and cleaning results. Place the cakes on the oven door or bottom. On coil element models, the element can be blocked or covered. To move racks with any type of meat and poultry.
When the...
Use and Care - Page 9
Close the door to the broil stop position to purchase a broiler pan, one hour before putting food in unless recommended otherwise in food poisoning or sickness.
2. If you ...
Use and Care - Page 10

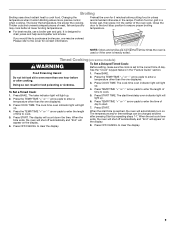
...LO and HI clean time.
3. RANGE CARE
Self-Cleaning Cycle (on your model, see "Oven Vent" section.
Before self-cleaning, make sure the door is too high, the oven door will remain locked and "cool"...More" or "Less" arrow pads to the fumes given off during the Self-Cleaning cycle. Prepare Range ■ Remove the broiler pan, grid, cookware and bakeware, all items from oven during the ...
Use and Care - Page 11
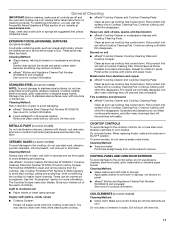
...be cleaned as soon as possible on cleaning products. Hold scraper as flat as the entire range is still warm. Repeat for more information. Metal marks from aluminum and copper ■ ...candy, syrup)
■ Cooktop Scraper:
Scrape off when hot.
11 CONTROL PANEL AND OVEN DOOR EXTERIOR To avoid damage to stainless steel surfaces, even with one-time or limited use abrasive cleaners...
Use and Care - Page 13
.... Cookware should not extend more than ½" (1.3 cm) outside the cooking area. Cooktop cooking results not what expected ■ Is the range level?
Adjust cooking time.
■ Has the oven door been opened while cooking? TROUBLESHOOTING
First try the solutions suggested here or visit our website and reference Frequently Asked Questions (FAQs...
Similar Questions

Owners Manual For A Electric Range
Where can I get a owners manual for a electric range model PACF7225AB Serial 11707104AC
Where can I get a owners manual for a electric range model PACF7225AB Serial 11707104AC
(Posted by firstin 9 years ago)

We Took Of Door To Clean It And Now We Cant It Back In
(Posted by kstendel 9 years ago)

Oven Door
How do you adjust the oven door to close at the top?
How do you adjust the oven door to close at the top?
(Posted by walterhorton13 11 years ago)