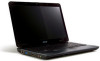
Acer Aspire 5532 Support Question
Acer Aspire 5532 Support Question
Find answers below for this question about Acer Aspire 5532.Need a Acer Aspire 5532 manual? We have 2 online manuals for this item!
Question posted by Nitarocky on May 9th, 2014
Antenna Cables From The Wlan Board Acer Aspire 5532 Where Does Black Wire Go
The person who posted this question about this Acer product did not include a detailed explanation. Please use the "Request More Information" button to the right if more details would help you to answer this question.
Current Answers
Related Acer Aspire 5532 Manual Pages
Acer Aspire 5532 Notebook Series Service Guide - Page 1
for more information,
please refer to http://csd.acer.com.tw
PRINTED IN TAIWAN Aspire 5532 Service Guide
Service guide files and updates are available on the ACER/CSD web;
Acer Aspire 5532 Notebook Series Service Guide - Page 7
... System Utilities 16 Acer GridVista (dual-display compatible 16 Hardware Specifications and Configurations 17
System Utilities
23
BIOS Setup Utility 23 Navigating the BIOS Utility 23
Aspire 5532 BIOS 24 Information ... 44 Removing the Optical Drive Module 45 Removing the DIMM Modules 47 Removing the WLAN Module 48 Removing the Hard Disk Drive Module 50
Main Unit Disassembly Process 52...
Acer Aspire 5532 Notebook Series Service Guide - Page 9
... and Connector Locations
137
Top View 137 Bottom View 138 Power Board 139 Clearing Password Check and BIOS Recovery 140 Clearing Password Check 140 Clear CMOS Jumper 140 BIOS Recovery by Crisis Disk 141
FRU (Field Replaceable Unit) List
143
Aspire 5532 Exploded Diagrams 144 Main Assembly 144 Base Assembly 146 Rear Assembly...
Acer Aspire 5532 Notebook Series Service Guide - Page 34
... (DCE).
24
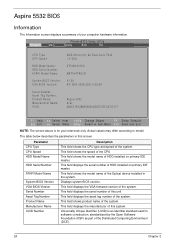
Chapter 2 Universally Unique Identifier (UUID) is for your computer hardware information. Aspire 5532 BIOS
Information
The Information screen displays a summary of this unit. Information M a i n... TK42 1.6 GHz
ST9160310AS
MATSHITADVD
V1.00 ATI M92 V008.050I.0-26.00
Aspire 5532 Acer 39353164386665643635001EECE1D377
F1 Help Esc Exit
Select Item F5/F6 Change Values
F9 Setup Defaults...
Acer Aspire 5532 Notebook Series Service Guide - Page 58
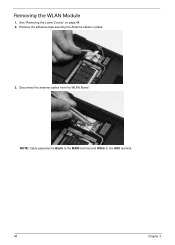
Removing the WLAN Module
1. Remove the adhesive tape securing the Antenna cables in place.
3. Disconnect the antenna cables from the WLAN Board. See "Removing the Lower Covers" on page 44. 2.
NOTE: Cable placement is Black to the MAIN terminal and White to the AUX terminal.
48
Chapter 3
Acer Aspire 5532 Notebook Series Service Guide - Page 59
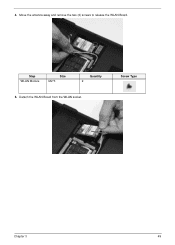
Screw Type
Chapter 3
49 Detach the WLAN Board from the WLAN socket. Step WLAN Module
Size M2*3
Quantity 2
5.
Move the antenna away and remove the two (2) screws to release the WLAN Board. 4.
Acer Aspire 5532 Notebook Series Service Guide - Page 65
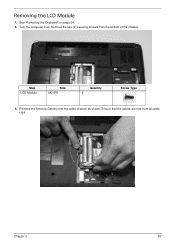
Remove the two (2) securing screws from the cable channel as shown.
See "Removing the Keyboard" on page 54. 2. Remove the Antenna Cables from the bottom of the chassis. Step LCD Module
Size M2.5*8
Quantity 2
Screw Type
3. Ensure that the cables are free from all cable clips. Turn the computer over. Chapter 3
55 Removing the LCD Module
1.
Acer Aspire 5532 Notebook Series Service Guide - Page 66

Ensure that the cable is completely free of the retaining clips all the way to the hinge well.
56
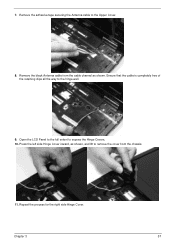
Chapter 3 Remove the white Antenna cable from the cable channel.
6. Stand the computer on the LCD Panel and pull the Antenna cables completely through the chassis.
5. Disconnect the LCD cable from the Mainboard and remove the cable from the cable channel. 4.
Acer Aspire 5532 Notebook Series Service Guide - Page 67
...Chapter 3
57 Open the LCD Panel to the full extent to the hinge well.
9. Remove the black Antenna cable from the chassis.
11. 7. Ensure that the cable is completely free of the retaining clips all the way to expose the Hinge Covers. 10. Repeat ... Cover inward, as shown, and lift to the Upper Cover.
8. Remove the adhesive tape securing the Antenna cable to remove the cover from the...
Acer Aspire 5532 Notebook Series Service Guide - Page 94
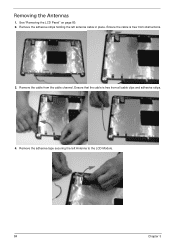
... tape securing the left antenna cable in place. Removing the Antennas
1. Remove the cable from all cable clips and adhesive strips.
4. Ensure that the cable is free from obstructions.
3. See "Removing the LCD Panel" on page 80. 2. Remove the adhesive strips holding the left Antenna to the LCD Module.
84
Chapter 3 Ensure the cable is free from the...
Acer Aspire 5532 Notebook Series Service Guide - Page 95

Lift the left Antenna clear of the cover.
6. Chapter 3
85 Remove the adhesive strips holding the right antenna cable in place. Ensure the cable is free from all cable clips and adhesive strips.
Remove the cable from obstructions.
7. 5. Ensure that the cable is free from the cable channel.
Acer Aspire 5532 Notebook Series Service Guide - Page 118

... cable along the cable channel as shown using all available retaining clips.
10. Connect the LCD cable to secure the cable in place.
11. Replace the adhesive strip to the Mainboard as shown using 13. Run the white Antenna cable along the cable channel as
all available retaining clips.
12. shown.
108
Chapter 3
9. Run the black Antenna cable along the cable...
Acer Aspire 5532 Notebook Series Service Guide - Page 119
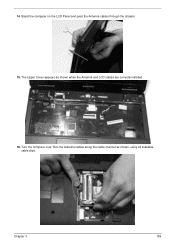
Turn the computer over. Chapter 3
109 The Upper Cover appears as shown, using all available cable clips. Run the Antenna cables along the cable channel as shown when the Antenna and LCD cables are correctly installed.
16.
Stand the computer on the LCD Panel and pass the Antenna cables through the chassis.
15. 14.
Acer Aspire 5532 Notebook Series Service Guide - Page 124

... terminal (MAIN). Connect the two (2) Antenna cables to secure the module.
3.
Insert the DIMM Module in place.
3. Press down to avoid trapping. Repeat steps for the second DIMM module if present. 114
Chapter 3 Insert the WLAN Module into the WLAN socket.
2. After connecting the cables to the terminals,
NOTE: The black cable connects to the upper terminal...
Acer Aspire 5532 Notebook Series Service Guide - Page 150
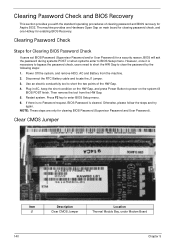
... Disconnect the RTC Battery cable and locate the J1 jumper. 3. Use an electric conductivity tool to BIOS Setup menu. NOTE: These steps are only for Aspire 5532. Clearing Password Check and...5. Clear CMOS Jumper
Item J1
Description Clear CMOS Jumper
Location Thermal Module Bay, under Modem Board
140
Chapter 5 Then remove the tool from the machine. 2. Restart system. The machine ...
Acer Aspire 5532 Notebook Series Service Guide - Page 153
... SERVICE PROVIDERS, your Acer office may have a DIFFERENT part number code from those given in global configurations of Aspire 5532.
NOTE: To scrap or to return the defective parts, you the FRU... and service of this printed Service Guide. You MUST use the local FRU list provided by your regional Acer office on how to return it will not be noted on your regional web or channel. FRU (Field...
Acer Aspire 5532 Notebook Series Service Guide - Page 158
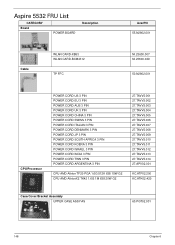
Aspire 5532 FRU List
CATEGORY Board
POWER BOARD
Description
AcerPN 55.N2802.001
Cable
WLAN CARD-XB63 WLAN CARD-BCM4312
TP FFC
NI.23600.007 NI.23600.029
50.N2802.001
CPU/Processor
POWER CORD US 3 PIN POWER CORD EU 3 PIN POWER CORD ...
Acer Aspire 5532 Notebook Series Service Guide - Page 181

... configuration, combination and test procedures, please refer to the following lists for components, adapter cards, and peripherals which have passed these tests.
Refer to the Aspire 5532 Compatibility Test Report released by Acer's internal testing department. Appendix B
171 Test Compatible Components
Appendix B
This computer's compatibility is tested and verified by the ...
Aspire 5740DG Notebook Series Users Guide - Page 59
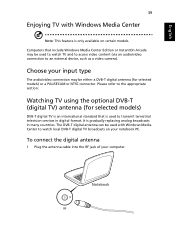
... watch local DVB-T digital TV broadcasts on certain models. To connect the digital antenna
1 Plug the antenna cable into the RF jack of your input type
The avdio/video connection may be used...camera). It is only available on your notebook PC. The DVB-T digital antenna can be either a DVB-T digital antenna (for selected models)
DVB-T digital TV is an international standard that include ...
Aspire 5740DG Notebook Series Users Guide - Page 60

... or loop the antenna cable. Connecting antenna cables
To connect your cables: 1 Plug the antenna connector into the RF jack of your computer. 2 Connect the other end to watch TV on your TV cable, using the cable converter if
necessary.
Important! Extending the antenna cable up to 20 cm to connect the antenna cable. Watching TV with an external antenna or cable socket
You...
Similar Questions


How To Reset Current On Screen Password On Acer Aspire 5532 Laptop
(Posted by mitcFoo 10 years ago)

How To Take Replace A Video Cable On An Acer Aspire 5734z
(Posted by didusti 10 years ago)
How Much, What Kind Ram Will Work With Acer Aspire 5532
how much, what kind ram will work with acer aspire 5532
how much, what kind ram will work with acer aspire 5532
(Posted by jblizz 12 years ago)