User Guide
Page 3
Contents Overview Contents Overview User's Guide ...15 Getting to Know Your NSA ...17 NAS Starter Utility for NSA221, NSA310, NSA320, and NSA325 21 NAS Starter Utility for NSA210 31 Web Configurator Basics ...47 Tutorials ...67 Technical Reference ...151 Status Screen ...153 System Setting ...157 Storage ...161 Network ...175 Applications ...185 Package Management ...229...
Contents Overview Contents Overview User's Guide ...15 Getting to Know Your NSA ...17 NAS Starter Utility for NSA221, NSA310, NSA320, and NSA325 21 NAS Starter Utility for NSA210 31 Web Configurator Basics ...47 Tutorials ...67 Technical Reference ...151 Status Screen ...153 System Setting ...157 Storage ...161 Network ...175 Applications ...185 Package Management ...229...

User Guide
Page 6
... 4.5 Administration Screens ...62 4.5.1 Global Administration Icons ...63 4.5.2 Navigation Panel ...63 4.5.3 Main Window ...64 4.5.4 Status Messages ...65 4.5.5 Common Screen Icons ...65 4.5.6 Session Example (Windows 66 Chapter 5 Tutorials ...67 5.1 Overview ...67 5.2 Windows 7 Network ...67 5.2.1 If the NSA Icon Does Not Display 69 5.2.2 NSA Icon Right-click Options 70 5.3 Windows 7 Network Map ...71 5.4 Playing...
... 4.5 Administration Screens ...62 4.5.1 Global Administration Icons ...63 4.5.2 Navigation Panel ...63 4.5.3 Main Window ...64 4.5.4 Status Messages ...65 4.5.5 Common Screen Icons ...65 4.5.6 Session Example (Windows 66 Chapter 5 Tutorials ...67 5.1 Overview ...67 5.2 Windows 7 Network ...67 5.2.1 If the NSA Icon Does Not Display 69 5.2.2 NSA Icon Right-click Options 70 5.3 Windows 7 Network Map ...71 5.4 Playing...

User Guide
Page 7
... ...80 5.7.2 Migrate Button ...80 5.7.3 Create a SATA Volume Button 81 5.7.4 Creating a PC Compatible Volume 83 5.8 Deleting a Volume ...86 5.9 File Sharing Tutorials ...87 5.9.1 Creating a User Account ...87 5.9.2 Creating a Share ...89 5.9.3 Creating a Group ...91 5.9.4 Accessing a Share From Windows Explorer 92 5.9.5 Accessing... a Share Using FTP 94 5.9.6 Accessing a Share Through the Web Configurator 95 5.10 Download Service Tutorial ...96 5.10.1 Copying/Pasting a Download Link 96 5.10.2 Installing the Link Capture Browser Plugin 99 5.10.3 Using the...
... ...80 5.7.2 Migrate Button ...80 5.7.3 Create a SATA Volume Button 81 5.7.4 Creating a PC Compatible Volume 83 5.8 Deleting a Volume ...86 5.9 File Sharing Tutorials ...87 5.9.1 Creating a User Account ...87 5.9.2 Creating a Share ...89 5.9.3 Creating a Group ...91 5.9.4 Accessing a Share From Windows Explorer 92 5.9.5 Accessing... a Share Using FTP 94 5.9.6 Accessing a Share Through the Web Configurator 95 5.10 Download Service Tutorial ...96 5.10.1 Copying/Pasting a Download Link 96 5.10.2 Installing the Link Capture Browser Plugin 99 5.10.3 Using the...
User Guide
Page 67
... This chapter provides tutorials that show how to use the NSA. • Windows 7 Network, see page 67 • Windows 7 Network Map, see page 71 • Playing Media Files in ..., see page 79 • Deleting a Volume, see page 86 • File Sharing Tutorials, see page 87 • Download Service Tutorial, see page 96 • Broadcatching Tutorial, see page 111 • Copy and Flickr Auto Upload Tutorial, see page 117 • FTP Uploadr Tutorial, see page 118 • Web Configurator's Security Sessions, see page 121 •...
... This chapter provides tutorials that show how to use the NSA. • Windows 7 Network, see page 67 • Windows 7 Network Map, see page 71 • Playing Media Files in ..., see page 79 • Deleting a Volume, see page 86 • File Sharing Tutorials, see page 87 • Download Service Tutorial, see page 96 • Broadcatching Tutorial, see page 111 • Copy and Flickr Auto Upload Tutorial, see page 117 • FTP Uploadr Tutorial, see page 118 • Web Configurator's Security Sessions, see page 121 •...
User Guide
Page 68
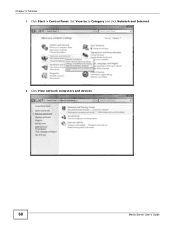
Set View by to Category and click Network and Internet. 2 Click View network computers and devices. 68 Media Server User's Guide Chapter 5 Tutorials 1 Click Start > Control Panel.
Set View by to Category and click Network and Internet. 2 Click View network computers and devices. 68 Media Server User's Guide Chapter 5 Tutorials 1 Click Start > Control Panel.

User Guide
Page 69
Double- Media Server User's Guide 69 If the network containing the NSA displays as "Public": 1 Click Network and Sharing Center and then the network's link (circled in order for the NSA icons to open the Web Configurator login screen. 5.2.1 If the NSA Icon Does Not Display The network containing the NSA must be set as a home or work network in the figure). Chapter 5 Tutorials 3 The NSA icon displays twice because the NSA is both a media server and a storage device. click either NSA icon to display.
Double- Media Server User's Guide 69 If the network containing the NSA displays as "Public": 1 Click Network and Sharing Center and then the network's link (circled in order for the NSA icons to open the Web Configurator login screen. 5.2.1 If the NSA Icon Does Not Display The network containing the NSA must be set as a home or work network in the figure). Chapter 5 Tutorials 3 The NSA icon displays twice because the NSA is both a media server and a storage device. click either NSA icon to display.
User Guide
Page 70
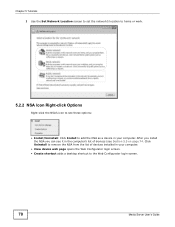
... page opens the Web Configurator login screen. • Create shortcut adds a desktop shortcut to the Web Configurator login screen. 70 Media Server User's Guide Chapter 5 Tutorials 2 Use the Set Network Location screen to set the network's location to home or work. 5.2.2 NSA Icon Right-click Options Right-click the NSA's icon...
... page opens the Web Configurator login screen. • Create shortcut adds a desktop shortcut to the Web Configurator login screen. 70 Media Server User's Guide Chapter 5 Tutorials 2 Use the Set Network Location screen to set the network's location to home or work. 5.2.2 NSA Icon Right-click Options Right-click the NSA's icon...
User Guide
Page 71
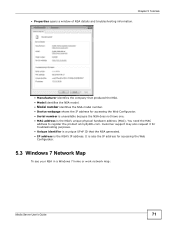
Chapter 5 Tutorials • Properties opens a window of NSA details and troubleshooting information. • Manufacturer identifies the company that the NSA generated. • IP address is the NSA's ...
Chapter 5 Tutorials • Properties opens a window of NSA details and troubleshooting information. • Manufacturer identifies the company that the NSA generated. • IP address is the NSA's ...
User Guide
Page 72
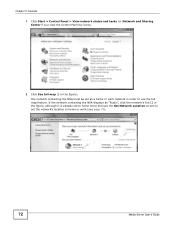
The network containing the NSA must be set as "Public", click the network's link (2 in the figure, although it is already set to home or work network in the figure). Chapter 5 Tutorials 1 Click Start > Control Panel > View network status and tasks (or Network and Sharing Center if you view the Control Panel by icons). 2 Click See full map (1 in order to use the Set Network Location screen to set the network's location to home here) and use the full map feature. If the network containing the NSA displays as a home or work (see page 70). 1 2 72 Media Server User's Guide
The network containing the NSA must be set as "Public", click the network's link (2 in the figure, although it is already set to home or work network in the figure). Chapter 5 Tutorials 1 Click Start > Control Panel > View network status and tasks (or Network and Sharing Center if you view the Control Panel by icons). 2 Click See full map (1 in order to use the Set Network Location screen to set the network's location to home here) and use the full map feature. If the network containing the NSA displays as a home or work (see page 70). 1 2 72 Media Server User's Guide
User Guide
Page 73
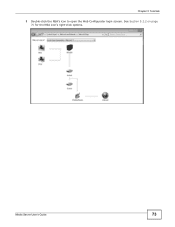
Chapter 5 Tutorials 3 Double-click the NSA's icon to open the Web Configurator login screen. Media Server User's Guide 73 See Section 5.2.2 on page 70 for the NSA icon's right-click options.
Chapter 5 Tutorials 3 Double-click the NSA's icon to open the Web Configurator login screen. Media Server User's Guide 73 See Section 5.2.2 on page 70 for the NSA icon's right-click options.
User Guide
Page 74
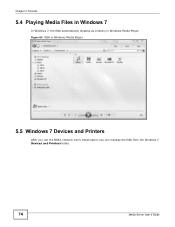
Figure 64 NSA in Windows Media Player. Chapter 5 Tutorials 5.4 Playing Media Files in Windows 7 In Windows 7, the NSA automatically displays as a library in Windows Media Player 5.5 Windows 7 Devices and Printers After you use the NSA's network icon's install option you can manage the NSA from the Windows 7 Devices and Printers folder. 74 Media Server User's Guide
Figure 64 NSA in Windows Media Player. Chapter 5 Tutorials 5.4 Playing Media Files in Windows 7 In Windows 7, the NSA automatically displays as a library in Windows Media Player 5.5 Windows 7 Devices and Printers After you use the NSA's network icon's install option you can manage the NSA from the Windows 7 Devices and Printers folder. 74 Media Server User's Guide
User Guide
Page 75
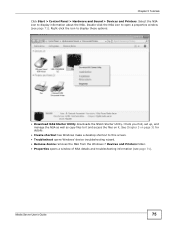
... details and troubleshooting information (see page 71). Select the NSA icon to it . Right-click the icon to open a properties window (see page 71). Chapter 5 Tutorials Click Start > Control Panel > Hardware and Sound > Devices and Printers. Double-click the NSA icon to display these options: • Download NAS Starter Utility downloads...
... details and troubleshooting information (see page 71). Select the NSA icon to it . Right-click the icon to open a properties window (see page 71). Chapter 5 Tutorials Click Start > Control Panel > Hardware and Sound > Devices and Printers. Double-click the NSA icon to display these options: • Download NAS Starter Utility downloads...
User Guide
Page 76
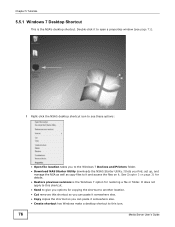
.... It lets you to give you can paste it somewhere else. • Copy copies the shortcut so you options for restoring a file or folder. Chapter 5 Tutorials 5.5.1 Windows 7 Desktop Shortcut This is the Windows 7 option for copying the shortcut to this shortcut so you can paste it . See Chapter 3 on it somewhere...
.... It lets you to give you can paste it somewhere else. • Copy copies the shortcut so you options for restoring a file or folder. Chapter 5 Tutorials 5.5.1 Windows 7 Desktop Shortcut This is the Windows 7 option for copying the shortcut to this shortcut so you can paste it . See Chapter 3 on it somewhere...

User Guide
Page 77
... in your 2-bay NSA. Use this section. To create a RAID 1 volume, you are two ways to create a RAID 1 volume: • Click the Migrate button - Chapter 5 Tutorials • Delete sends the shortcut to the recycle bin. • Rename lets you change the name of the shortcut. • Troubleshoot opens Windows' device troubleshooting...
... in your 2-bay NSA. Use this section. To create a RAID 1 volume, you are two ways to create a RAID 1 volume: • Click the Migrate button - Chapter 5 Tutorials • Delete sends the shortcut to the recycle bin. • Rename lets you change the name of the shortcut. • Troubleshoot opens Windows' device troubleshooting...
User Guide
Page 78
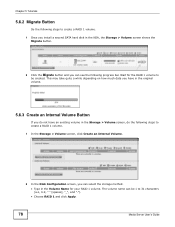
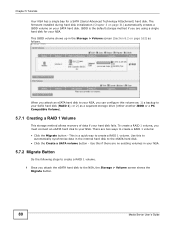
The volume name can see the following progress bar. Chapter 5 Tutorials 5.6.2 Migrate Button Do the following steps to 31 characters (a-z, 0-9, " " [spaces], "_", and "."). • Choose RAID 1 and click Apply. 78 Media Server User's Guide This may take ...
The volume name can see the following progress bar. Chapter 5 Tutorials 5.6.2 Migrate Button Do the following steps to 31 characters (a-z, 0-9, " " [spaces], "_", and "."). • Choose RAID 1 and click Apply. 78 Media Server User's Guide This may take ...

User Guide
Page 79
... a backup of your RAID 1 volume. 5.7 Creating a Volume in a 1-Bay NSA This section shows you have a backup of any existing data in the hard disk. Chapter 5 Tutorials This deletes all existing data in the SATA or eSATA hard disk.
... a backup of your RAID 1 volume. 5.7 Creating a Volume in a 1-Bay NSA This section shows you have a backup of any existing data in the hard disk. Chapter 5 Tutorials This deletes all existing data in the SATA or eSATA hard disk.
User Guide
Page 80
... you can configure this volume as: 1) a backup to your NSA, you are using a single hard disk for a SATA (Serial Advanced Technology Attachment) hard disk. Chapter 5 Tutorials Your NSA has a single bay for your NSA. Use this if there are two ways to the eSATA hard disk. • Click the Create a SATA...
... you can configure this volume as: 1) a backup to your NSA, you are using a single hard disk for a SATA (Serial Advanced Technology Attachment) hard disk. Chapter 5 Tutorials Your NSA has a single bay for your NSA. Use this if there are two ways to the eSATA hard disk. • Click the Create a SATA...
User Guide
Page 81
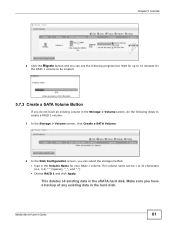
... can select the storage method. • Type in the Volume Name for the RAID 1 volume to be 1 to 10 minutes for your RAID 1 volume. Chapter 5 Tutorials 2 Click the Migrate button and you can be created. 5.7.3 Create a SATA Volume Button If you do the following progress bar. Media Server User's Guide 81...
... can select the storage method. • Type in the Volume Name for the RAID 1 volume to be 1 to 10 minutes for your RAID 1 volume. Chapter 5 Tutorials 2 Click the Migrate button and you can be created. 5.7.3 Create a SATA Volume Button If you do the following progress bar. Media Server User's Guide 81...
User Guide
Page 82
Chapter 5 Tutorials The NSA starts creating the volume and you can see the following progress bar. Wait for 2 minutes for the RAID 1 volume to be created. 3 The Storage > Volume screen displays with your RAID 1 volume. 82 Media Server User's Guide
Chapter 5 Tutorials The NSA starts creating the volume and you can see the following progress bar. Wait for 2 minutes for the RAID 1 volume to be created. 3 The Storage > Volume screen displays with your RAID 1 volume. 82 Media Server User's Guide
User Guide
Page 83
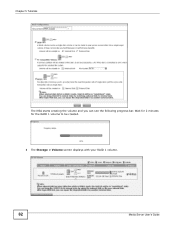
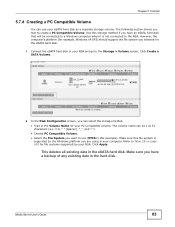
... a backup of any existing data in the eSATA hard disk. Make sure you how to use your eSATA hard disk as a separate storage volume. Chapter 5 Tutorials 5.7.4 Creating a PC Compatible Volume You can select the storage method. • Type in the Volume Name for your PC Compatible volume. This deletes all existing...
... a backup of any existing data in the eSATA hard disk. Make sure you how to use your eSATA hard disk as a separate storage volume. Chapter 5 Tutorials 5.7.4 Creating a PC Compatible Volume You can select the storage method. • Type in the Volume Name for your PC Compatible volume. This deletes all existing...