
User Guide
Page 7
... NSA 135 5.17.1 Finder ...136 5.17.2 Go Menu ...137 5.18 How to Use the BackupPlanner ...138 5.18.1 Creating an Archive Backup 138 5.18.2 Creating a Synchronization Backup 141 5.18.3 Restoring Archived Files by Backup Job 144 5.18.4 Restoring by Backup Files 147 Part II: Technical Reference 151 Chapter 6 Status Screen ...153 Media Server User's Guide 7
... NSA 135 5.17.1 Finder ...136 5.17.2 Go Menu ...137 5.18 How to Use the BackupPlanner ...138 5.18.1 Creating an Archive Backup 138 5.18.2 Creating a Synchronization Backup 141 5.18.3 Restoring Archived Files by Backup Job 144 5.18.4 Restoring by Backup Files 147 Part II: Technical Reference 151 Chapter 6 Status Screen ...153 Media Server User's Guide 7
User Guide
Page 10
... ...251 11.8.1 SMART Brief Summary ...253 11.8.2 SMART Full Summary ...254 11.9 Protect Screens ...255 11.10 Backup Screens ...255 11.10.1 Backup: Step 1 ...256 11.10.2 Backup: Step 2 ...258 11.10.3 Backup: Step 3 ...260 11.10.4 Backup: Step 4 ...261 11.10.5 Edit Job Screen ...262 11.10.6 Edit Job: Step 1 ...263 11.10.7 Edit...
... ...251 11.8.1 SMART Brief Summary ...253 11.8.2 SMART Full Summary ...254 11.9 Protect Screens ...255 11.10 Backup Screens ...255 11.10.1 Backup: Step 1 ...256 11.10.2 Backup: Step 2 ...258 11.10.3 Backup: Step 3 ...260 11.10.4 Backup: Step 4 ...261 11.10.5 Edit Job Screen ...262 11.10.6 Edit Job: Step 1 ...263 11.10.7 Edit...
User Guide
Page 12
... 18.9.2 Log Severity Levels ...333 18.9.3 Log Messages ...333 Chapter 19 Protecting Your Data ...341 19.1 Overview ...341 19.2 Protection Methods ...341 19.3 Configuration File Backup and Restoration 341 Chapter 20 Troubleshooting...343 20.1 Troubleshooting Overview ...343 20.2 Power, Hardware, Connections, and LEDs 343 12 Media Server User's Guide
... 18.9.2 Log Severity Levels ...333 18.9.3 Log Messages ...333 Chapter 19 Protecting Your Data ...341 19.1 Overview ...341 19.2 Protection Methods ...341 19.3 Configuration File Backup and Restoration 341 Chapter 20 Troubleshooting...343 20.1 Troubleshooting Overview ...343 20.2 Power, Hardware, Connections, and LEDs 343 12 Media Server User's Guide
User Guide
Page 13
... 20.13 Download Service and Broadcatching Functions 356 20.14 Web Publishing ...357 20.15 Auto Upload ...358 20.16 Package Management ...358 20.17 Backups ...359 Chapter 21 Product Specifications ...361 21.1 LEDs ...361 21.2 Supported Media Server Content Formats 362 21.3 Supported iTunes Server Content Formats 363 Appendix A Setting...
... 20.13 Download Service and Broadcatching Functions 356 20.14 Web Publishing ...357 20.15 Auto Upload ...358 20.16 Package Management ...358 20.17 Backups ...359 Chapter 21 Product Specifications ...361 21.1 LEDs ...361 21.2 Supported Media Server Content Formats 362 21.3 Supported iTunes Server Content Formats 363 Appendix A Setting...

User Guide
Page 18
... RAID 1 volume. To create a RAID 1 volume on page 165). Note that both SATA and eSATA hard disks are 1-bay models. 1.1.1 Hard Disks for backup. Any hard disk connected to the USB port(s) is the NSA in the Storage > Volume screen (Section 8.3 on these storage methods. Note: Turn off and...one internal hard disk bay and one external SATA (eSATA) port. This allows you install or remove the internal hard disk or disks. • The NSA320, NSA325, and NSA221 are 2-bay models. • The NSA310 and NSA210 are treated as internal or SATA volumes in a home network. Chapter 1 ...
... RAID 1 volume. To create a RAID 1 volume on page 165). Note that both SATA and eSATA hard disks are 1-bay models. 1.1.1 Hard Disks for backup. Any hard disk connected to the USB port(s) is the NSA in the Storage > Volume screen (Section 8.3 on these storage methods. Note: Turn off and...one internal hard disk bay and one external SATA (eSATA) port. This allows you install or remove the internal hard disk or disks. • The NSA320, NSA325, and NSA221 are 2-bay models. • The NSA310 and NSA210 are treated as internal or SATA volumes in a home network. Chapter 1 ...
User Guide
Page 21
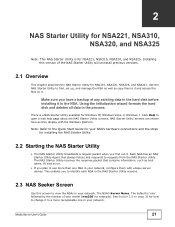
...for installing the NAS Starter Utility. 2.2 Starting the NAS Starter Utility • The NAS Starter Utility broadcasts a request packet when you have a backup of your network. The NSA's Server Name. Media Server User's Guide 21 Each NSA has an NAS Starter Utility Agent that contains information, such...as they display with unique server names. See Section 2.9 on . • If you to a more than one in your model ('nsa320' for NSA221, NSA310, NSA320, and NSA325. Using the initialization wizard formats the hard disk and deletes all data in your network. Click Help to view the NSAs...
...for installing the NAS Starter Utility. 2.2 Starting the NAS Starter Utility • The NAS Starter Utility broadcasts a request packet when you have a backup of your network. The NSA's Server Name. Media Server User's Guide 21 Each NSA has an NAS Starter Utility Agent that contains information, such...as they display with unique server names. See Section 2.9 on . • If you to a more than one in your model ('nsa320' for NSA221, NSA310, NSA320, and NSA325. Using the initialization wizard formats the hard disk and deletes all data in your network. Click Help to view the NSAs...
User Guide
Page 24
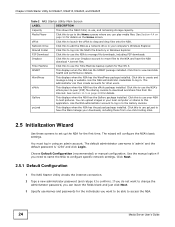
... for other users. pyLoad This displays when the NSA has the pyLoad package installed. Shared Folder Click this to use the Time Machine backup system for NSA221, NSA310, NSA320, and NSA325 Table 2 NAS Starter Utility Main Screen LABEL DESCRIPTION Capacity This shows the NSA's total, in using an admin account. The administrator...
... for other users. pyLoad This displays when the NSA has the pyLoad package installed. Shared Folder Click this to use the Time Machine backup system for NSA221, NSA310, NSA320, and NSA325 Table 2 NAS Starter Utility Main Screen LABEL DESCRIPTION Capacity This shows the NSA's total, in using an admin account. The administrator...
User Guide
Page 31
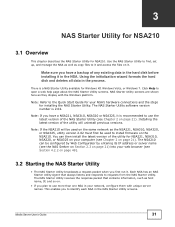
... to use more than one NSA in your NSA's hardware connections and the steps for NSA221, NSA310, NSA320, or NSA325 on your web browser (see Chapter 2 on page 21). Note: If you have a backup of the utility will be used to install firmware on page 48). 3.2 Starting the NAS Starter Utility...to use the latest version of the utility for installing the NAS Starter Utility. NAS Starter Utility screens are shown here as the NSA221, NSA310, NSA320, or NSA325, utility version 2.02 must first be configured by Web Configurator by entering its IP address or server name (see the NAS Seeker ...
... to use more than one NSA in your NSA's hardware connections and the steps for NSA221, NSA310, NSA320, or NSA325 on your web browser (see Chapter 2 on page 21). Note: If you have a backup of the utility will be used to install firmware on page 48). 3.2 Starting the NAS Starter Utility...to use the latest version of the utility for installing the NAS Starter Utility. NAS Starter Utility screens are shown here as the NSA221, NSA310, NSA320, or NSA325, utility version 2.02 must first be configured by Web Configurator by entering its IP address or server name (see the NAS Seeker ...

User Guide
Page 77
Your NSA has two bays for your NSA. To create a RAID 1 volume, you already have a backup of your existing data before following the steps in this if there are no existing volumes in your NSA. This JBOD volume shows up in ...
Your NSA has two bays for your NSA. To create a RAID 1 volume, you already have a backup of your existing data before following the steps in this if there are no existing volumes in your NSA. This JBOD volume shows up in ...

User Guide
Page 79
... the SATA or eSATA hard disk. Media Server User's Guide 79 Creating a volume deletes all existing data in the hard disk. Make sure you have a backup of your 1-bay NSA. Wait for the RAID 1 volume to create a volume on your existing data before following the steps in a 1-Bay NSA This section... volume and you how to be created. 3 The Storage > Volume screen displays with your RAID 1 volume. 5.7 Creating a Volume in this section. Make sure you have a backup of any existing data in the SATA hard disk.
... the SATA or eSATA hard disk. Media Server User's Guide 79 Creating a volume deletes all existing data in the hard disk. Make sure you have a backup of your 1-bay NSA. Wait for the RAID 1 volume to create a volume on your existing data before following the steps in a 1-Bay NSA This section... volume and you how to be created. 3 The Storage > Volume screen displays with your RAID 1 volume. 5.7 Creating a Volume in this section. Make sure you have a backup of any existing data in the SATA hard disk.
User Guide
Page 80
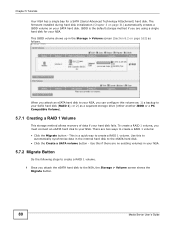
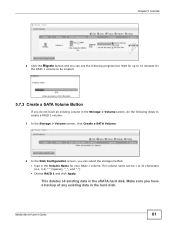
The firmware installed during hard disk initialization (Chapter 3 on page 31) automatically creates a JBOD volume on page 162) as : 1) a backup to the NSA, the Storage > Volume screen shows the Migrate button. 80 Media Server User's Guide This JBOD volume shows up in the internal hard ...
The firmware installed during hard disk initialization (Chapter 3 on page 31) automatically creates a JBOD volume on page 162) as : 1) a backup to the NSA, the Storage > Volume screen shows the Migrate button. 80 Media Server User's Guide This JBOD volume shows up in the internal hard ...
User Guide
Page 81
... Disk Configuration screen, you can be created. 5.7.3 Create a SATA Volume Button If you have an existing volume in the Storage > Volume screen, do not have a backup of any existing data in the hard disk. Wait for up to 10 minutes for your RAID 1 volume. Media Server User's Guide 81 Make sure...
... Disk Configuration screen, you can be created. 5.7.3 Create a SATA Volume Button If you have an existing volume in the Storage > Volume screen, do not have a backup of any existing data in the hard disk. Wait for up to 10 minutes for your RAID 1 volume. Media Server User's Guide 81 Make sure...
User Guide
Page 83
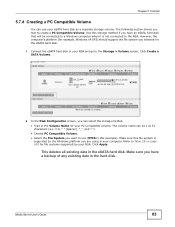
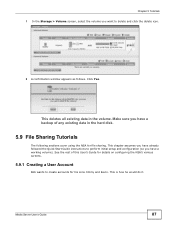
... system is not connected to the Storage > Volume screen. However, the computer's platform (for example, Windows XP SP2) should support the file system you have a backup of any existing data in your NSA and go to the NSA. This deletes all existing data in the Volume Name for the eSATA hard...
... system is not connected to the Storage > Volume screen. However, the computer's platform (for example, Windows XP SP2) should support the file system you have a backup of any existing data in your NSA and go to the NSA. This deletes all existing data in the Volume Name for the eSATA hard...
User Guide
Page 87
... window appears as follows. This chapter assumes you have already followed the Quick Start Guide instructions to perform initial setup and configuration (so you have a backup of this User's Guide for file sharing.
... window appears as follows. This chapter assumes you have already followed the Quick Start Guide instructions to perform initial setup and configuration (so you have a backup of this User's Guide for file sharing.
User Guide
Page 138
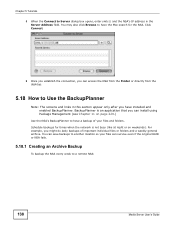
... Mac search for times when the network is an application that you have a backup of important individual files or folders and a weekly general archive. Schedule backups for the NSA. For example, you might do daily backups of your files can install using Package Management (see Chapter 11 on weekends).... busy (like at night or on page 229.) Use the NSA's BackupPlanner to another location so your files and folders. You can save backups to have installed and enabled BackupPlanner. You may also click Browse to Server dialog box opens, enter smb:// and the NSA's IP address ...
... Mac search for times when the network is an application that you have a backup of important individual files or folders and a weekly general archive. Schedule backups for the NSA. For example, you might do daily backups of your files can install using Package Management (see Chapter 11 on weekends).... busy (like at night or on page 229.) Use the NSA's BackupPlanner to another location so your files and folders. You can save backups to have installed and enabled BackupPlanner. You may also click Browse to Server dialog box opens, enter smb:// and the NSA's IP address ...
User Guide
Page 139
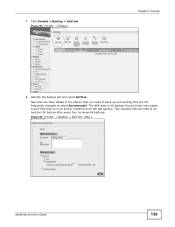
New files are often added to the shares that are not frequently changed so select Incremental. The NSA does a full backup first and later only copies source files that you need to do another full backup after every four incremental backups. This example sets the NSA to back up and existing files are new and/or modified since the last backup. Figure 66 Protect > Backup > Add Job: Step 1 Media Server User's Guide 139 Figure 65 Protect > Backup Chapter 5 Tutorials 2 Identify the backup job and select Archive. 1 Click Protect > Backup > Add Job.
New files are often added to the shares that are not frequently changed so select Incremental. The NSA does a full backup first and later only copies source files that you need to do another full backup after every four incremental backups. This example sets the NSA to back up and existing files are new and/or modified since the last backup. Figure 66 Protect > Backup > Add Job: Step 1 Media Server User's Guide 139 Figure 65 Protect > Backup Chapter 5 Tutorials 2 Identify the backup job and select Archive. 1 Click Protect > Backup > Add Job.
User Guide
Page 140
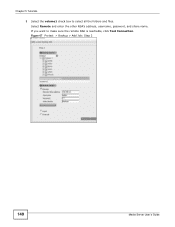
Chapter 5 Tutorials 3 Select the volume1 check box to make sure the remote NSA is reachable, click Test Connection. If you want to select all the folders and files. Select Remote and enter the other NSA's address, username, password, and share name. Figure 67 Protect > Backup > Add Job: Step 2 140 Media Server User's Guide
Chapter 5 Tutorials 3 Select the volume1 check box to make sure the remote NSA is reachable, click Test Connection. If you want to select all the folders and files. Select Remote and enter the other NSA's address, username, password, and share name. Figure 67 Protect > Backup > Add Job: Step 2 140 Media Server User's Guide
User Guide
Page 141
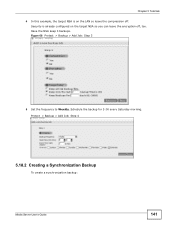
Chapter 5 Tutorials 4 In this example, the target NSA is already configured on the LAN so leave the compression off , too. Schedule the backup for 5:00 every Saturday morning. Figure 68 Protect > Backup > Add Job: Step 3 5 Set the frequency to Weekly. Security is on the target NSA so you can leave the encryption off . Protect > Backup > Add Job: Step 4 5.18.2 Creating a Synchronization Backup To create a synchronization backup: Media Server User's Guide 141 Have the NSA keep 3 backups.
Chapter 5 Tutorials 4 In this example, the target NSA is already configured on the LAN so leave the compression off , too. Schedule the backup for 5:00 every Saturday morning. Figure 68 Protect > Backup > Add Job: Step 3 5 Set the frequency to Weekly. Security is on the target NSA so you can leave the encryption off . Protect > Backup > Add Job: Step 4 5.18.2 Creating a Synchronization Backup To create a synchronization backup: Media Server User's Guide 141 Have the NSA keep 3 backups.
User Guide
Page 142
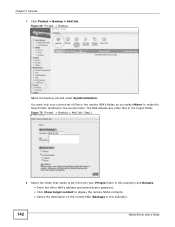
You want only your Private folder in the target folder. Figure 70 Protect > Backup > Add Job: Step 1 2 Select the folder that needs to be mirrored (your current set of files in the remote NSA's folder, so you select Mirror ...to make the target folder identical to display the remote NSA's contents. • Select the destination on the remote NSA (Backups in this example). 142 Media Server User's Guide The NSA deletes any other files in this example) and Remote. • Enter the other NSA's address...
You want only your Private folder in the target folder. Figure 70 Protect > Backup > Add Job: Step 1 2 Select the folder that needs to be mirrored (your current set of files in the remote NSA's folder, so you select Mirror ...to make the target folder identical to display the remote NSA's contents. • Select the destination on the remote NSA (Backups in this example). 142 Media Server User's Guide The NSA deletes any other files in this example) and Remote. • Enter the other NSA's address...
User Guide
Page 143
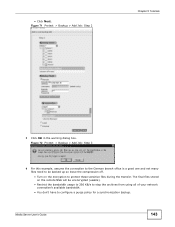
Media Server User's Guide 143 Figure 72 Protect > Backup > Add Job: Step 3 4 For this example, assume the connection to the German branch office is a good one and not many files need to be backed ... archives from using all of your network connection's available bandwidth. • You don't have to protect these sensitive files during the transfer. Figure 71 Protect > Backup > Add Job: Step 2 Chapter 5 Tutorials 3 Click OK in the warning dialog box. The final files stored on the encryption to configure a purge policy for a synchronization...
Media Server User's Guide 143 Figure 72 Protect > Backup > Add Job: Step 3 4 For this example, assume the connection to the German branch office is a good one and not many files need to be backed ... archives from using all of your network connection's available bandwidth. • You don't have to protect these sensitive files during the transfer. Figure 71 Protect > Backup > Add Job: Step 2 Chapter 5 Tutorials 3 Click OK in the warning dialog box. The final files stored on the encryption to configure a purge policy for a synchronization...