User Guide
Page 12
... and Restoration 336 Chapter 28 Troubleshooting...337 28.1 Troubleshooting Overview ...337 28.2 Power, Hardware, Connections, and LEDs 337 28.3 NAS Starter Utility ...339 28.4 NAS Login and Access ...340 28.4.1 Enabling Scripting of Safe ActiveX Controls 341 28.5 I Cannot Access The NAS ...343 28.6 Users Cannot Access the NAS ...344 28...
... and Restoration 336 Chapter 28 Troubleshooting...337 28.1 Troubleshooting Overview ...337 28.2 Power, Hardware, Connections, and LEDs 337 28.3 NAS Starter Utility ...339 28.4 NAS Login and Access ...340 28.4.1 Enabling Scripting of Safe ActiveX Controls 341 28.5 I Cannot Access The NAS ...343 28.6 Users Cannot Access the NAS ...344 28...
User Guide
Page 19
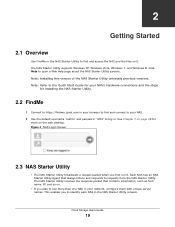
...connections and the steps for more on . • If you plan to use more than one NAS in the NAS Starter Utility screens. Figure 4 NAS Login Screen 2.3 NAS Starter Utility • The NAS Starter Utility broadcasts a request packet when you to identify each NAS in your network, configure them with ... Help to requests from the NAS Starter Utility. See Chapter 7 on page 38 for installing the NAS Starter Utility. 2.2 FindMe 1 Connect to https://findme.zyxel.com in your browser to find and access the NAS and the files on it . This enables you first run it . Cloud Storage User's Guide...
...connections and the steps for more on . • If you plan to use more than one NAS in the NAS Starter Utility screens. Figure 4 NAS Login Screen 2.3 NAS Starter Utility • The NAS Starter Utility broadcasts a request packet when you to identify each NAS in your network, configure them with ... Help to requests from the NAS Starter Utility. See Chapter 7 on page 38 for installing the NAS Starter Utility. 2.2 FindMe 1 Connect to https://findme.zyxel.com in your browser to find and access the NAS and the files on it . This enables you first run it . Cloud Storage User's Guide...
User Guide
Page 22
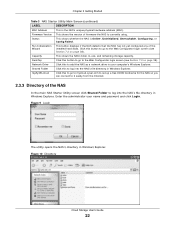
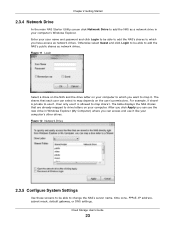
...of firmware the NAS is currently using. Capacity This shows the NAS's total, in Windows Explorer. Enter the administrator user name and password and click Login. Click this to log into the NAS's file directory in Windows Explorer. Shared Folder Click this button to go to add the NAS as a ...network drive in Windows Explorer. myZyXELcloud Click this to the Web Configurator login screen (see Section 7.2 on page 38). Network Drive Click this to go to mycloud.zyxel.com to set up a free DDNS hostname for the NAS so you can connect to it easily from...
...of firmware the NAS is currently using. Capacity This shows the NAS's total, in Windows Explorer. Enter the administrator user name and password and click Login. Click this to log into the NAS's file directory in Windows Explorer. Shared Folder Click this button to go to add the NAS as a ...network drive in Windows Explorer. myZyXELcloud Click this to the Web Configurator login screen (see Section 7.2 on page 38). Network Drive Click this to go to mycloud.zyxel.com to set up a free DDNS hostname for the NAS so you can connect to it easily from...
User Guide
Page 23
... each user can select to map depends on the user's permissions. Otherwise select Guest and click Login to be able to add the NAS's public shares as network drives. After you click Apply ...can see the new drive in your computer to which you have access as network drives. Figure 11 Login Select a share on the NAS and the drive letter on your computer's other drives. The shares that...private to user1, then only user1 is allowed to map share1. Enter your user name and password and click Login to be able to change the NAS's server name, time zone, PPPoE, IP address, subnet mask, default ...
... each user can select to map depends on the user's permissions. Otherwise select Guest and click Login to be able to add the NAS's public shares as network drives. After you click Apply ...can see the new drive in your computer to which you have access as network drives. Figure 11 Login Select a share on the NAS and the drive letter on your computer's other drives. The shares that...private to user1, then only user1 is allowed to map share1. Enter your user name and password and click Login to be able to change the NAS's server name, time zone, PPPoE, IP address, subnet mask, default ...

User Guide
Page 39
...). Go to the Desktop (Section 7.3 on RAID for a simple set up. Go to create more than one storage volume. Chapter 7 Web Configurator Figure 21 NAS Login Screen Make sure you have a backup of any existing data in the hard disk before installing it in the process. 4 This screen displays if you...
...). Go to the Desktop (Section 7.3 on RAID for a simple set up. Go to create more than one storage volume. Chapter 7 Web Configurator Figure 21 NAS Login Screen Make sure you have a backup of any existing data in the hard disk before installing it in the process. 4 This screen displays if you...
User Guide
Page 108
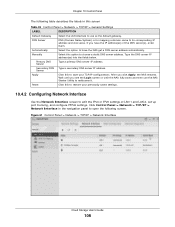
... a static DNS server address. Chapter 10 Control Panel The following screen. Primary DNS Server Type a primary DNS server IP address. Wait until you see the Login screen or until the NAS fully boots and then use as the default gateway. After you have the NAS get a DNS server address automatically. Apply...
... a static DNS server address. Chapter 10 Control Panel The following screen. Primary DNS Server Type a primary DNS server IP address. Wait until you see the Login screen or until the NAS fully boots and then use as the default gateway. After you have the NAS get a DNS server address automatically. Apply...
User Guide
Page 109
... page 110. The gateway helps forward packets to configure the following IPv4 settings. Cloud Storage User's Guide 109 Automatically For adding a port trunking, see the Login screen or until you click Apply, the NAS restarts. You must fill in the following screen to get IP address information automatically. Type a default gateway...
... page 110. The gateway helps forward packets to configure the following IPv4 settings. Cloud Storage User's Guide 109 Automatically For adding a port trunking, see the Login screen or until you click Apply, the NAS restarts. You must fill in the following screen to get IP address information automatically. Type a default gateway...
User Guide
Page 122
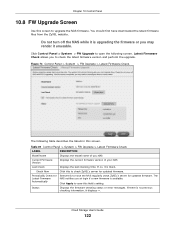
...Check LABEL DESCRIPTION Model Name Displays the model name of you may render it is available. The NAS notifies you to check ZyXEL's server for updated firmware. Status Displays the firmware checking status or error messages. Periodically Check for Latest Firmware Automatically Select this.... You should first have the NAS regularly check ZyXEL's server for updated firmware. Figure 74 Control Panel > System > FW Upgrade > Latest Firmware Check The following screen. Latest Firmware Check allows you at login if a new firmware is upgrading the firmware or you NAS ...
...Check LABEL DESCRIPTION Model Name Displays the model name of you may render it is available. The NAS notifies you to check ZyXEL's server for updated firmware. Status Displays the firmware checking status or error messages. Periodically Check for Latest Firmware Automatically Select this.... You should first have the NAS regularly check ZyXEL's server for updated firmware. Figure 74 Control Panel > System > FW Upgrade > Latest Firmware Check The following screen. Latest Firmware Check allows you at login if a new firmware is upgrading the firmware or you NAS ...

User Guide
Page 147
Cloud Storage User's Guide 147 Doubleclick either NAS icon to open the Web Configurator login screen. Chapter 14 Tutorials 2 Click View network computers and devices. 3 The NAS icon displays twice because the NAS is both a media server and a storage device.
Cloud Storage User's Guide 147 Doubleclick either NAS icon to open the Web Configurator login screen. Chapter 14 Tutorials 2 Click View network computers and devices. 3 The NAS icon displays twice because the NAS is both a media server and a storage device.
User Guide
Page 149
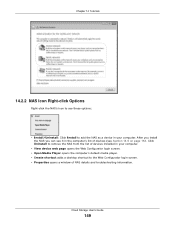
... these options: • Install/Uninstall: Click Install to add the NAS as a device in your computer. • View device web page opens the Web Configurator login screen. • Open Media Player opens the computer's default media player. • Create shortcut adds a desktop shortcut to the Web Configurator...
... these options: • Install/Uninstall: Click Install to add the NAS as a device in your computer. • View device web page opens the Web Configurator login screen. • Open Media Player opens the computer's default media player. • Create shortcut adds a desktop shortcut to the Web Configurator...

User Guide
Page 151
... use the full map feature. EXAMPLE Cloud Storage User's Guide 151 Chapter 14 Tutorials 2 Click See full map (1 in order to open the Web Configurator login screen. See Section 14.2.2 on page 149 for the NAS icon's right-click options. The network containing the NAS must be set the network's location...
... use the full map feature. EXAMPLE Cloud Storage User's Guide 151 Chapter 14 Tutorials 2 Click See full map (1 in order to open the Web Configurator login screen. See Section 14.2.2 on page 149 for the NAS icon's right-click options. The network containing the NAS must be set the network's location...
User Guide
Page 155
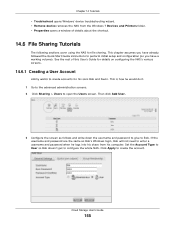
... the NAS's various screens. 14.6.1 Creating a User Account Jimmy wants to open the Users screen. Then click Add User. 3 Configure the screen as Bob's Windows login, Bob will not need to enter a username and password when he would do it. 1 Go to the advanced administration screens. 2 Click Sharing > Users to create...
... the NAS's various screens. 14.6.1 Creating a User Account Jimmy wants to open the Users screen. Then click Add User. 3 Configure the screen as Bob's Windows login, Bob will not need to enter a username and password when he would do it. 1 Go to the advanced administration screens. 2 Click Sharing > Users to create...
User Guide
Page 159
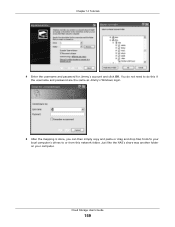
You do not need to do this if the username and password are the same as Jimmy's Windows login. 5 After the mapping is done, you can then simply copy and paste or drag and drop files from/to your computer. Cloud Storage User's Guide 159 Just like the NAS's share was another folder on your local computer's drives to or from this network folder. Chapter 14 Tutorials 4 Enter the username and password for Jimmy's account and click OK.
You do not need to do this if the username and password are the same as Jimmy's Windows login. 5 After the mapping is done, you can then simply copy and paste or drag and drop files from/to your computer. Cloud Storage User's Guide 159 Just like the NAS's share was another folder on your local computer's drives to or from this network folder. Chapter 14 Tutorials 4 Enter the username and password for Jimmy's account and click OK.
User Guide
Page 160
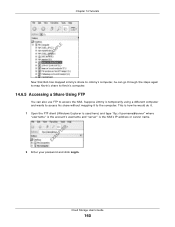
... map Kevin's share to Kevin's computer. 14.6.5 Accessing a Share Using FTP You can also use FTP to the computer. EXAMPLE 2 Enter your password and click Login. Chapter 14 Tutorials EXAMPLE Now that Bob has mapped Jimmy's share to Jimmy's computer, he would do it to access the NAS.
... map Kevin's share to Kevin's computer. 14.6.5 Accessing a Share Using FTP You can also use FTP to the computer. EXAMPLE 2 Enter your password and click Login. Chapter 14 Tutorials EXAMPLE Now that Bob has mapped Jimmy's share to Jimmy's computer, he would do it to access the NAS.

User Guide
Page 178
Chapter 14 Tutorials 2 Next, let's modify the certificate by changing the Common Name to this NAS's host name of "nsa", the Organization to "ZyXEL" and the Key Length to 2048. 3 The NAS restarts its network services and returns you to the login screen. Cloud Storage User's Guide 178
Chapter 14 Tutorials 2 Next, let's modify the certificate by changing the Common Name to this NAS's host name of "nsa", the Organization to "ZyXEL" and the Key Length to 2048. 3 The NAS restarts its network services and returns you to the login screen. Cloud Storage User's Guide 178

User Guide
Page 188
... it before adding a security exception (as in steps 6 to 7 on page 177 to the NAS's Web Configurator screens will automatically do so by HTTPs. 9 The login screen displays.
... it before adding a security exception (as in steps 6 to 7 on page 177 to the NAS's Web Configurator screens will automatically do so by HTTPs. 9 The login screen displays.
User Guide
Page 251
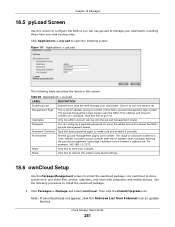
...Packages > Package and select ownCloud. The range of valid port numbers is the IP address and port number of the NAS's pyLoad management login screen. Management Page This is 1024~65536. Username Only the admin account can log into the pyLoad management screen. Then click the Install...click the Retrieve List from one-click hosting sites. Include this port number after the IP address when manually entering the pyLoad management login page's address in this to restore the screen's last-saved settings. 18.6 ownCloud Setup Use the Package Management screen to make sure...
...Packages > Package and select ownCloud. The range of valid port numbers is the IP address and port number of the NAS's pyLoad management login screen. Management Page This is 1024~65536. Username Only the admin account can log into the pyLoad management screen. Then click the Install...click the Retrieve List from one-click hosting sites. Include this port number after the IP address when manually entering the pyLoad management login page's address in this to restore the screen's last-saved settings. 18.6 ownCloud Setup Use the Package Management screen to make sure...
User Guide
Page 253
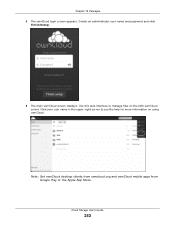
Note: Get ownCloud desktop clients from owncloud.org and ownCloud mobile apps from Google Play or the Apple App Store. Click your user name in the upper-right corner to manage files on using ownCloud. Cloud Storage User's Guide 253 Chapter 18 Packages 5 The ownCloud login screen appears. Use this web interface to see the help for more information on the NAS ownCloud server. Create an administrator user name and password and click Finish Setup. 6 The main ownCloud screen displays.
Note: Get ownCloud desktop clients from owncloud.org and ownCloud mobile apps from Google Play or the Apple App Store. Click your user name in the upper-right corner to manage files on using ownCloud. Cloud Storage User's Guide 253 Chapter 18 Packages 5 The ownCloud login screen appears. Use this web interface to see the help for more information on the NAS ownCloud server. Create an administrator user name and password and click Finish Setup. 6 The main ownCloud screen displays.

User Guide
Page 263
... Flickr from the list and click this screen. The following table describes the labels in this to which the NAS can automatically upload files. Flickr login page. Chapter 19 Auto Upload Figure 156 Applications > Auto Upload > Flickr/YouTube The following screen displays if you turned off . This field displays the service...
... Flickr from the list and click this screen. The following table describes the labels in this to which the NAS can automatically upload files. Flickr login page. Chapter 19 Auto Upload Figure 156 Applications > Auto Upload > Flickr/YouTube The following screen displays if you turned off . This field displays the service...

User Guide
Page 264
Click OK, I'LL ALLOW IT to establish a link between the NAS and your authorization. Chapter 19 Auto Upload Figure 158 Yahoo! Figure 159 Flickr Authorization Cloud Storage User's Guide 264 Flickr Login Page The following page displays asking for your Flickr account.
Click OK, I'LL ALLOW IT to establish a link between the NAS and your authorization. Chapter 19 Auto Upload Figure 158 Yahoo! Figure 159 Flickr Authorization Cloud Storage User's Guide 264 Flickr Login Page The following page displays asking for your Flickr account.