
User Guide
Page 56
... the same capacity of disk failure. For example, the Repair RAID option is available only when a degraded volume is not available at this screen to review the settings you configured in the Volume section to create a volume. Use Basic with three or more hard disks where you have selected. Volume Name...
... the same capacity of disk failure. For example, the Repair RAID option is available only when a degraded volume is not available at this screen to review the settings you configured in the Volume section to create a volume. Use Basic with three or more hard disks where you have selected. Volume Name...
User Guide
Page 61
... corresponding disk tray of hard disks for what the configuration is built. Volume Name This field displays the name of the disk. Select this to review the settings you want to expand a 1 TB RAID 1 volume by adding two more disks to your selections on which the volume is . Next Click Next...
... corresponding disk tray of hard disks for what the configuration is built. Volume Name This field displays the name of the disk. Select this to review the settings you want to expand a 1 TB RAID 1 volume by adding two more disks to your selections on which the volume is . Next Click Next...

User Guide
Page 62
... volume you select Expand the volume by adding disk(s) in the last step. Select disk(s) to This section lists all entries in this screen to review the settings you have selected. Disk Name This field shows the name of the volume. Back Click Back to go to the previous step. Next...
... volume you select Expand the volume by adding disk(s) in the last step. Select disk(s) to This section lists all entries in this screen to review the settings you have selected. Disk Name This field shows the name of the volume. Back Click Back to go to the previous step. Next...

User Guide
Page 63
... the volume. Model Name This field shows the model of the volume. The following screens after you select Change RAID Type in this screen to review the settings you selected on the top to close the screen without saving any settings. Select one or more disks to avoid wasting space. Action...
... the volume. Model Name This field shows the model of the volume. The following screens after you select Change RAID Type in this screen to review the settings you selected on the top to close the screen without saving any settings. Select one or more disks to avoid wasting space. Action...

User Guide
Page 68
... data protection in case of disk failure. The corresponding space allocations of the volume. Summary Note: Use the same capacity of the disk group to review the settings you configured in the last step. Click Cancel to close the screen without saving any settings. This field displays the default name of...
... data protection in case of disk failure. The corresponding space allocations of the volume. Summary Note: Use the same capacity of the disk group to review the settings you configured in the last step. Click Cancel to close the screen without saving any settings. This field displays the default name of...

User Guide
Page 74
Use RAID 0 with four disks for more data protection in case of disk failure. Summary Click Next to go to review the settings you configured in case of RAID on RAID (Disk Group X) where Disk Group X is the disk group's name. Disk Selected This field displays ...
Use RAID 0 with four disks for more data protection in case of disk failure. Summary Click Next to go to review the settings you configured in case of RAID on RAID (Disk Group X) where Disk Group X is the disk group's name. Disk Selected This field displays ...
User Guide
Page 86
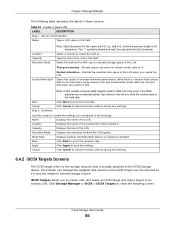
... Capacity Allocation Mode Enable Write Back Note: Valid characters for the name are 0-9, a-z, and A-Z, and the maximum length is enabled or disabled. Click Cancel to review the settings you configured in this field. Use this screen to close the screen without saving any settings. 8.4.2 iSCSI Targets Screens The iSCSI target refers...
... Capacity Allocation Mode Enable Write Back Note: Valid characters for the name are 0-9, a-z, and A-Z, and the maximum length is enabled or disabled. Click Cancel to review the settings you configured in this field. Use this screen to close the screen without saving any settings. 8.4.2 iSCSI Targets Screens The iSCSI target refers...
User Guide
Page 91
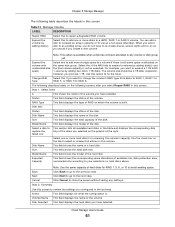
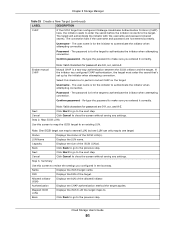
... this screen to authenticate the initiator when attempting connection. The password is for password are not entered correctly. Note: Valid characters for the target to review the settings you configured in the last step. Note: One iSCSI target can map to several LUN, but one LUN can only map to . Click...
... this screen to authenticate the initiator when attempting connection. The password is for password are not entered correctly. Note: Valid characters for the target to review the settings you configured in the last step. Note: One iSCSI target can map to several LUN, but one LUN can only map to . Click...

User Guide
Page 260
Review what the Grive app wants to Google and complete the authorization. Click Apply to have the NAS connect to use and click Accept if you ...
Review what the Grive app wants to Google and complete the authorization. Click Apply to have the NAS connect to use and click Accept if you ...