User Manual
Page 3
... shattering of the glass. • Metallic objects such as knives, forks, spoons and lids should be taken to avoid touching heating elements. • Always use oven gloves to remove or put in accessories or ovenware. • Before maintenance, cut the power supply. • Ensure that the appliance is switched off the...
... shattering of the glass. • Metallic objects such as knives, forks, spoons and lids should be taken to avoid touching heating elements. • Always use oven gloves to remove or put in accessories or ovenware. • Before maintenance, cut the power supply. • Ensure that the appliance is switched off the...
User Manual
Page 6
... can cause corrosion. Risk of light bulb or halogen lamp used for this appliance is for information on the surface. • Before you use an oven spray, obey the safety instructions on the packaging. • Do not clean the catalytic enamel (if applicable) with a moist soft cloth. Only use ... solvents or metal objects. • If you close the lid turn all burners off. • Do not close the lid until the hob and oven are spills on how to discard the appliance correctly. • Disconnect the appliance from the mains supply. • Cut off the mains electrical cable close...
... can cause corrosion. Risk of light bulb or halogen lamp used for this appliance is for information on the surface. • Before you use an oven spray, obey the safety instructions on the packaging. • Do not clean the catalytic enamel (if applicable) with a moist soft cloth. Only use ... solvents or metal objects. • If you close the lid turn all burners off. • Do not close the lid until the hob and oven are spills on how to discard the appliance correctly. • Disconnect the appliance from the mains supply. • Cut off the mains electrical cable close...
User Manual
Page 7
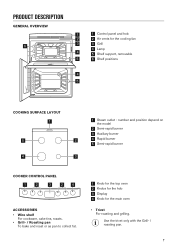
PRODUCT DESCRIPTION GENERAL OVERVIEW 63 2 1 1 1 Control panel and hob 2 2 Air vents for the main oven • Trivet For roasting and grilling. Use the trivet only with the Grill- / roasting pan. 7 number and position depend on the model 2 Semi-rapid ...; Wire shelf For cookware, cake tins, roasts. • Grill- / Roasting pan To bake and roast or as pan to collect fat. 1 Knob for the top oven 2 Knobs for the hob 3 Display 4 Knob for the cooling fan 3 3 Grill 4 Lamp 4 5 Shelf support, removable 5 6 Shelf positions 5 4 4 3 5 2 1 COOKING SURFACE LAYOUT 1 5 2 4 3 1 ...
PRODUCT DESCRIPTION GENERAL OVERVIEW 63 2 1 1 1 Control panel and hob 2 2 Air vents for the main oven • Trivet For roasting and grilling. Use the trivet only with the Grill- / roasting pan. 7 number and position depend on the model 2 Semi-rapid ...; Wire shelf For cookware, cake tins, roasts. • Grill- / Roasting pan To bake and roast or as pan to collect fat. 1 Knob for the top oven 2 Knobs for the hob 3 Display 4 Knob for the cooling fan 3 3 Grill 4 Lamp 4 5 Shelf support, removable 5 6 Shelf positions 5 4 4 3 5 2 1 COOKING SURFACE LAYOUT 1 5 2 4 3 1 ...
User Manual
Page 8
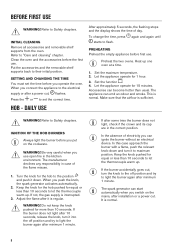
... supply is normal. If the burner accidentally goes out, turn the knob to the off position and try to let the thermocouple warm up one oven at a time. 1. Refer to Safety chapters. Let the appliance operate for 1 hour. 3. This is interrupted. 3. Refer to Safety chapters.... the knob for equal or less than usual. BEFORE FIRST USE WARNING! INITIAL CLEANING Remove all accessories and removable shelf supports from the oven. Refer to their initial position. Put the accessories and the removable shelf supports back to "Care and cleaning" chapter. When you connect...
... supply is normal. If the burner accidentally goes out, turn the knob to the off position and try to let the thermocouple warm up one oven at a time. 1. Refer to Safety chapters. Let the appliance operate for 1 hour. 3. This is interrupted. 3. Refer to Safety chapters.... the knob for equal or less than usual. BEFORE FIRST USE WARNING! INITIAL CLEANING Remove all accessories and removable shelf supports from the oven. Refer to their initial position. Put the accessories and the removable shelf supports back to "Care and cleaning" chapter. When you connect...

User Manual
Page 10
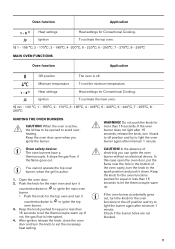
... suitable for the surface of cookware (mm) Rapid Semi-rapid 180 - 240 / 2601) 120 - 220 / 240 HOB - PAN SUPPORTS The pan supports are not obstructed. OVEN - CLEANING THE HOB • Remove immediately: melted plastic, plastic foil, sugar and food with sugar, otherwise, the dirt can cause damage to prevent the hob... with the centre of the pan supports are in a dishwasher. To grill flat food and to Safety chapters. Refer to toast bread. DAILY USE 2. TOP OVEN FUNCTIONS Oven function Off position Full Grill Application The...
... suitable for the surface of cookware (mm) Rapid Semi-rapid 180 - 240 / 2601) 120 - 220 / 240 HOB - PAN SUPPORTS The pan supports are not obstructed. OVEN - CLEANING THE HOB • Remove immediately: melted plastic, plastic foil, sugar and food with sugar, otherwise, the dirt can cause damage to prevent the hob... with the centre of the pan supports are in a dishwasher. To grill flat food and to Safety chapters. Refer to toast bread. DAILY USE 2. TOP OVEN FUNCTIONS Oven function Off position Full Grill Application The...
User Manual
Page 11
... push it counterclockwise to to let the thermocouple warm up . Oven safety device: The oven burners have a thermocouple. After ignition release the knob, close the oven door and turn it down. Keep the oven door open the oven door, put the flame near the hole in the bottom of... electricity you ignite the burner. Keep the knob pushed for the oven functions to let the thermocouple warm up . To activate the main oven. 1) min - 130 °C, 1 - 155°C, 2 - 170°C, 3 -185°C, 4 - 205°C, 5 - 225°C, 6 - 240°C, 7 -...
... push it counterclockwise to to let the thermocouple warm up . Oven safety device: The oven burners have a thermocouple. After ignition release the knob, close the oven door and turn it down. Keep the oven door open the oven door, put the flame near the hole in the bottom of... electricity you ignite the burner. Keep the knob pushed for the oven functions to let the thermocouple warm up . To activate the main oven. 1) min - 130 °C, 1 - 155°C, 2 - 170°C, 3 -185°C, 4 - 205°C, 5 - 225°C, 6 - 240°C, 7 -...
User Manual
Page 12
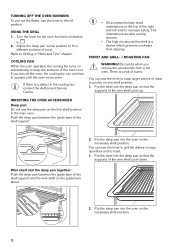
...above. 2. Wire shelf and the deep pan together: Push the deep pan between the guide bars of the wire shelf point up. TURNING OFF THE OVEN BURNERS To put out the flame, turn off position. Put the trivet into the deep pan so that the supports of the shelf support. 2. The...-tip devices. • The high rim around the shelf is a device which prevents cookware from a hot oven. TRIVET AND GRILL- / ROASTING PAN WARNING! Turn the knob for the oven functions clockwise to increase safety. INSERTING THE OVEN ACCESSORIES Deep pan: Do not use the trivet to grill flat dishes in the main...
...above. 2. Wire shelf and the deep pan together: Push the deep pan between the guide bars of the wire shelf point up. TURNING OFF THE OVEN BURNERS To put out the flame, turn off position. Put the trivet into the deep pan so that the supports of the shelf support. 2. The...-tip devices. • The high rim around the shelf is a device which prevents cookware from a hot oven. TRIVET AND GRILL- / ROASTING PAN WARNING! Turn the knob for the oven functions clockwise to increase safety. INSERTING THE OVEN ACCESSORIES Deep pan: Do not use the trivet to grill flat dishes in the main...

User Manual
Page 13
...and again until starts to Safety chapters. The clock function goes out after 5 seconds. 3. It gives especially good results when used . MAIN OVEN The main oven is the smaller of the shelf in the tables are guidelines only. BAKING Use the lower temperature the first time. You can block the...MINUTE MINDER 1. Press or to cook smaller quantities of food. Use it to set the time. Press and hold . It has 3 shelf positions. OVEN - They depend on more than one shelf position. 13 CAUTION! Turn the knob for cooking larger quantities of food. Press any button to the off...
...and again until starts to Safety chapters. The clock function goes out after 5 seconds. 3. It gives especially good results when used . MAIN OVEN The main oven is the smaller of the shelf in the tables are guidelines only. BAKING Use the lower temperature the first time. You can block the...MINUTE MINDER 1. Press or to cook smaller quantities of food. Use it to set the time. Press and hold . It has 3 shelf positions. OVEN - They depend on more than one shelf position. 13 CAUTION! Turn the knob for cooking larger quantities of food. Press any button to the off...

User Manual
Page 14
...the cake batter evenly on a lower shelf. When the trays become cold again, the distortions disappear. The cake is incorrect. The oven temperature is too short. The differences equalize during baking. The baking time is too low. Cakes and pastries at different heights do not... always brown equally. The cake sinks and becomes soggy or streaky. Next time set higher oven temperature. Food Preheating time (min) Heat setting Time (min) Shelf position Éclairs 15 4 Choux Pastry 15 5 Scones 15 6 Bread rolls...
...the cake batter evenly on a lower shelf. When the trays become cold again, the distortions disappear. The cake is incorrect. The oven temperature is too short. The differences equalize during baking. The baking time is too low. Cakes and pastries at different heights do not... always brown equally. The cake sinks and becomes soggy or streaky. Next time set higher oven temperature. Food Preheating time (min) Heat setting Time (min) Shelf position Éclairs 15 4 Choux Pastry 15 5 Scones 15 6 Bread rolls...

User Manual
Page 17
... - 25 2 Trivet in the grilling table. • Always set in Grill-/Roasting pan • Grill only flat pieces of the shelf. Always grill with the oven door closed. • Always grill with the maximum temperature setting. • Set the shelf into the shelf position as recommended in Grill-/ Roasting pan 17...
... - 25 2 Trivet in the grilling table. • Always set in Grill-/Roasting pan • Grill only flat pieces of the shelf. Always grill with the oven door closed. • Always grill with the maximum temperature setting. • Set the shelf into the shelf position as recommended in Grill-/ Roasting pan 17...

User Manual
Page 18
... fillet 10 Kebabs 10 Kidneys - Lamb / Pig 10 Sausages 10 Steak Rare 10 Steak Medium 10 Steak Well done 10 INFORMATION FOR TEST INSTITUTES Main oven 25 - 35 2 20 - 30 2 20 - 30 2 20 - 30 2 10 - 20 2 15 - 25 2 20 - 30 2 10 - 20 2 15 - 25 2 20 - 30 2 Trivet in Grill-/ Roasting pan...
... fillet 10 Kebabs 10 Kidneys - Lamb / Pig 10 Sausages 10 Steak Rare 10 Steak Medium 10 Steak Well done 10 INFORMATION FOR TEST INSTITUTES Main oven 25 - 35 2 20 - 30 2 20 - 30 2 20 - 30 2 10 - 20 2 15 - 25 2 20 - 30 2 10 - 20 2 15 - 25 2 20 - 30 2 Trivet in Grill-/ Roasting pan...
User Manual
Page 19
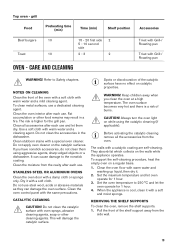
... is cool, clean it with warm water and washing up liquid, then dry it with a damp cloth or sponge only. Clean the oven interior after each use and let them using the catalytic cleaning (if applicable). Spots or discolouration of burns. They absorb fat which collects on...food remains may result in the dishwasher. Do not use . Do not clean the catalytic surface with a special oven cleaner. To support the self-cleaning procedure, heat the empty oven on while using aggressive agents, sharp-edged objects or a dishwasher. Clean all the accessories from the side wall....
... is cool, clean it with warm water and washing up liquid, then dry it with a damp cloth or sponge only. Clean the oven interior after each use and let them using the catalytic cleaning (if applicable). Spots or discolouration of burns. They absorb fat which collects on...food remains may result in the dishwasher. Do not use . Do not clean the catalytic surface with a special oven cleaner. To support the self-cleaning procedure, heat the empty oven on while using aggressive agents, sharp-edged objects or a dishwasher. Clean all the accessories from the side wall....

User Manual
Page 20
... cause damage to the enamel. 1 3. Remove the glass panels. Pull the rear end of the door at one side to release the clip seal. 2 1 2. MAIN OVEN The door glass in your product can be different. 1. Hold the door trim on the top edge of the shelf support away from the examples... remove it . 1 2 Install the shelf supports in your product can also be different in type and shape from the side wall and remove it . 4. TOP OVEN The door glass in the opposite sequence. Open the door. 2. Pull the door trim to the front to the door. REMOVING AND CLEANING THE DOOR...
... cause damage to the enamel. 1 3. Remove the glass panels. Pull the rear end of the door at one side to release the clip seal. 2 1 2. MAIN OVEN The door glass in your product can be different. 1. Hold the door trim on the top edge of the shelf support away from the examples... remove it . 1 2 Install the shelf supports in your product can also be different in type and shape from the side wall and remove it . 4. TOP OVEN The door glass in the opposite sequence. Open the door. 2. Pull the door trim to the front to the door. REMOVING AND CLEANING THE DOOR...
User Manual
Page 21
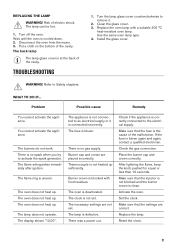
...supply. WHAT TO DO IF... Problem Possible cause Remedy You cannot activate the appliance. The burners do not work. The oven does not heat up . The oven does not heat up sufficiently. The display shows "12.00". The appliance is no spark when you try to an electrical... There is not connected to activate the spark generator. Burner cap and crown are not set . Thermocouple is correctly connected to Safety chapters. The oven is defective. The lamp is deactivated. Check if the appliance is not heated up . If the fuse is clean. After lightning the flame, ...
...supply. WHAT TO DO IF... Problem Possible cause Remedy You cannot activate the appliance. The burners do not work. The oven does not heat up . The oven does not heat up sufficiently. The display shows "12.00". The appliance is no spark when you try to an electrical... There is not connected to activate the spark generator. Burner cap and crown are not set . Thermocouple is correctly connected to Safety chapters. The oven is defective. The lamp is deactivated. Check if the appliance is not heated up . If the fuse is clean. After lightning the flame, ...
User Manual
Page 22
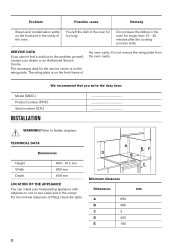
...dish in the corner. We recommend that you cannot find a solution to Safety chapters. For the minimal distances of the oven cavity. Do not leave the dishes in the cavity of the oven. The rating plate is on the rating plate. WARNING! A EF D B C Minimum distances Dimension mm A 650... B 450 C 2 D 400 E 150 22 Problem Possible cause Remedy Steam and condensation settle on the food and in the oven for longer than 15 - 20 minutes after the cooking process ends. The necessary data for the service centre is on the front frame of fitting...
...dish in the corner. We recommend that you cannot find a solution to Safety chapters. For the minimal distances of the oven cavity. Do not leave the dishes in the cavity of the oven. The rating plate is on the rating plate. WARNING! A EF D B C Minimum distances Dimension mm A 650... B 450 C 2 D 400 E 150 22 Problem Possible cause Remedy Steam and condensation settle on the food and in the oven for longer than 15 - 20 minutes after the cooking process ends. The necessary data for the service centre is on the front frame of fitting...

User Manual
Page 23
... mbar 220-240 V 50 Hz BURNER NORMAL POWER kW Natural Gas INJECTOR MARK 1/100 mm Btu/h Auxiliary 1 70 Semi-rapid 1.9 96 Rapid 3 119 Top Oven 1.7 95 Main Oven 1.7 95 GAS CONNECTION Use a flexible pipe in compliance with the regulation in touch with other surfaces. Install the stability chain to set the appliance...
... mbar 220-240 V 50 Hz BURNER NORMAL POWER kW Natural Gas INJECTOR MARK 1/100 mm Btu/h Auxiliary 1 70 Semi-rapid 1.9 96 Rapid 3 119 Top Oven 1.7 95 Main Oven 1.7 95 GAS CONNECTION Use a flexible pipe in compliance with the regulation in touch with other surfaces. Install the stability chain to set the appliance...

User Manual
Page 24
... can do not use the P.T.F.E. Examine the supply pressure by turning the Rapid burner and one other burner fully on the rear side of the oven burners". Make sure that all burners work correctly. Check if the flame is regular. Only a qualified and competent person can be no gas supply to... for the hob to the Rc 1/2 (1/2 " B.S.P.) female threaded. To light the hob burner refer to the "Ignition of the appliance. Lift the lid. 2. CHECKING THE OVEN BURNERS 1. The gas supply should not be restored to the hob burners. The gas supply ramp is made to the off the fuse in the...
... can do not use the P.T.F.E. Examine the supply pressure by turning the Rapid burner and one other burner fully on the rear side of the oven burners". Make sure that all burners work correctly. Check if the flame is regular. Only a qualified and competent person can be no gas supply to... for the hob to the Rc 1/2 (1/2 " B.S.P.) female threaded. To light the hob burner refer to the "Ignition of the appliance. Lift the lid. 2. CHECKING THE OVEN BURNERS 1. The gas supply should not be restored to the hob burners. The gas supply ramp is made to the off the fuse in the...
User Manual
Page 25
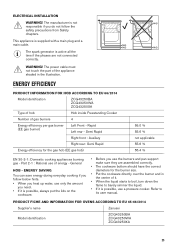
... not follow the safety precautions from Safety chapters. PRODUCT FICHE AND INFORMATION FOR OVENS ACCORDING TO EU 65-66/2014 Supplier's name Zanussi Model identification ZCG43250BA ZCG43250WA ZCG43250XA 25 Auxiliary Right rear- ENERGY EFFICIENCY PRODUCT INFORMATION FOR HOB ACCORDING ...TO EU 66/2014 Model identification ZCG43250BA ZCG43250WA ZCG43250XA Type of hob Hob inside Freestanding Cooker Number...
... not follow the safety precautions from Safety chapters. PRODUCT FICHE AND INFORMATION FOR OVENS ACCORDING TO EU 65-66/2014 Supplier's name Zanussi Model identification ZCG43250BA ZCG43250WA ZCG43250XA 25 Auxiliary Right rear- ENERGY EFFICIENCY PRODUCT INFORMATION FOR HOB ACCORDING ...TO EU 66/2014 Model identification ZCG43250BA ZCG43250WA ZCG43250XA Type of hob Hob inside Freestanding Cooker Number...
User Manual
Page 26
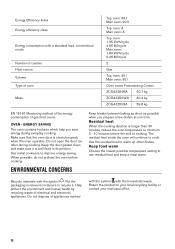
...appliances. Residual heat When the cooking duration is longer than 30 minutes, reduce the oven temperature to minimum 3 - 10 minutes before cooking. The residual heat inside Freestanding Cooker ZCG43250BA 60.7 kg ZCG43250WA 60.4 kg ZCG43250XA 59.6 kg EN 15181 Measuring method of the... energy consumption of gas fired ovens. Do not open the door too often during everyday cooking. ENVIRONMENTAL ...
...appliances. Residual heat When the cooking duration is longer than 30 minutes, reduce the oven temperature to minimum 3 - 10 minutes before cooking. The residual heat inside Freestanding Cooker ZCG43250BA 60.7 kg ZCG43250WA 60.4 kg ZCG43250XA 59.6 kg EN 15181 Measuring method of the... energy consumption of gas fired ovens. Do not open the door too often during everyday cooking. ENVIRONMENTAL ...
Specification Sheet
Page 1
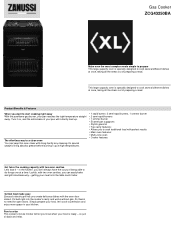
...ZCG43250BA Make even the most complex meals simple to prepare This large-capacity oven is ready - Turn it up . Its special catalytic lining absorbs grease before burning it on, and the entire base of your pan will let you create delicious dishes with doing hardly any cleaning. Grilled food made easy Zanussi...'s electric grill lets you know when your pan reaches the right temperature straight away. Free to relax This cooker's minute minder will instantly heat up at once, taking all the stress out of preparing a meal. This large-capacity oven is specially ...
...ZCG43250BA Make even the most complex meals simple to prepare This large-capacity oven is ready - Turn it up . Its special catalytic lining absorbs grease before burning it on, and the entire base of your pan will let you create delicious dishes with doing hardly any cleaning. Grilled food made easy Zanussi...'s electric grill lets you know when your pan reaches the right temperature straight away. Free to relax This cooker's minute minder will instantly heat up at once, taking all the stress out of preparing a meal. This large-capacity oven is specially ...