Product Manaul
Page 2
General safety Warning! During transportation and installation of the appliance, be certain that none of the components of ignition - Power cord must be lengthened. 2 www.zanussi.com Save these user's instructions as you can) and remove the door to prevent playing children ... Do not use other electrical appliances (such as ice cream makers) inside of refrigerating appliances, unless they do if 7 Technical data 9 Installation 9 Environmental concerns 13 Subject to make sure that all packaging well away from becoming a death trap for a child. Safety information In ...
General safety Warning! During transportation and installation of the appliance, be certain that none of the components of ignition - Power cord must be lengthened. 2 www.zanussi.com Save these user's instructions as you can) and remove the door to prevent playing children ... Do not use other electrical appliances (such as ice cream makers) inside of refrigerating appliances, unless they do if 7 Technical data 9 Installation 9 Environmental concerns 13 Subject to make sure that all packaging well away from becoming a death trap for a child. Safety information In ...
Product Manaul
Page 3
... are special purpose lamps selected for household appliances use sharp objects to direct sunlight. • Bulb lamps (if foreseen) used . 3 www.zanussi.com • Do not clean the appliance with the frozen food manufacturer's instructions. • Appliance's manufacturers storage recommendations should be carried out ... or competent person. • This product must be serviced by the back of the appliance. 4. If necessary, clean the drain. Installation Important! Do not connect the appliance if it has been thawed out. • Store pre-packed frozen food in the appliance, because...
... are special purpose lamps selected for household appliances use sharp objects to direct sunlight. • Bulb lamps (if foreseen) used . 3 www.zanussi.com • Do not clean the appliance with the frozen food manufacturer's instructions. • Appliance's manufacturers storage recommendations should be carried out ... or competent person. • This product must be serviced by the back of the appliance. 4. If necessary, clean the drain. Installation Important! Do not connect the appliance if it has been thawed out. • Store pre-packed frozen food in the appliance, because...
Product Manaul
Page 9
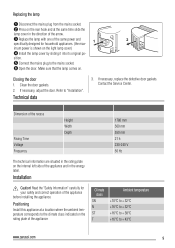
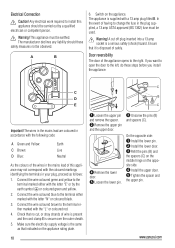
... for household appliances. (the max- 1 2 imum power is shown on the light lamp cover) 4 Install the lamp cover by sliding it into its original po- Closing the door 1. Installation Caution! Dimension of the recess Rising Time Voltage Frequency Height Width Depth 1780 mm 560 mm 550 mm 21...+ 32°C +16°C to + 32°C +16°C to + 38°C +16°C to + 43°C www.zanussi.com 9 Technical data 3. Contact the Service Center. Positioning Install this appliance at the same time slide the lamp cover in the rating plate on . sition. 5 Connect the mains plug to...
... for household appliances. (the max- 1 2 imum power is shown on the light lamp cover) 4 Install the lamp cover by sliding it into its original po- Closing the door 1. Installation Caution! Dimension of the recess Rising Time Voltage Frequency Height Width Depth 1780 mm 560 mm 550 mm 21...+ 32°C +16°C to + 32°C +16°C to + 38°C +16°C to + 43°C www.zanussi.com 9 Technical data 3. Contact the Service Center. Positioning Install this appliance at the same time slide the lamp cover in the rating plate on . sition. 5 Connect the mains plug to...
Product Manaul
Page 10
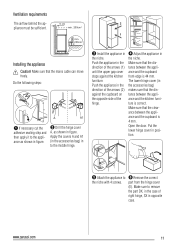
...the lower pin. 3 Unscrew the pins (B) and spacers (C). Connect the wire coloured green and yellow to install this appliance may not correspond with the letter "E" or by a qualified electrician or competent person. A ...of wire is present and the cord clamp E is supplied with the "L" or coloured red. 4. If you install the appliance: C C D B E C Important! Connect the wire coloured brown to the terminal either with...the same as follows: 1. On the opposite side: 1 Install the lower pin. 2 Install the lower door. 3 Refit the pins (B) and the spacers (C) on the middle ...
...the lower pin. 3 Unscrew the pins (B) and spacers (C). Connect the wire coloured green and yellow to install this appliance may not correspond with the letter "E" or by a qualified electrician or competent person. A ...of wire is present and the cord clamp E is supplied with the "L" or coloured red. 4. If you install the appliance: C C D B E C Important! Connect the wire coloured brown to the terminal either with...the same as follows: 1. On the opposite side: 1 Install the lower pin. 2 Install the lower door. 3 Refit the pins (B) and the spacers (C) on the middle ...
Product Manaul
Page 11
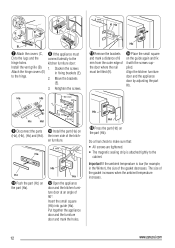
... from the hinge cover (E). Make sure that the distance between the appliance and the cupboard is 44 mm. I I 5 Attach the appliance to the middle hinge. 3 Install the appliance in the case of the arrows (2) against the kitchen furniture. Do the following steps: x x A A1 1 If necessary cut the adhesive sealing strip and...cupboard on the opposite side of the hinge. 4 Adjust the appliance in the accessories bag) makes sure that the mains cable can move freely. www.zanussi.com 11 Open the door. Push the appliance in the direction of right hinge, SX in position.
... from the hinge cover (E). Make sure that the distance between the appliance and the cupboard is 44 mm. I I 5 Attach the appliance to the middle hinge. 3 Install the appliance in the case of the arrows (2) against the kitchen furniture. Do the following steps: x x A A1 1 If necessary cut the adhesive sealing strip and...cupboard on the opposite side of the hinge. 4 Adjust the appliance in the accessories bag) makes sure that the mains cable can move freely. www.zanussi.com 11 Open the door. Push the appliance in the direction of right hinge, SX in position.
Product Manaul
Page 12
... (Ha). 12 Open the appliance door and the kitchen furniture door at an angle of the gasket increases when the ambient temperature increases. 12 www.zanussi.com C E D E E 8 mm K Ha B E 7 Attach the covers (C, 8 If the appliance must be fitted (K). 14 Place the small square on the guide again and fix it ... (Hd) on (Ha), (Hb), (Hc) and (Hd). Ha Hb Hc Hd ~50 mm 90o 21 mm 90o ~50 mm 21 mm 9 Disconnect the parts 10 Install the part (Ha) on the part (Hb). Insert the small square (Hb) into guide (Ha). Move the brackets (E). 3. Slacken the screws in the Winter), the...
... (Ha). 12 Open the appliance door and the kitchen furniture door at an angle of the gasket increases when the ambient temperature increases. 12 www.zanussi.com C E D E E 8 mm K Ha B E 7 Attach the covers (C, 8 If the appliance must be fitted (K). 14 Place the small square on the guide again and fix it ... (Hd) on (Ha), (Hb), (Hc) and (Hd). Ha Hb Hc Hd ~50 mm 90o 21 mm 90o ~50 mm 21 mm 9 Disconnect the parts 10 Install the part (Ha) on the part (Hb). Insert the small square (Hb) into guide (Ha). Move the brackets (E). 3. Slacken the screws in the Winter), the...