Product Manaul
Page 2
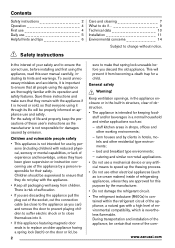
... death trap for a child. stuff and/or beverages in shops, offices and other residential type environments; - During transportation and installation of the appliance, be 2 sure to ensure that none of environmental compatibility, which is nevertheless flammable. Children and vulnerable people .... catering and similar non-retail applications. • Do not use a mechanical device or any artificial means to change without notice. www.zanussi.com Save these user's instructions as : - Contents Safety instructions 2 Operation 4 First use 4 Daily use 5 Helpful hints and tips ...
... death trap for a child. stuff and/or beverages in shops, offices and other residential type environments; - During transportation and installation of the appliance, be 2 sure to ensure that none of environmental compatibility, which is nevertheless flammable. Children and vulnerable people .... catering and similar non-retail applications. • Do not use a mechanical device or any artificial means to change without notice. www.zanussi.com Save these user's instructions as : - Contents Safety instructions 2 Operation 4 First use 4 Daily use 5 Helpful hints and tips ...
Product Manaul
Page 3
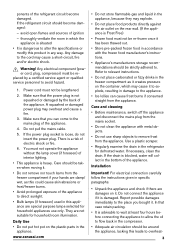
... appliance and check if there are not suitable for defrosted water. If the refrigerant circuit should be strictly adhered to avoid hazard. 1. www.zanussi.com • Do not store flammable gas and liquid in which may cause a short-circuit, fire and/or electric shock. Care and ... If necessary, clean the drain. Do not connect the appliance if it . avoid open flames and sources of the appliance. Warning! Installation Important! In that the power plug is advisable to wait at least four hours before connecting the appliance to allow the oil to alter...
... appliance and check if there are not suitable for defrosted water. If the refrigerant circuit should be strictly adhered to avoid hazard. 1. www.zanussi.com • Do not store flammable gas and liquid in which may cause a short-circuit, fire and/or electric shock. Care and ... If necessary, clean the drain. Do not connect the appliance if it . avoid open flames and sources of the appliance. Warning! Installation Important! In that the power plug is advisable to wait at least four hours before connecting the appliance to allow the oil to alter...
Product Manaul
Page 4
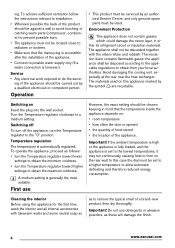
...new product, then dry thoroughly. Operation • This product must be discarded together with lukewarm water and some neutral soap so as to installation. • Wherever possible the back of the appliance. Environment Protection This appliance does not contain gasses which could damage the ozone layer, in...cooling unit, especially at the rear near the heat exchanger. To operate the appliance, proceed as these will damage the finish. 4 www.zanussi.com If the ambient temperature is high or the appliance is fully loaded, and the appliance is opened • the quantity of food ...
...new product, then dry thoroughly. Operation • This product must be discarded together with lukewarm water and some neutral soap so as to installation. • Wherever possible the back of the appliance. Environment Protection This appliance does not contain gasses which could damage the ozone layer, in...cooling unit, especially at the rear near the heat exchanger. To operate the appliance, proceed as these will damage the finish. 4 www.zanussi.com If the ambient temperature is high or the appliance is fully loaded, and the appliance is opened • the quantity of food ...
Product Manaul
Page 11
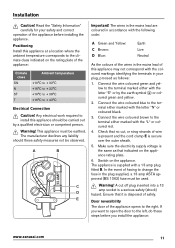
...and yellow to the terminal either with a 13 amp plug fitted B. If you install the appliance: www.zanussi.com 11 Positioning Install this appliance should these steps before installing the appliance. Connect the wire coloured blue to the terminal marked either marked with... the letter "N" or coloured black. 3. Installation Caution! The manufacturer declines any liability should be ...
...and yellow to the terminal either with a 13 amp plug fitted B. If you install the appliance: www.zanussi.com 11 Positioning Install this appliance should these steps before installing the appliance. Connect the wire coloured blue to the terminal marked either marked with... the letter "N" or coloured black. 3. Installation Caution! The manufacturer declines any liability should be ...
Product Manaul
Page 12
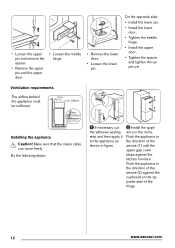
... lower door. • Tighten the middle hinge. • Install the upper door. • Tighten the spacer and tighten the upper pin. Push the appliance in the direction of the hinge. 12 www.zanussi.com Push the appliance in the niche. • Loosen the upper pin and remove the spacer. •... sufficient. Do the following steps: 1 If necessary cut the adhesive sealing strip and then apply it to the appliance as shown in figure. 2 Install the appliance in the direction of the arrows (1) until the upper gap cover stops against the cupboard on the opposite side of the arrows (2) against...
... lower door. • Tighten the middle hinge. • Install the upper door. • Tighten the spacer and tighten the upper pin. Push the appliance in the direction of the hinge. 12 www.zanussi.com Push the appliance in the niche. • Loosen the upper pin and remove the spacer. •... sufficient. Do the following steps: 1 If necessary cut the adhesive sealing strip and then apply it to the appliance as shown in figure. 2 Install the appliance in the direction of the arrows (1) until the upper gap cover stops against the cupboard on the opposite side of the arrows (2) against...
Product Manaul
Page 13
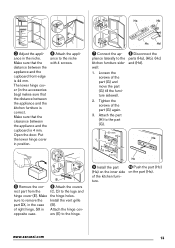
... with 4 screws. GH Ha Hb Hc Hd 7 Connect the appliance laterally to remove the Install the vent grille part DX, in Attach the hinge cov- Tighten the screws of right hinge, SX in the case (B). www.zanussi.com 13 Make sure that the clearance between the appliance and the kitchen furniture is... from the (C, D) to the part (G). 8 Disconnect the parts (Ha), (Hb), (Hc) and (Hd). ~50 mm 90o Ha 21 mm 90o ~50 mm 21 mm Hc 9 Install the part (Ha) on the part (Ha).
... with 4 screws. GH Ha Hb Hc Hd 7 Connect the appliance laterally to remove the Install the vent grille part DX, in Attach the hinge cov- Tighten the screws of right hinge, SX in the case (B). www.zanussi.com 13 Make sure that the clearance between the appliance and the kitchen furniture is... from the (C, D) to the part (G). 8 Disconnect the parts (Ha), (Hb), (Hc) and (Hd). ~50 mm 90o Ha 21 mm 90o ~50 mm 21 mm Hc 9 Install the part (Ha) on the part (Ha).